
Version 6.8
January 2017
Document # LTRT-40524
Configuration Note
Microsoft® Office 365 Exchange UM
with IP PBXs using AudioCodes Mediant SBC
Session Border Controllers (SBCs)
AudioCodes Mediant™ Series
Interoperability Lab
October 2013
Document #: LTRT-XXXXX

Configuration Note Contents
Microsoft Office 365 Exchange UM with IP PBXs 3 AudioCodes Mediant SBC
Table of Contents
1 Introduction ......................................................................................................... 7
1.1 Focus of the Guide ................................................................................................... 8
2 Prepare for SBC Configuration ........................................................................ 11
2.1 Configure DNS ....................................................................................................... 11
2.2 Certificate Generation ............................................................................................ 11
2.3 Configure UM ......................................................................................................... 12
2.3.1 Create a UM Dial Plan ............................................................................................. 12
2.3.2 Create a UM IP Gateway ......................................................................................... 17
3 Configure AudioCodes SBC ............................................................................. 23
3.1 Configure IP Network Interfaces ............................................................................ 23
3.1.1 Step A: Configure VLANs ........................................................................................ 24
3.1.2 Step B: Configure Network Interfaces ..................................................................... 24
3.1.3 Step C: Configure the Native VLAN ID .................................................................... 25
3.2 Configure the NTP Server IP Address ................................................................... 26
3.3 Enable SBC Functionality ...................................................................................... 26
3.4 Configure Signaling Routing Domains ................................................................... 27
3.4.1 Step A: Configure Media Realms ............................................................................ 27
3.4.2 Step B: Configure SRDs .......................................................................................... 29
3.4.3 Step C: Configure SIP Signaling Interfaces............................................................. 30
3.5 Configure Proxy Sets ............................................................................................. 31
3.6 Configure IP Groups .............................................................................................. 35
3.6.1 Configure an Internal IP Group ................................................................................ 35
3.6.2 Configure an External IP Group .............................................................................. 36
3.7 Configure Media Security ....................................................................................... 37
3.8 Configure IP Profiles .............................................................................................. 37
3.9 Configure IP-to-IP Call Routing Rules .................................................................... 41
3.10 Configure Certificates ............................................................................................. 48
3.10.1 Configure the Cryptographic Setting ....................................................................... 48
3.10.2 Generate a Certificate Signing Request (CSR) ....................................................... 49
3.10.3 Load the Certificate .................................................................................................. 50
3.10.3.1 Convert Certificates to DER (PEM) ..........................................................51
3.10.4 Intermediate and Trusted Root Certificates ............................................................. 53
3.11 Reset the SBC ....................................................................................................... 54

Microsoft Office 365 Exchange UM with IP PBX
AudioCodes Mediant SBC 4 Document #: LTRT-40524
This page is intentionally left blank.

Configuration Note Notices
Microsoft Office 365 Exchange UM with IP PBXs 5 AudioCodes Mediant SBC
Notice
This note shows how to configure Microsoft Office 365 Exchange UM with IP PBXs using
AudioCodes Mediant E-SBC product series, which includes the Mediant 800 Gateway &
E-SBC, Mediant 1000B Gateway & E-SBC, Mediant 3000 Gateway & E-SBC, Mediant 2600
SBC, Mediant 4000 E-SBC, Mediant Server Edition SBC, and Mediant Virtual Edition SBC.
Information contained in this document is believed to be accurate and reliable at the time of
printing. However, due to ongoing product improvements and revisions, AudioCodes cannot
guarantee accuracy of printed material after the Date Published, nor can it accept
responsibility for errors or omissions. Updates to this document and other documents as
well as software files can be viewed by registered customers at
http://www.audiocodes.com/downloads.
© Copyright 2017 AudioCodes Ltd. All rights reserved.
This document is subject to change without notice.
Date Published: January-30-2017
Trademarks
©2017 AudioCodes Ltd. All rights reserved. AudioCodes, AC, HD VoIP, HD VoIP Sounds
Better, IPmedia, Mediant, MediaPack, What’s Inside Matters, OSN, SmartTAP, User
Management Pack, VMAS, VoIPerfect, VoIPerfectHD, Your Gateway To VoIP, 3GX,
VocaNom, AudioCodes One Voice and CloudBond are trademarks or registered
trademarks of AudioCodes Limited. All other products or trademarks are property of their
respective owners. Product specifications are subject to change without notice.
WEEE EU Directive
Pursuant to the WEEE EU Directive, electronic and electrical waste must not be disposed
of with unsorted waste. Please contact your local recycling authority for disposal of this
product.
Customer Support
Customer technical support and service are generally provided by AudioCodes'
Distributors, Partners, and Resellers from whom the product was purchased. For technical
support for products purchased directly from AudioCodes, or for customers subscribed to
AudioCodes Customer Technical Support (ACTS), contact support@audiocodes.com
.
Documentation Feedback
AudioCodes continually strives to produce high quality documentation. If you have any
comments (suggestions or errors) regarding this document, please fill out the
Documentation Feedback form on our Web site at http://www.audiocodes.com/downloads
.

Microsoft Office 365 Exchange UM with IP PBX
AudioCodes Mediant SBC 6 Document #: LTRT-40524
Related Documentation
Mediant 500 E-SBC User's Manual Ver. 6.8
Mediant 800B Gateway and E-SBC SIP User's Manual Ver. 6.8
Mediant 1000B Gateway & E-SBC User's Manual Ver. 6.8
Mediant 2600 E-SBC User's Manual Ver. 6.8
Mediant 3000 SIP User's Manual Ver. 6.8
Mediant 4000 SBC User's Manual Ver. 6.8
Mediant Server Edition SBC User's Manual
Mediant Virtual Edition SBC User's Manual
Downloadable from AudioCodes Web site at http://www.audiocodes.com/downloads
Configuration Note 1. Introduction
Microsoft Office 365 Exchange UM with IP PBXs 7 AudioCodes Mediant SBC
1 Introduction
Office 365 Microsoft Exchange Online Unified Messaging (UM) provides voice mail for
Exchange mailboxes “in the cloud”. To allow telephony equipment to communicate
securely with the Office 365 network, customers are required to deploy AudioCodes'
Mediant Session Border Controller (SBC) which has been tested for interoperability with
Unified Messaging (UM).
Exchange Online Unified Messaging (Exchange UM) supports a wide range of
telephony/voice solutions, including many PBXs and IP PBXs. A list is published under the
title “Exchange Telephony Advisor” .
When making or receiving telephone calls, Exchange Online UM only communicates with
voice-over-IP (VoIP) protocols. PBXs that support circuit-switched telephony protocols
must be connected to Exchange Online UM with a suitable VoIP gateway. The gateway
performs the necessary protocol conversion. VoIP gateways are also listed in the
Exchange Telephony Advisor.
The Exchange Telephony Advisor also includes links to configuration notes that explain
how to configure the PBX to work with Exchange Online UM.
Exchange Online UM is now offered as an online service, in certain Microsoft Office 365
service plans. The telephony/voice solution remains on customer premises, but UM is now
'in the cloud', and VoIP communication between them is carried by the public IP network.
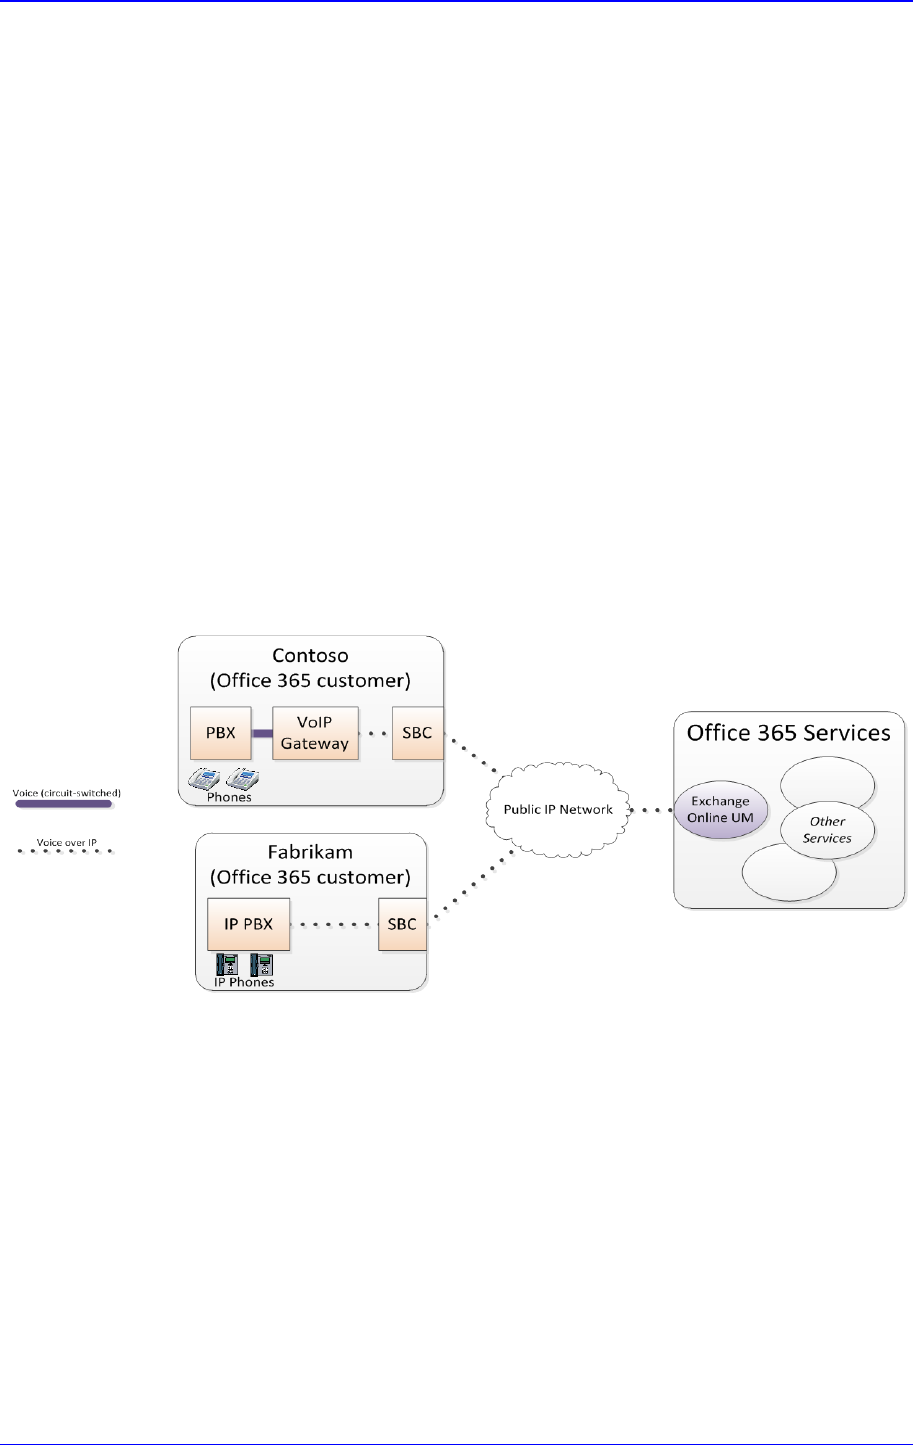
Figure 1-1 shows two fictional Office 365 customers and their connections to Exchange
Online UM.
Figure 1-1: Two Organizations, Connected to Exchange Online Unified Messaging
Contoso has a circuit-switched PBX. This is connected to a VoIP gateway, just as if
Exchange Online UM were running on Contoso’s own premises.
Fabrikam has an IP PBX that supports direct (VoIP) connection to Exchange Online UM.
Figure 1-1 also shows devices labeled “SBC” at the interface between the customers’
networks and the public IP network. SBC stands for Session Border Controller. Here, the
SBC acts as a VoIP-aware network border element that protects the customer’s internal
network. The SBC must also allow secure traversal of all the signaling and audio (voice)
data that are required by Exchange Online UM scenarios.
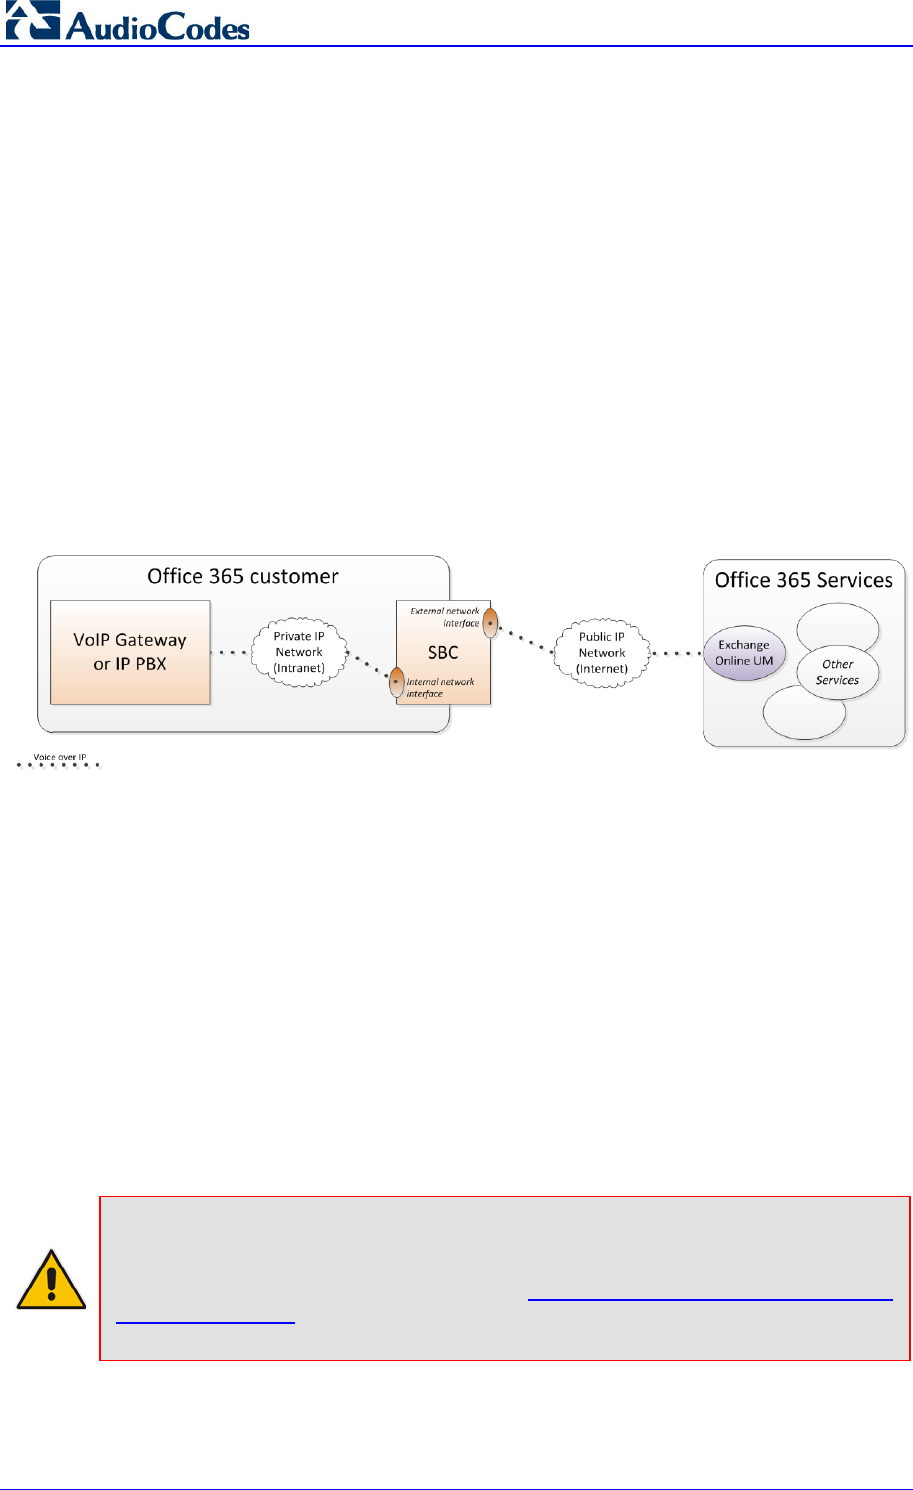
The SBC has two physical network interfaces. One interface is internal. It is connected, via
the customer’s private network, to the IP PBX or VoIP gateway. The other interface is
external. It is connected to the public IP network (“the Internet”), and thus to Office 365
Exchange Online UM.
Exchange Online UM requires that both signaling and audio media be secured. Signaling is
performed with SIP over mutual TLS (Transport Layer Security). Media are carried over
Microsoft Office 365 Exchange UM with IP PBX
AudioCodes Mediant SBC 8 Document #: LTRT-40524
SRTP (Secure Real Time Protocol). The establishment of secure communication between
the SBC and Exchange Online UM requires that a suitable digital certificate be loaded into
the SBC.
Customers must protect themselves against malicious attempts to intrude into or disrupt
their internal networks. IP PBXs and VoIP gateways, in their basic configurations, are not
designed to be exposed on public IP addresses. SBCs are thus regarded as an essential
part of the architecture for Office 365 Exchange UM customers with PBXs or IP PBXs.
Some SBCs are designed and marketed as standalone devices. Others are integrated into
a single chassis with a VoIP Gateway (though the capabilities may be licensed separately).
This guide describes the SBC configuration necessary to deploy it on an organization's
network’s edge for interoperability with Exchange Online UM.
The purpose of the configuration is to ensure that traffic from the IP PBX or VoIP Gateway,
which is sent to the SBC’s internal interface, is routed to the SBC’s external interface (and
thus to Exchange Online UM).
Similarly, traffic from Exchange Online UM, arriving at the SBC’s external interface, must
be routed to the SBC’s internal interface (and thus to the IP PBX or VoIP Gateway).
Configuring routing rules between the SBC’s interfaces is the main subject of this guide.
Figure 1-2: SBC as a VoIP Network Traffic Router
1.1 Focus of the Guide
This guide describes the following:
How to configure an AudioCodes SBC to establish communication between telephony
equipment on customer premises and Office 365 Unified Messaging.
How to configure Exchange Online UM to work with the AudioCodes SBC. Customers
will need an Office 365 subscription that includes an appropriate Exchange Online
service plan.
This guide focuses on AudioCodes SBC capabilities (the VoIP Gateway or the IP PBX are
external devices) required for interoperability with Office 365 Exchange Online UM.
In the guide, it's assumed that the external VoIP Gateway or IP PBX are using SIP UDP
transport type and RTP (not SRTP) for media.
AudioCodes' SBC may support additional characteristics that are not described in the
guide. For a complete product description, see page 6 under Related Documentation.
Note: The configuration described in this guide is generic for all IP PBXs and VoIP
Gateways. However, the IP PBX or VoIP Gateway used in your network may support
different capabilities and consequently, may require additional configuration. If so, refer
to AudioCodes' SBC Wizard application (http://www.audiocodes.com/mediant-sbc-
configuration-wizard) to find the correct SBC template for your IP PBX integration.
Contact your AudioCodes sales representative for further information.
Configuration Note 1. Introduction
Microsoft Office 365 Exchange UM with IP PBXs 9 AudioCodes Mediant SBC
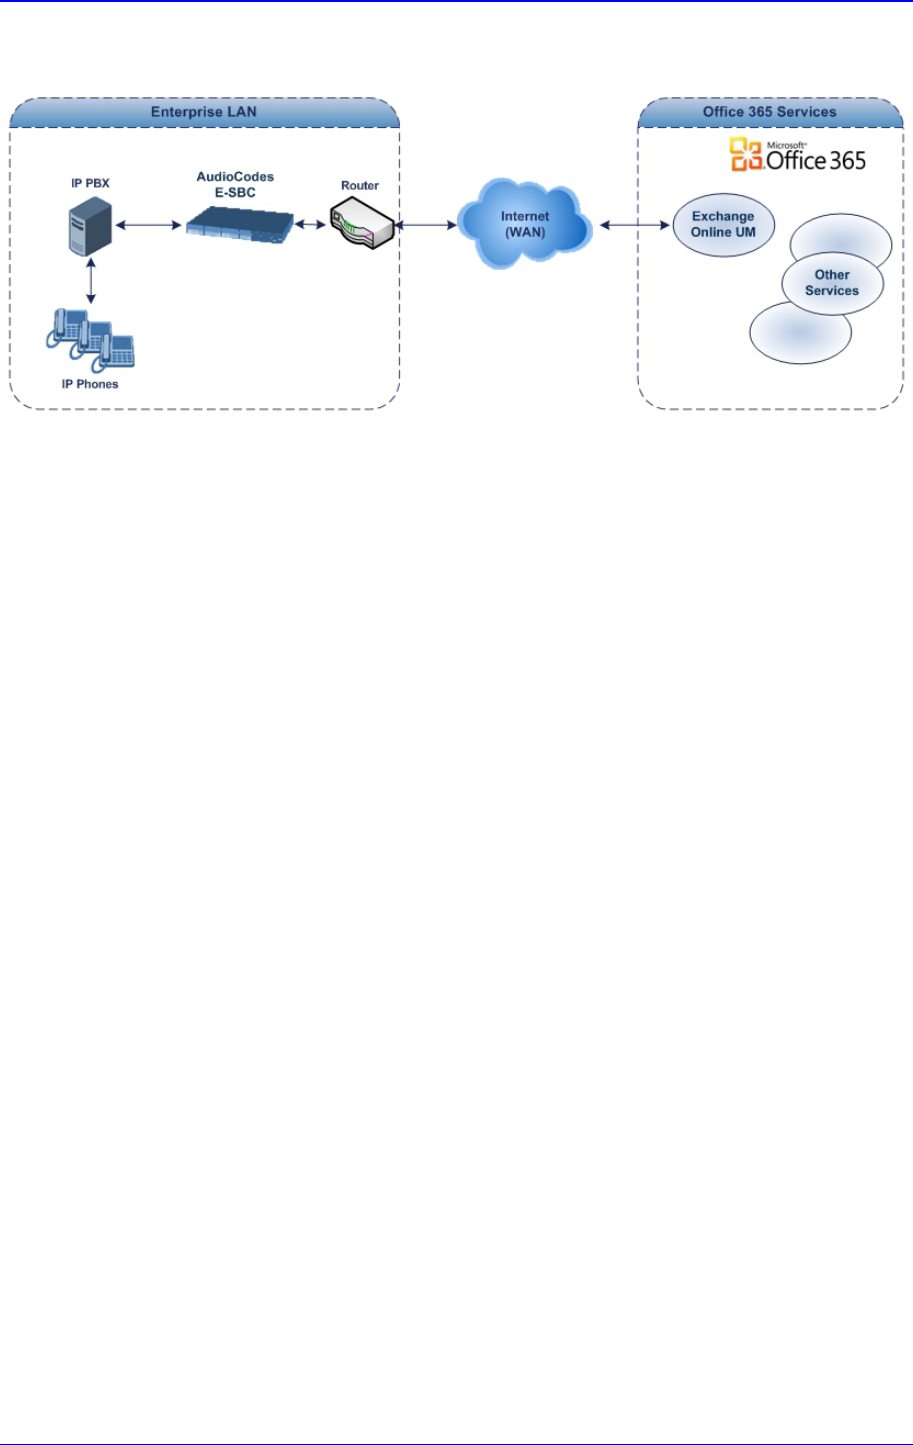
Figure 1-3: AudioCodes SBC Interfacing between IP PBX and Office 365

Microsoft Office 365 Exchange UM with IP PBX
AudioCodes Mediant SBC 10 Document #: LTRT-40524
This page is intentionally left blank.

Configuration Note 2. Prepare for SBC Configuration
Microsoft Office 365 Exchange UM with IP PBXs 11 AudioCodes Mediant SBC
2 Prepare for SBC Configuration
Before configuring the SBC to route traffic to and from Office 365 Exchange Online UM,
there are several steps that must be followed. Specifically, DNS configuration is required,
followed by some Exchange Online UM configuration.
2.1 Configure DNS
The Exchange Online UM service in Office 365 must be able to locate the AudioCodes
SBC when Exchange Online UM needs to initiate communication. Exchange Online UM
relies on its own configuration and use of the Domain Name Service (DNS) to discover the
IP address of the (external interface of the) SBC.
Assign (have your network administrator assign) an IP address and host name for the
external interface of the SBC. For example, Contoso (see Figure 1-1) might decide to use
sbcexternal.contoso.com as the name. Add this name and the corresponding IP address to
the public DNS entries for your domain.
2.2 Certificate Generation
You must replace the SBC’s self-signed certificate. This can be done during the main
process of SBC configuration. However, you may wish to consider the requirements before
embarking on the configuration.
The new certificate must meet the following requirements:
It must be signed by a recognized Certificate Authority (CA). Self-signed certificates
(the kind that customers can generate and sign themselves) are not suitable for
communication with Exchange Online UM.
The Subject Name (CN) that is contained in the certificate must match the fully
qualified domain name (FQDN) of the SBC’s external address (see DNS Configuration
above). For example, if the SBC will be addressed as sbcexternal.contoso.com, make
sure that the Subject Name in the certificate contains exactly the same string, i.e.
sbcexternal.contoso.com.
The certificate should be suitable for use for SSL (Secure Sockets Layer).
You must generate and send a Certificate Signing Request to one of the supported
Certificate Authorities (see below). The CA will sign and issue a certificate for the device.
The details of submitting the request, making payment and receiving the certificate issued
will depend on the CA chosen.
At the time of writing, the following Certificate Authorities are supported by Office 365
Exchange Online UM:
DigiCert (http://www.digicert.com/)
Entrust (http://www.entrust.com/)
Geotrust (http://www.geotrust.com/)
GoDaddy (http://www.godaddy.com/)
GTE CyberTrust (http://www.verizonbusiness.com/Products/security/identity/ssl/)
RSA Security (http://www.rsa.com/)
Thawte (http://www.thawte.com/)
Verisign (http://www.verisign.com/)
When the CA issues the certificate and returns it, save the certificate to a text file. For more
information on retrieving certificates for Exchange UM Online, refer to the following link:
https://msdn.microsoft.com/en-us/library/gg702672(v=exchsrvcs.149).aspx
For details on the process and how to load the certificate to the device, see Section 3.10
on page 48.
Microsoft Office 365 Exchange UM with IP PBX
AudioCodes Mediant SBC 12 Document #: LTRT-40524
2.3 Configure UM
Before communication can be established from a telephony solution (via the SBC) to Office
365 Exchange Online UM, specific Exchange Online UM configuration must be performed.
At a minimum, this consists of creating and configuring a UM Dial Plan and a UM IP
Gateway. These are configuration objects that represent devices that are part of the
telephony solution.
2.3.1 Create a UM Dial Plan
A UM Dial Plan represents a set of fixed-length telephone numbers and the PBX (or
equivalent) to which they are attached. All Exchange users whose mailboxes are enabled
for Exchange Online UM must be associated with a UM Dial Plan.
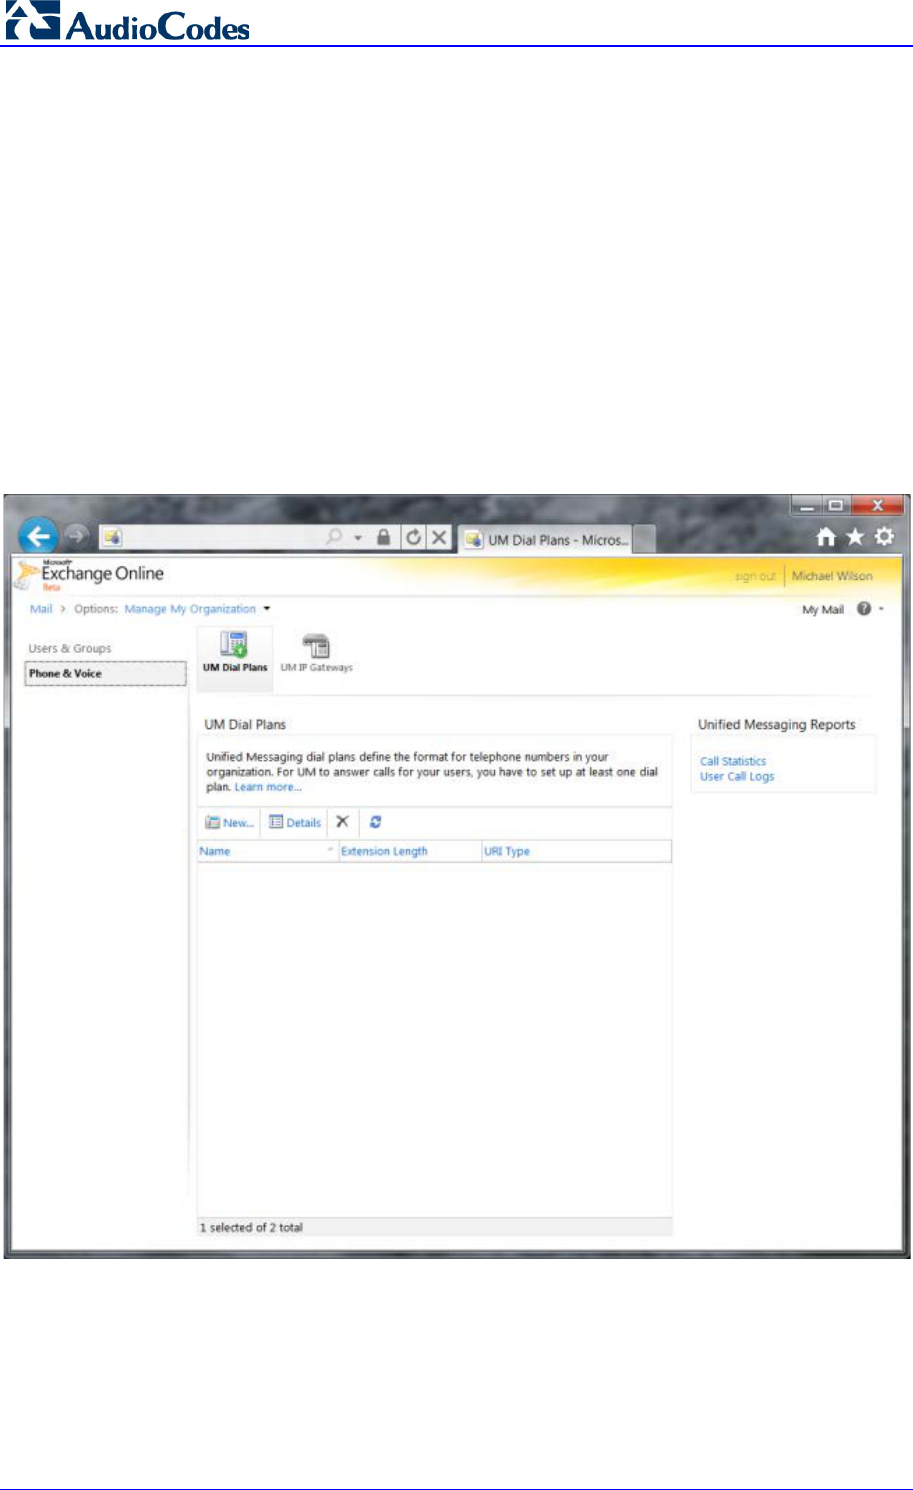
In Exchange Control Panel (ECP), create a new UM Dial Plan (shown in Figure 2-1 to
Figure 2-4 below).
Figure 2-1: Initial (Empty) UM Dial Plans List in Exchange Control Panel
In the screen above:
The UM Dial Plans tab in the ECP’s Phone & Voice configuration initially shows an empty
list. Click on the New… button to create a new UM Dial Plan.
Configuration Note 2. Prepare for SBC Configuration
Microsoft Office 365 Exchange UM with IP PBXs 13 AudioCodes Mediant SBC
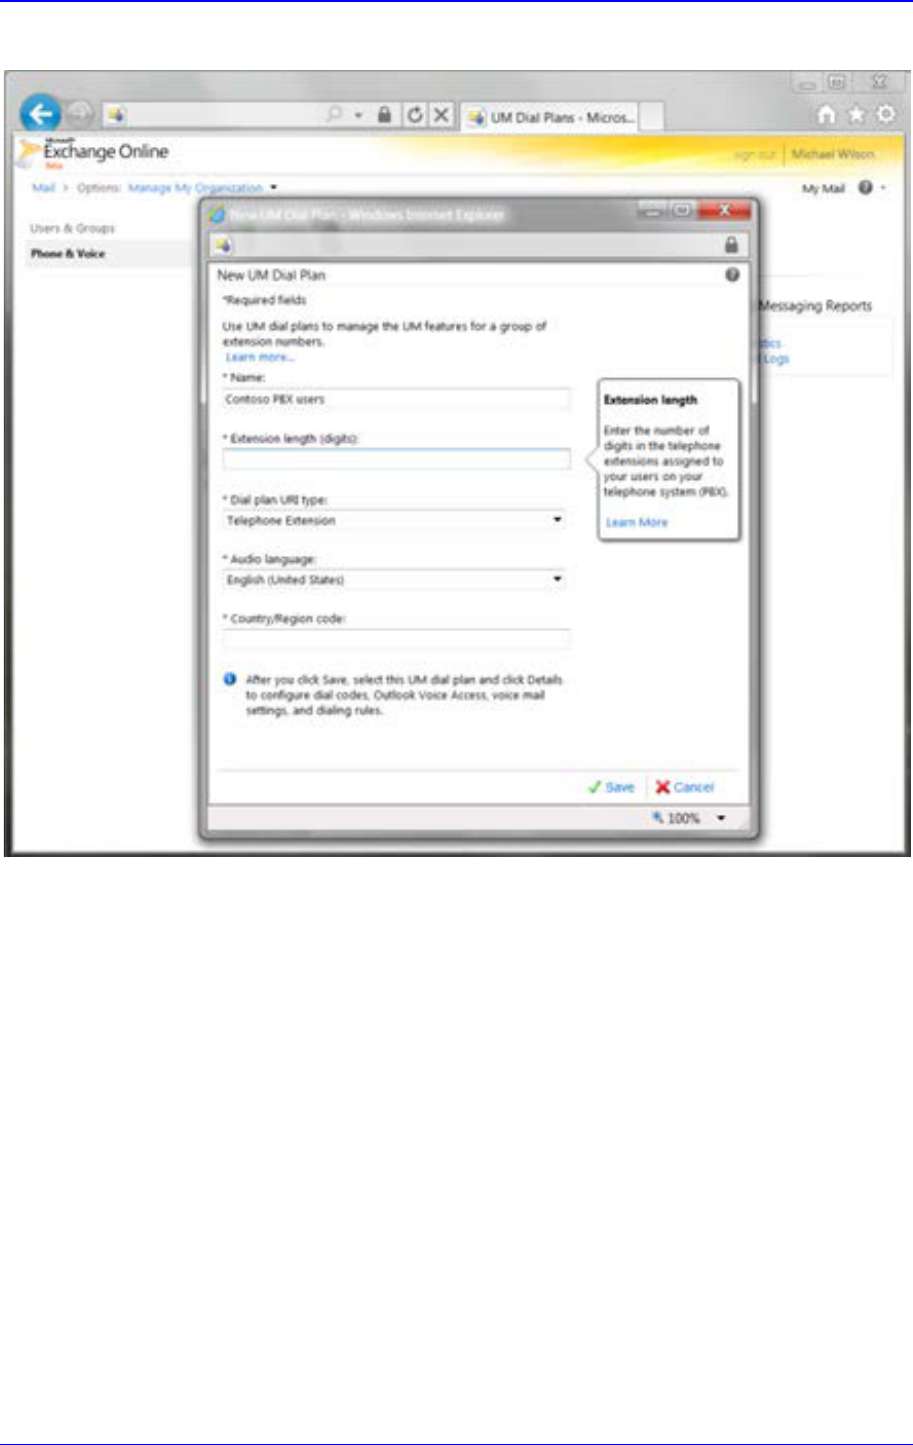
Figure 2-2: Specifying Properties for a New UM Dial Plan for a PBX or an IP PBX
In the screen above:
Enter a name for the UM Dial Plan.
The extension number (along with a PIN) is what UM-enabled users must enter to
identify themselves to UM when they call it from a telephone and try to log in to their
mailbox. All extension numbers in a Dial Plan must have the same number of digits. It
will be determined by the PBX’s numbering plan. You enter this length, here.
Select the UM Dial Plan type to be Telephone Extension. This indicates that the
telephony solution in use is a PBX or IP PBX (and not Microsoft Lync).
Microsoft Office 365 Exchange UM with IP PBX
AudioCodes Mediant SBC 14 Document #: LTRT-40524
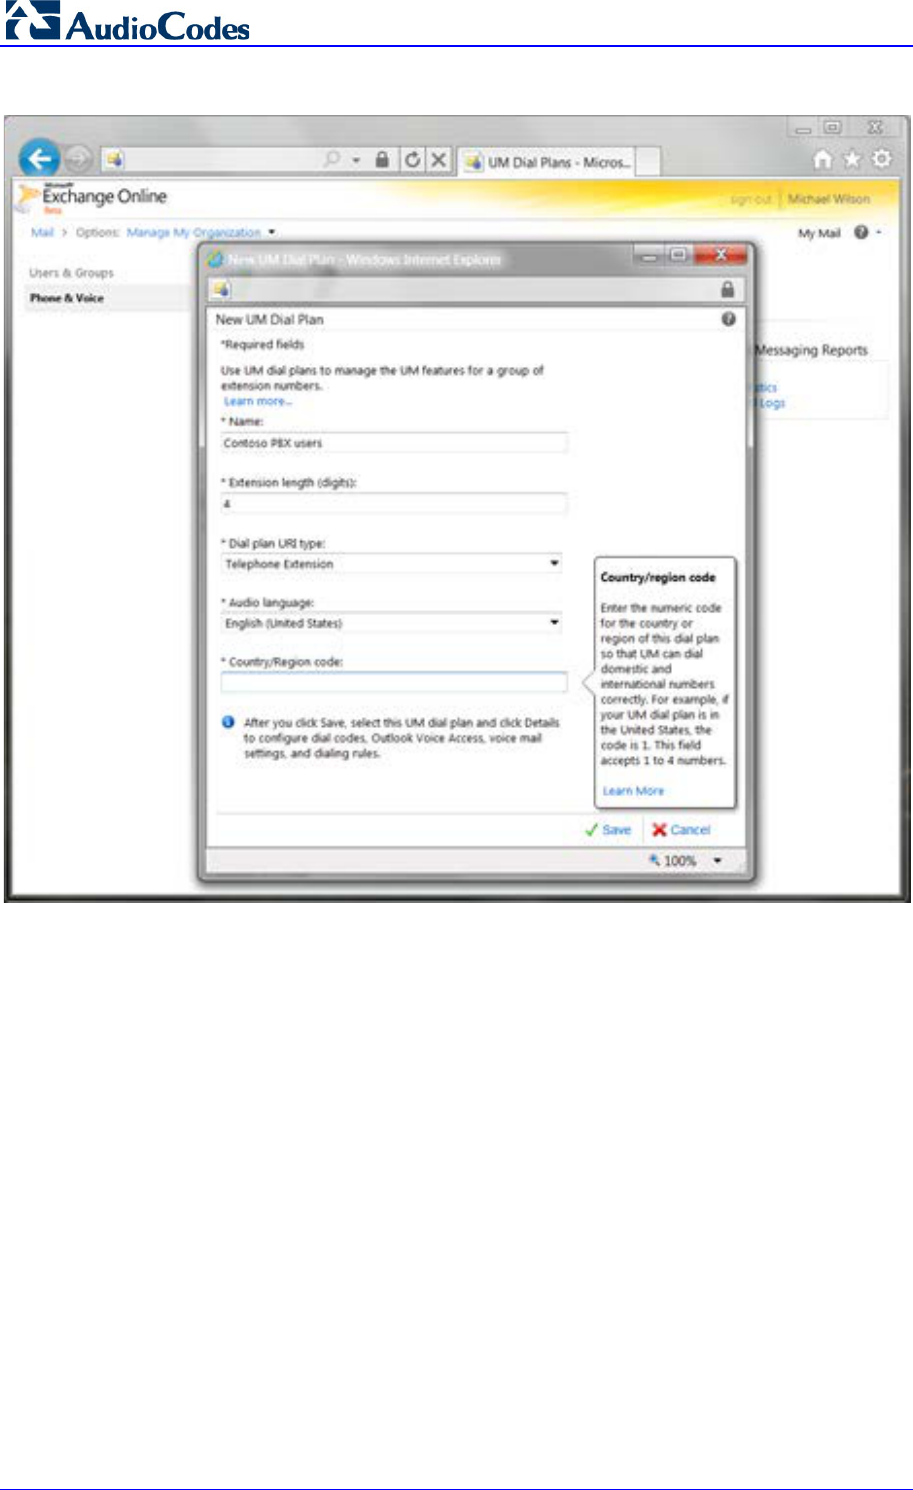
Figure 2-3: Specifying the Country Code for a New UM Dial Plan for PBX or an IP PBX
In the screen above:
All UM Dial Plans must have a country code. This is the international dialing code for
the country in which the telephony solution (PBX or IP PBX) is operating. For
example, enter 1 for the United States, 44 for the United Kingdom, etc.
Click Save when you have entered all the information required to specify the new UM
Dial Plan.
Configuration Note 2. Prepare for SBC Configuration
Microsoft Office 365 Exchange UM with IP PBXs 15 AudioCodes Mediant SBC
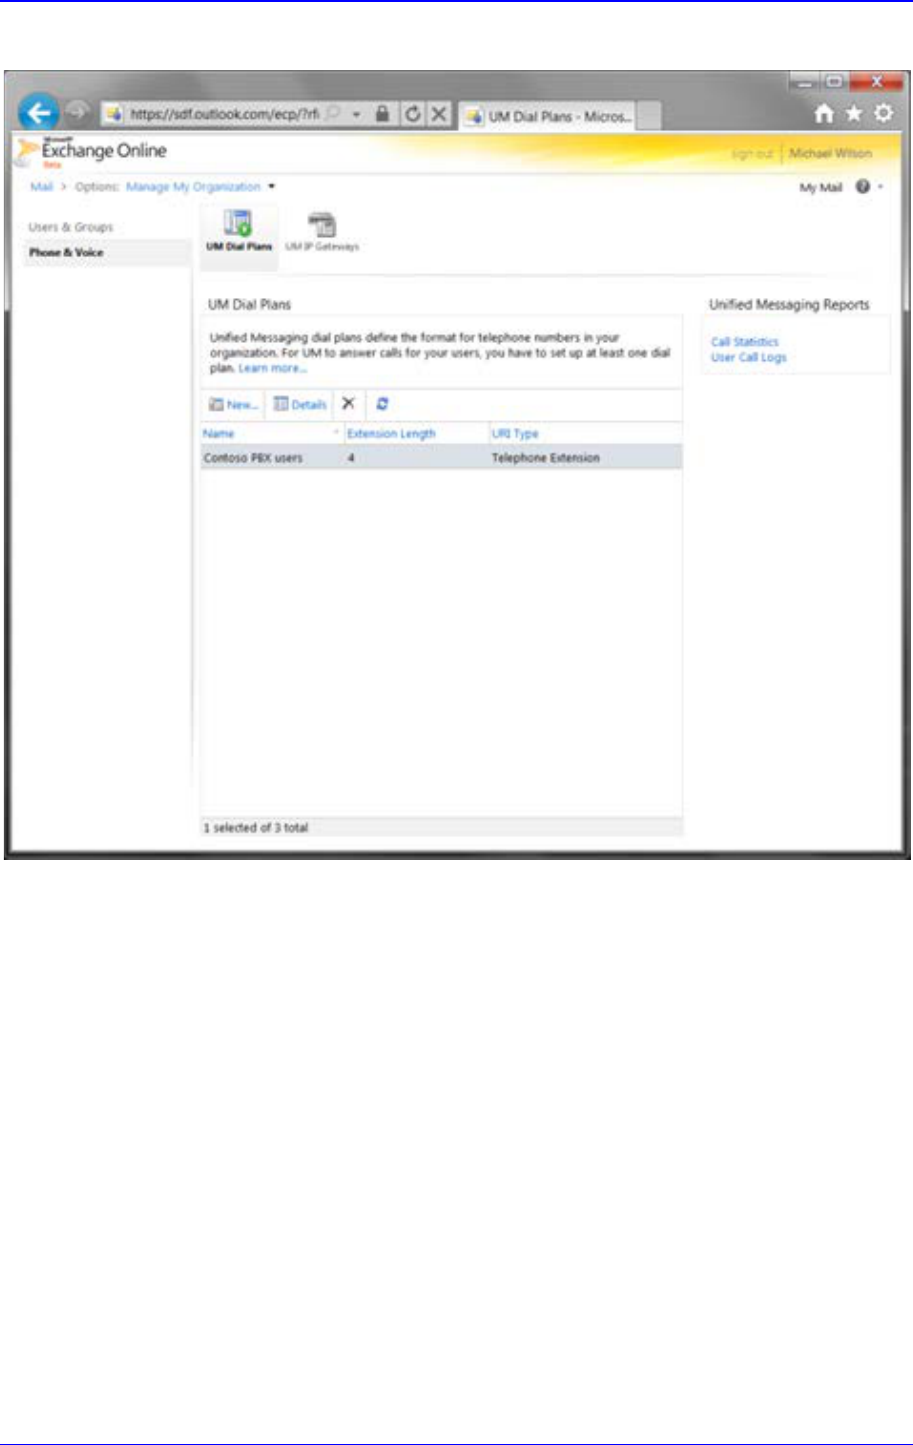
Figure 2-4: List Showing one UM Dial Plan
In the screen above:
The UM Dial Plan that you created is now listed. You can click the Details button to
view and edit its properties, and those of associated objects such as UM Mailbox
Policies.
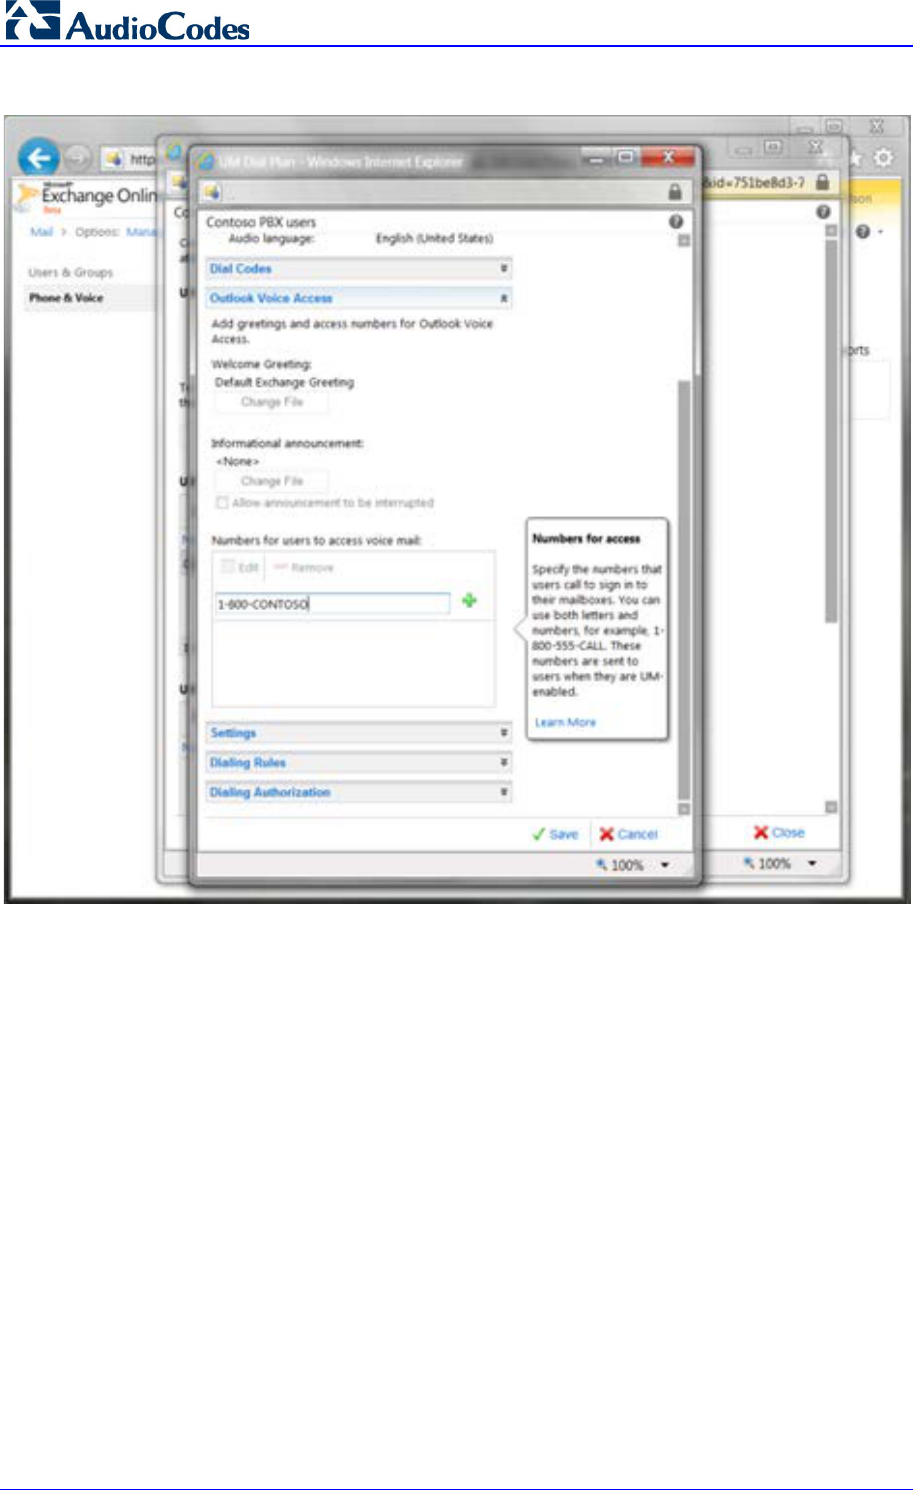
Set a number for user access on the new UM Dial Plan (see Figure 2-5). This can be in
any readable format, because it is for display to users. For example, the user access
number could be set to “(425) 266 8676” or “425-CONTOSO”. Two or more values can be
supplied. The user access number(s) should be consistent with call routing number(s), or
users will become confused. The user access number is included in the body of the
“Welcome to Exchange Unified Messaging” e-mail that is sent to each user when they are
UM-enabled. It is also displayed in the Outlook Voice Access section of the user’s Phone
personal options (accessed via OWA/Exchange Control Panel).
Microsoft Office 365 Exchange UM with IP PBX
AudioCodes Mediant SBC 16 Document #: LTRT-40524
Figure 2-5: Editing the Display Access Numbers for a UM Dial Plan
Configuration Note 2. Prepare for SBC Configuration
Microsoft Office 365 Exchange UM with IP PBXs 17 AudioCodes Mediant SBC
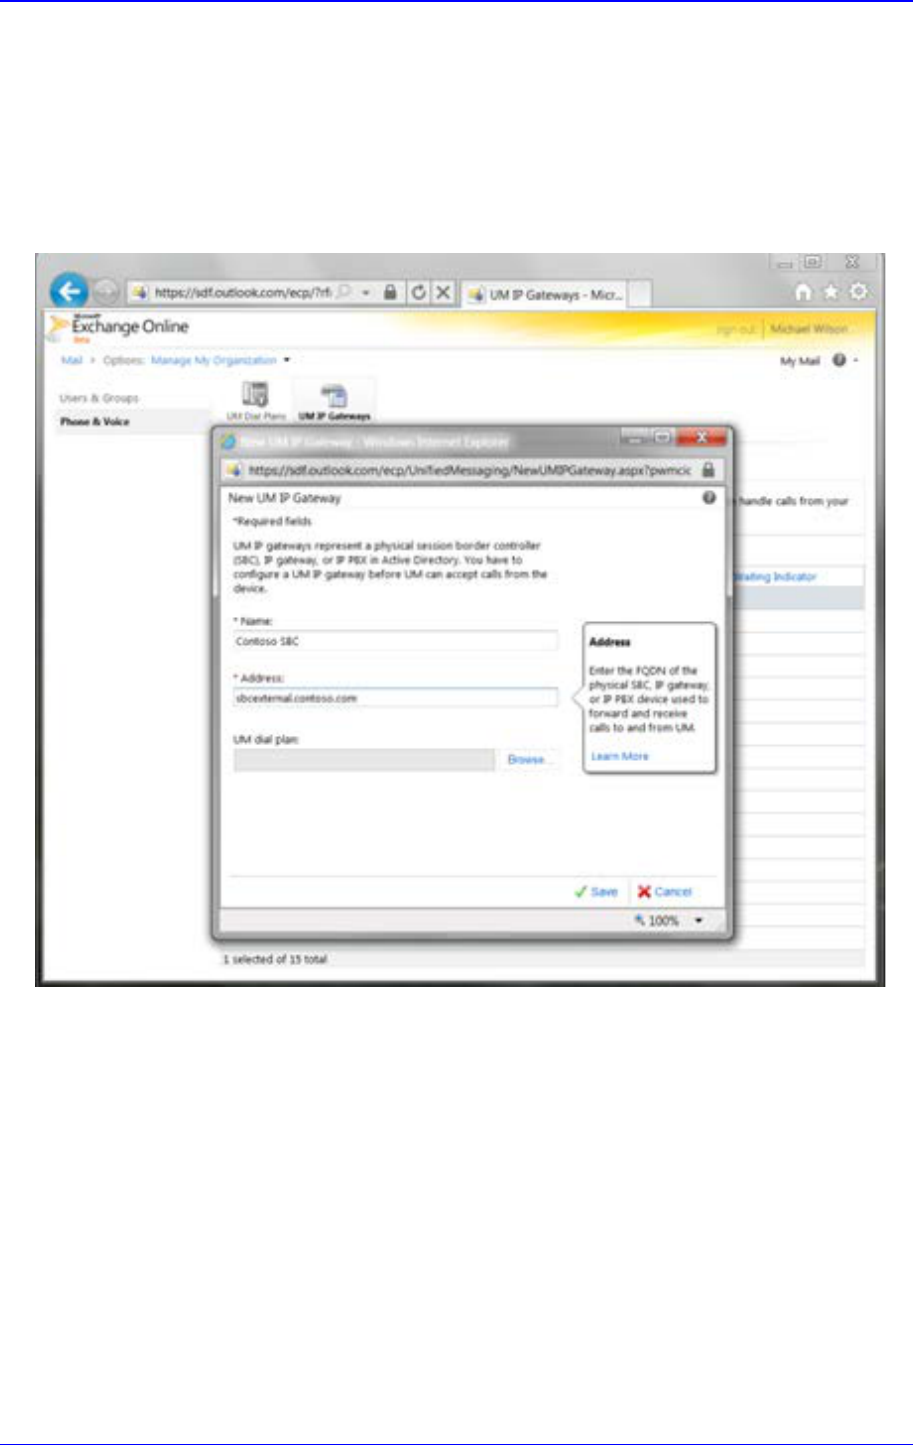
2.3.2 Create a UM IP Gateway
In ECP, go to the UM IP Gateways tab and create a new UM IP Gateway (see Figure 2-7).
For UM, this will represent (the external interface of) your SBC. Associate the UM IP
Gateway with the UM Dial Plan that you created by clicking the Browse… button and
selecting the Dial Plan from the list that is displayed (see Figure 2-7 and Figure 2-8).
Figure 2-6: Creating a New UM IP Gateway to Represent an SBC on the Customer's Premises
In the screen above:
The Name of the UM IP Gateway is for your reference only. It must be unique within
your Office 365 organization. The object represents an SBC on Contoso’s premises.
This example shows that the administrator chose a name to indicate this.
The Address must be the exact FQDN that represents the public (external) interface
of the SBC for your organization.
Microsoft Office 365 Exchange UM with IP PBX
AudioCodes Mediant SBC 18 Document #: LTRT-40524
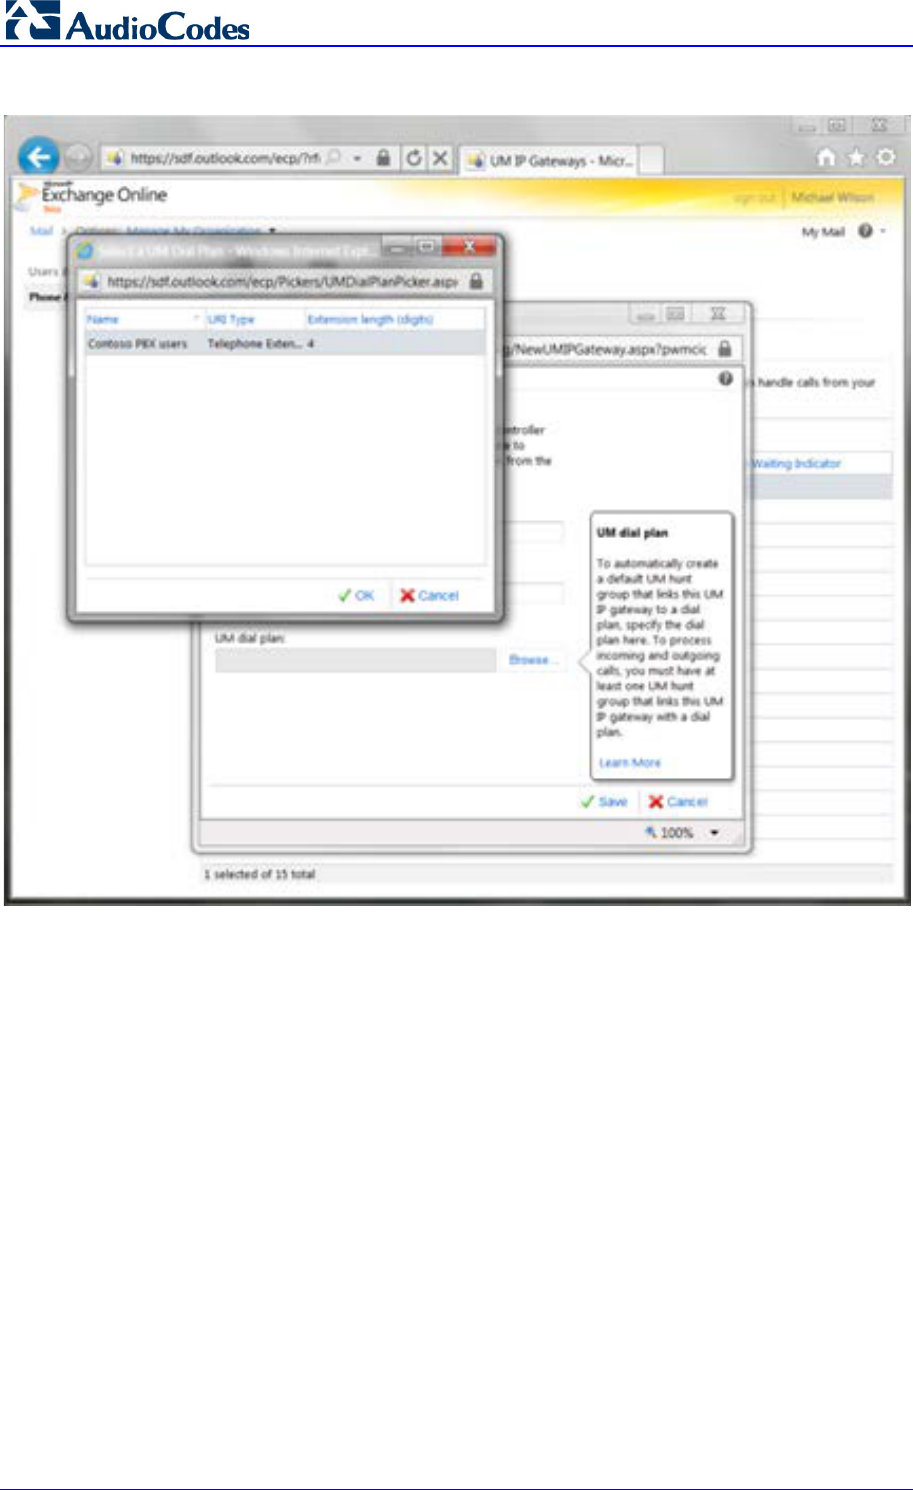
Figure 2-7: Associating the New UM IP Gateway with a UM Dial Plan
In the screen above:
The Browse… button on the UM IP Gateway details page displays a list of all the UM
Dial Plans of type Telephone Extension. Select one of these and click OK.
Configuration Note 2. Prepare for SBC Configuration
Microsoft Office 365 Exchange UM with IP PBXs 19 AudioCodes Mediant SBC
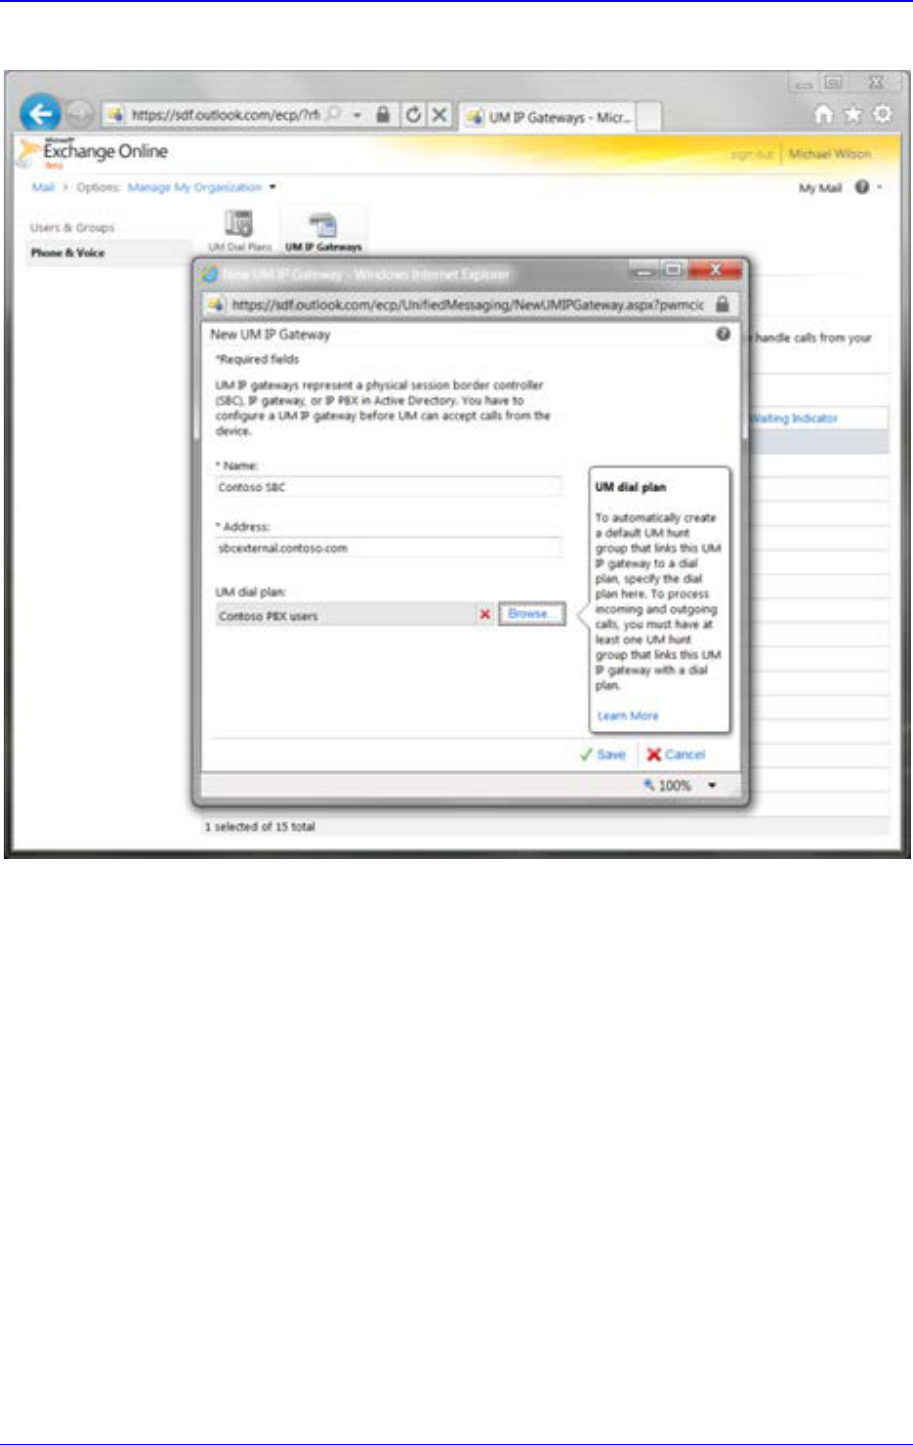
Figure 2-8: New UM IP Gateway Associated with a UM Dial Plan
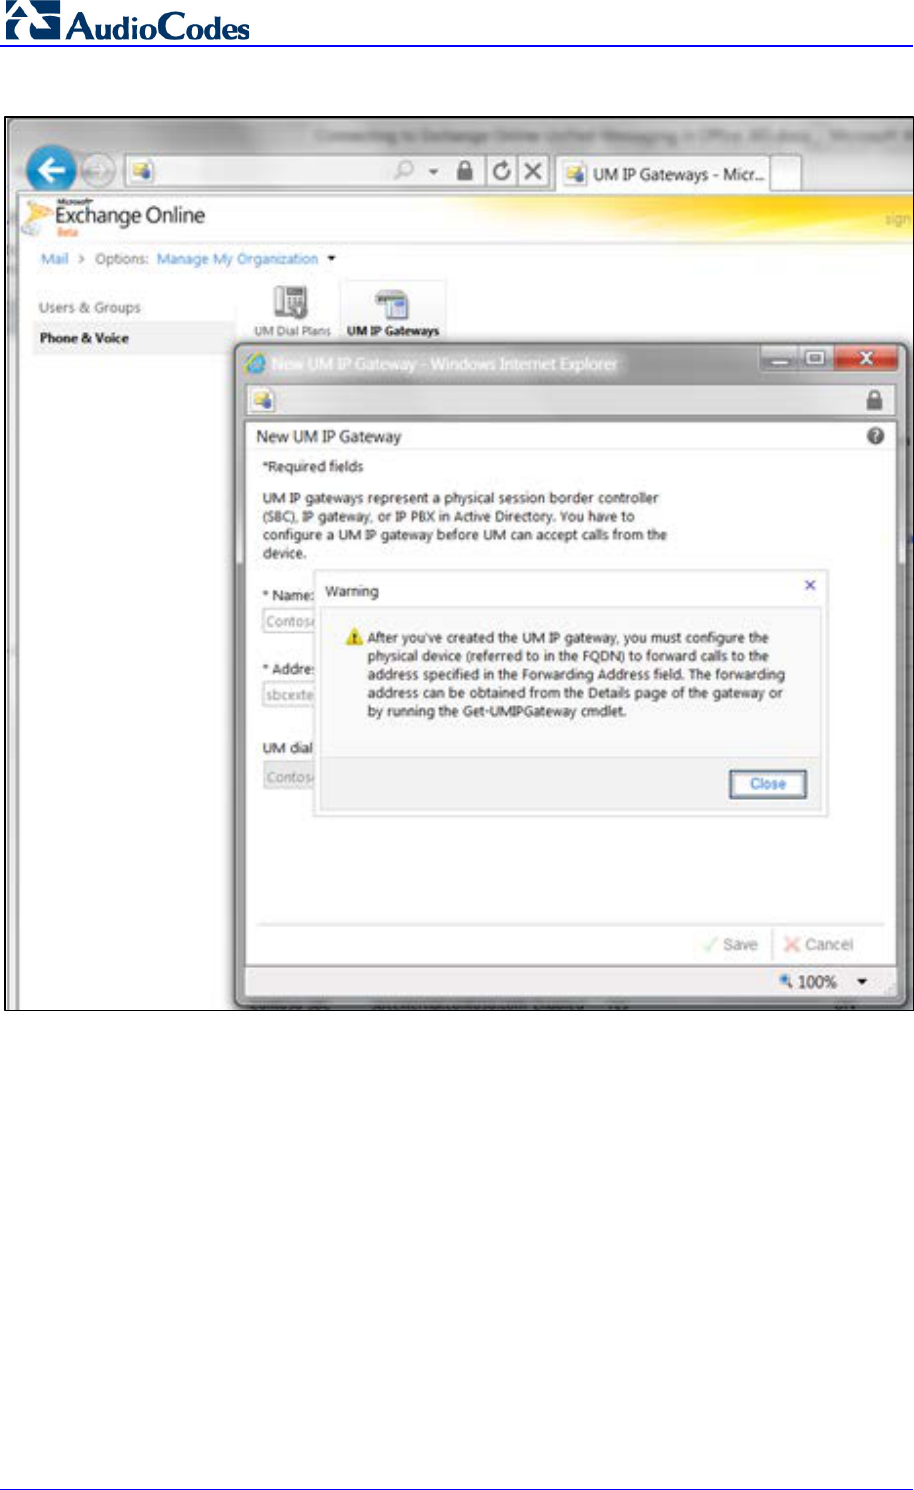
When you create the UM IP Gateway, it is automatically assigned a Forwarding Address.
You're alerted to this when you save the gateway configuration (see the figure below).
Microsoft Office 365 Exchange UM with IP PBX
AudioCodes Mediant SBC 20 Document #: LTRT-40524
Figure 2-9: Alert that UM IP Gateway Forwarding Address is needed for the SBC Configuration
To see the Forwarding Address, view the details of the UM IP Gateway object (see the
figure below).
Configuration Note 2. Prepare for SBC Configuration
Microsoft Office 365 Exchange UM with IP PBXs 21 AudioCodes Mediant SBC
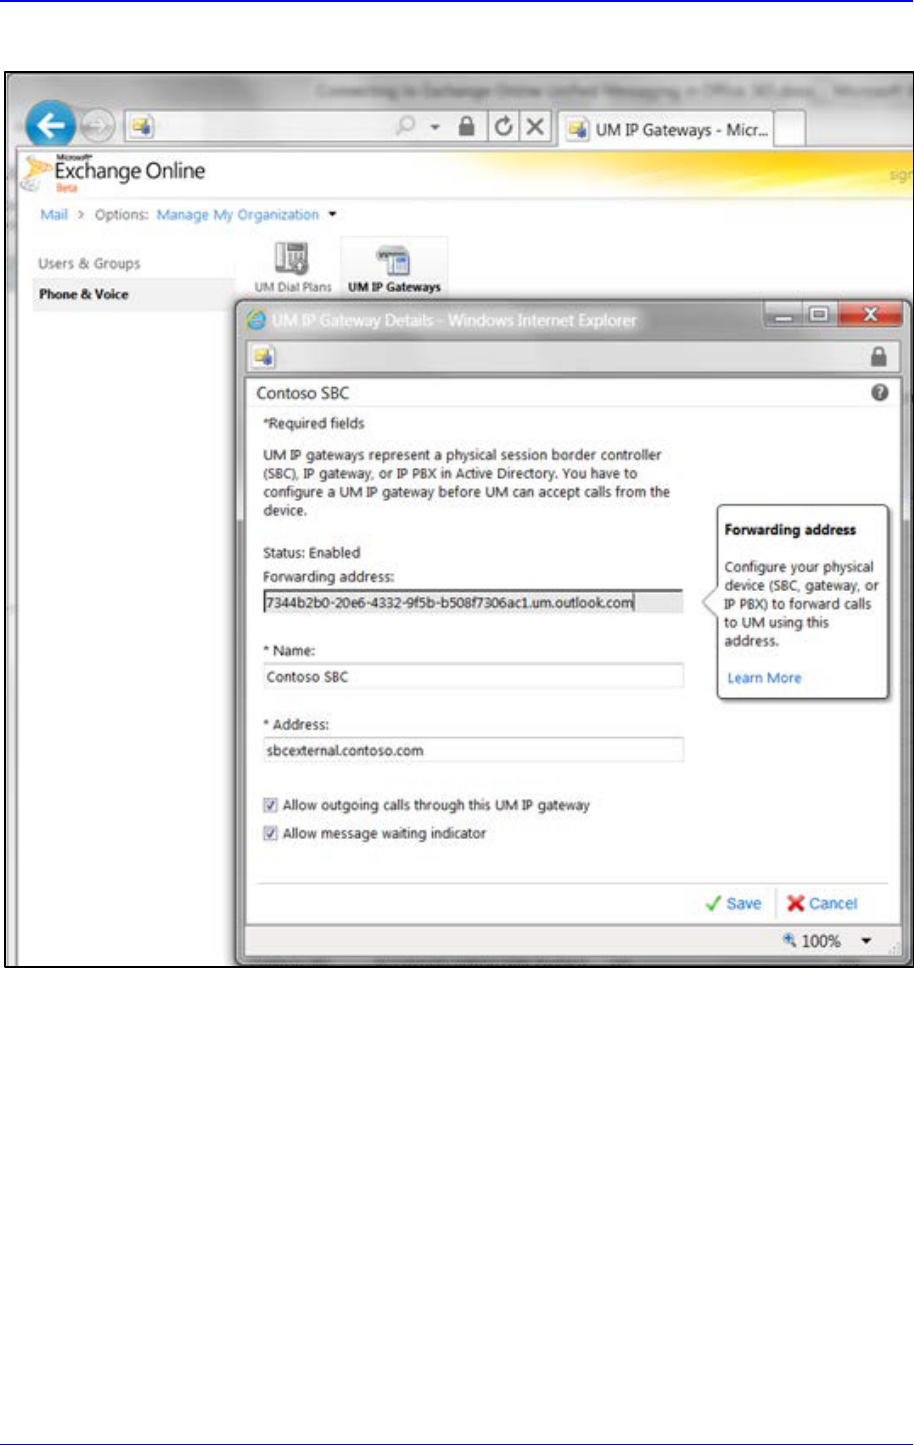
Figure 2-10: Viewing the Forwarding Address of a UM IP Gateway
In the screen above:
Forwarding addresses are of the form guid.um.outlook.com, where guid is replaced
by a 36-character string that uniquely identifies the organization (using UM) within the
Office 365 system.

Microsoft Office 365 Exchange UM with IP PBX
AudioCodes Mediant SBC 22 Document #: LTRT-40524
This page is intentionally left blank.
Configuration Note 3. Configure AudioCodes SBC
Microsoft Office 365 Exchange UM with IP PBXs 23 AudioCodes Mediant SBC
3 Configure AudioCodes SBC
Using your Web browser, connect to the SBC’s administration interface (the default
address is 192.168.0.2).
After providing the required credentials (the default user name is "Admin" and the default
password is "Admin"), the Home page of the Web interface is displayed.
Use the Full navigation menu tree to perform SBC configuration.
3.1 Configure IP Network Interfaces
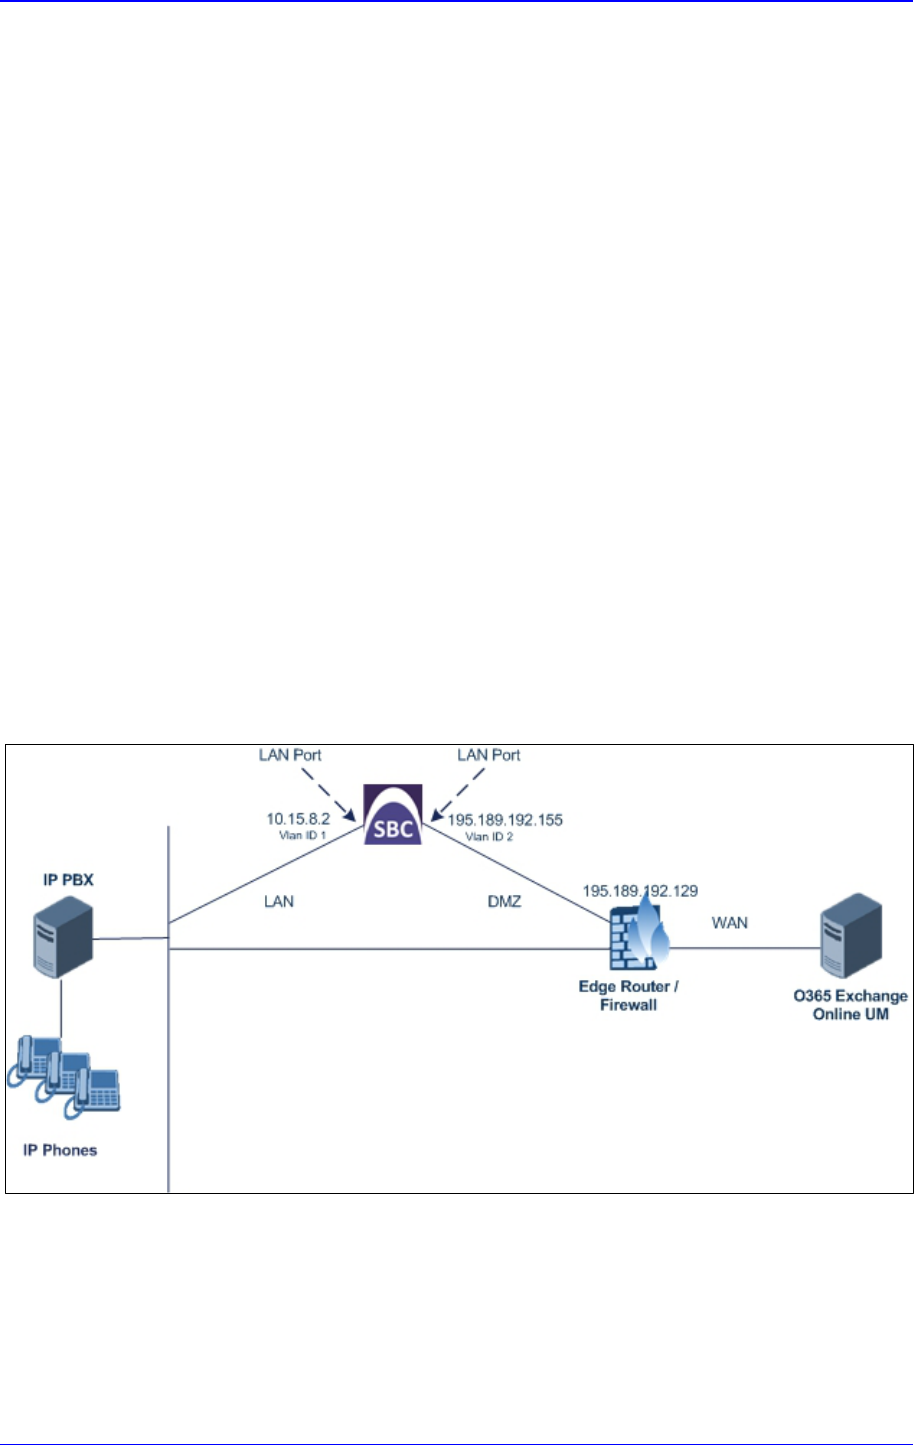
This step describes how to configure the SBC's IP network interfaces. There are several
ways to deploy the SBC; however, this interoperability test topology employs the following
deployment method:
The SBC interfaces with the following IP entities:
• IP PBX, located on the LAN
• O365 Exchange UM, located on the WAN
The SBC connects to the WAN through a DMZ network
Physical connection: The type of physical connection to the LAN depends on the
method used to connect to the Enterprise's network. In the interoperability test
topology, SBC connects to the LAN and WAN using dedicated LAN ports (i.e., two
ports and two network cables are used).
SBC also uses two logical network interfaces:
• LAN (VLAN ID 1)
• WAN (VLAN ID 2)
Figure 3-1: Network Interfaces in Topology
Microsoft Office 365 Exchange UM with IP PBX
AudioCodes Mediant SBC 24 Document #: LTRT-40524
3.1.1 Step A: Configure VLANs
This step describes how to define VLANs for each of the following interfaces:
LAN VoIP (assigned the name "Voice")
WAN VoIP (assigned the name "WANSP")
To configure the VLANs:
1. Open the Ethernet Device Table page (Configuration tab > VoIP menu > Network >
Ethernet Device Table).
2. There will be one existing row for VLAN ID 1 and underlying interface GROUP_1.
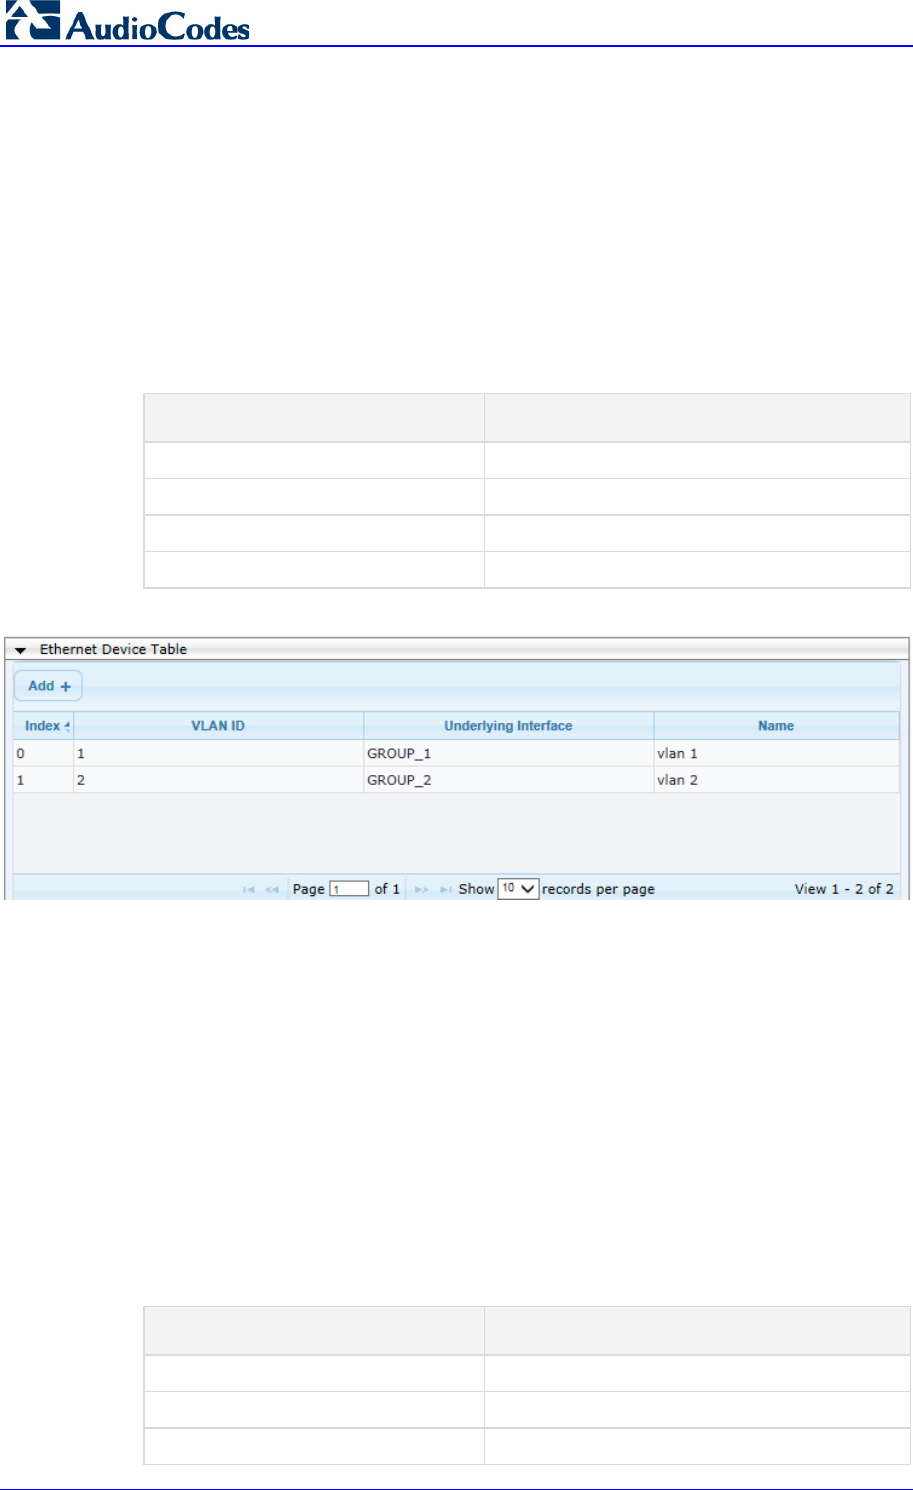
3. Add another VLAN ID 2 for the WAN side as follows:
Parameter Value
Index
1
VLAN ID
2
Underlying Interface GROUP_2 (Ethernet port group)
Name
vlan 2
Figure 3-2: Configured VLAN IDs in Ethernet Device Table
3.1.2 Step B: Configure Network Interfaces
This step describes how to configure the IP network interfaces for each of the following
interfaces:
LAN VoIP (assigned the name "Voice")
WAN VoIP (assigned the name "WANSP")
To configure the IP network interfaces:
1. Open the IP Interfaces Table page (Configuration tab > VoIP menu > Network > IP
Interfaces Table).
2. Modify the existing LAN network interface:
a. Select the 'Index' radio button of the OAMP + Media + Control table row, and
then click Edit.
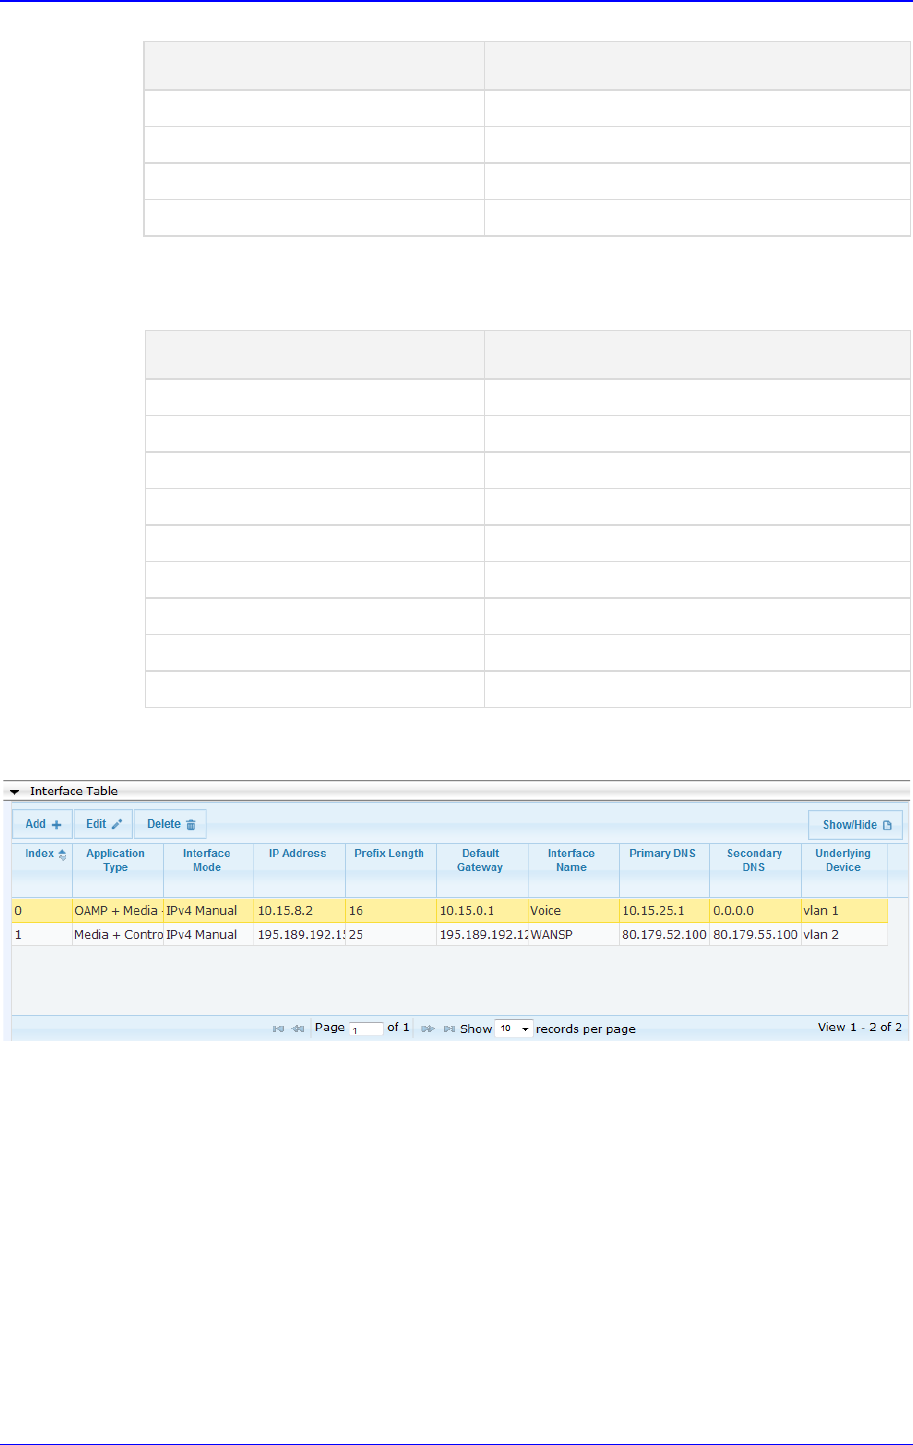
b. Configure the interface as follows:
Parameter Value
IP Address 10.15.8.2 (IP address of the SBC)
Prefix Length 16 (subnet mask in bits for 255.255.0.0)
Gateway
10.15.0.1
Configuration Note 3. Configure AudioCodes SBC
Microsoft Office 365 Exchange UM with IP PBXs 25 AudioCodes Mediant SBC
Parameter Value
VLAN ID
1
Interface Name Voice (arbitrary descriptive name)
Primary DNS Server IP Address 10.15.25.1 (company DNS server)
Underlying Device
vlan 1
3. Add a network interface for the WAN side:
a. Enter 1, and then click Add Index.
b. Configure the interface as follows:
Parameter Value
Application Type
Media + Control
IP Address 195.189.192.155 (WAN IP address)
Prefix Length 25 (for 255.255.255.128)
Gateway 195.189.192.129 (router's IP address)
VLAN ID
2
Interface Name
WANSP
Primary DNS Server IP Address
80.179.52.100
Secondary DNS Server IP Address
80.179.55.100
Underlying Device
vlan 2
4. Click Apply, and then Done; the configured IP network interfaces are shown below:
Figure 3-3: Configured Network Interfaces in IP Interfaces Table
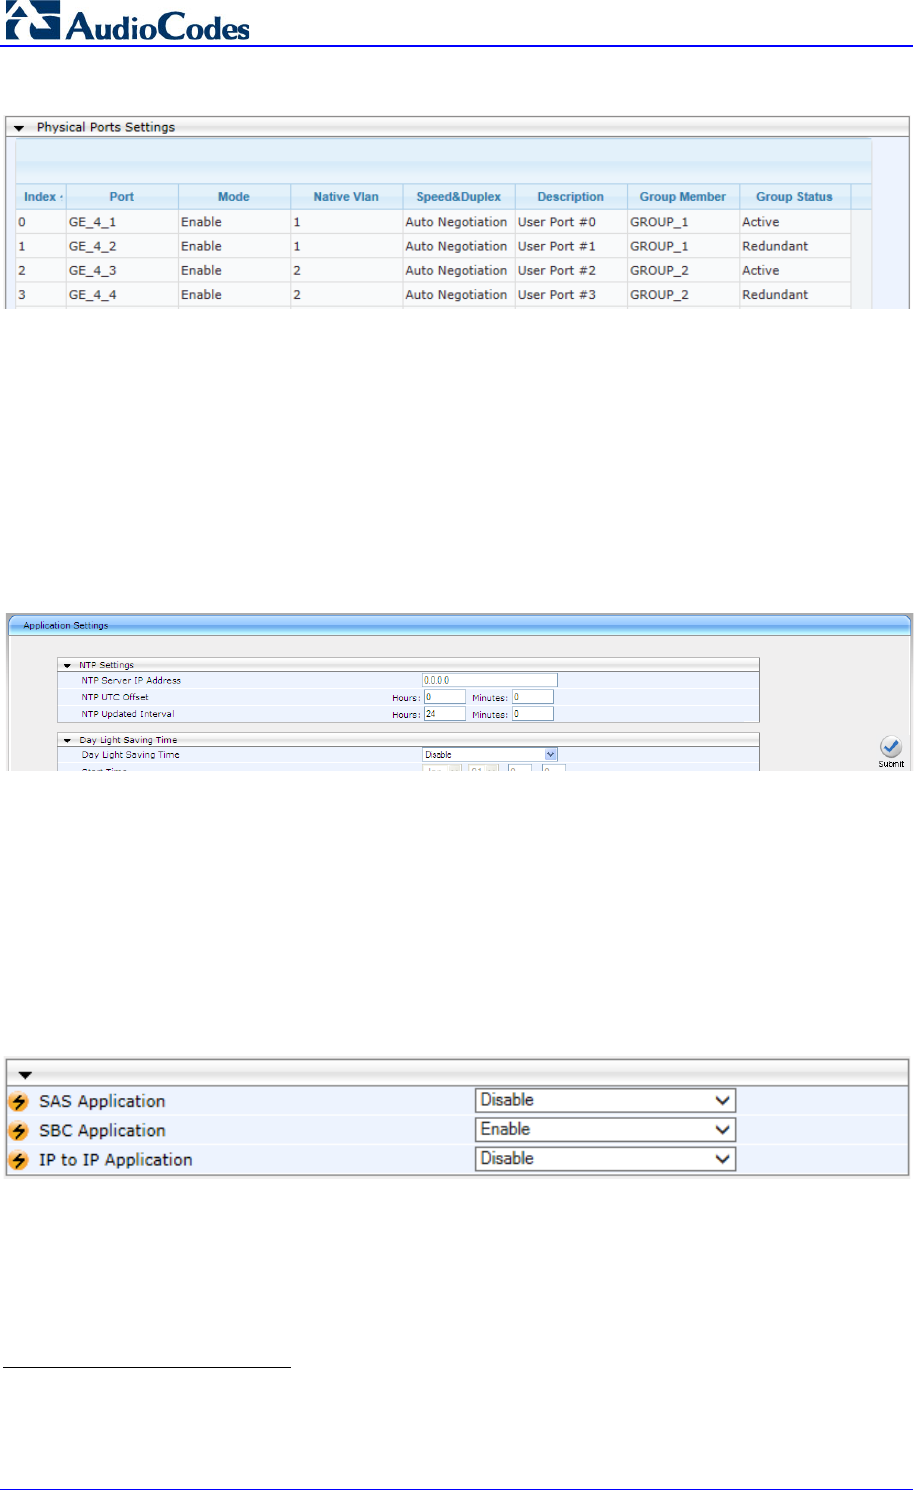
3.1.3 Step C: Configure the Native VLAN ID
This step describes how to configure the Native VLAN ID for the LAN and WAN interfaces.
To configure the Native VLAN ID for the IP network interfaces:
1. Open the Physical Ports Settings page (Configuration tab> VoIP menu > Network >
Physical Ports Table).
2. For the GROUP_1 member ports, set the 'Native Vlan' field to 1. This VLAN was
assigned to network interface "Voice".
3. For the GROUP_2 member ports, set the 'Native Vlan' field to 2. This VLAN was
assigned to network interface "WANSP".
Microsoft Office 365 Exchange UM with IP PBX
AudioCodes Mediant SBC 26 Document #: LTRT-40524
Figure 3-4: Configured Port Native VLAN
3.2 Configure the NTP Server IP Address
The SBC requires Network Time Protocol (NTP) for successful Transport Layer Security
(TLS) negotiation with the Office 365 Exchange Online UM system
1
.
To configure the NTP server IP address:
1. Open the Application Settings page (Configuration > System >
Application Settings).
2. Configure the NTP Server (e.g., server IP address), as required.
Figure 3-5: Application Settings Page
3. Click Submit.
3.3 Enable SBC Functionality
This step describes how to enable the SBC application.
To enable the SBC application:
1. Open the Applications Enabling page (Configuration tab > VoIP menu >
Applications Enabling > Applications Enabling).
Figure 3-6: Enabling SBC Application
2. From the 'SBC Application' drop-down list, select Enable.
3. Click Submit.
4. Reset the SBC with a burn to flash for this setting to take effect (see Section 3.11 on
page 54).
1
In principle, all that’s required is that the E-SBC and the Office 365 system have a sufficiently similar view of the current
time. It’s possible to manually set the date and time on the E-SBC itself; it has a clock that keeps it updated. However,
without the use of NTP it’s likely that the E-SBC’s time will eventually offset sufficiently, relative to the Office 365 system, for
TLS negotiation to stop working. This may be difficult to diagnose and thus, it is recommended to use NTP to maintain the
E-SBC’s time in sync.
Configuration Note 3. Configure AudioCodes SBC
Microsoft Office 365 Exchange UM with IP PBXs 27 AudioCodes Mediant SBC
3.4 Configure Signaling Routing Domains
This step describes how to configure Signaling Routing Domains (SRD). The SRD
represents a logical VoIP network. Each logical or physical connection requires an SRD,
for example, if the SBC interfaces with both the LAN and WAN, a different SRD would be
required for each one.
The SRD is composed of the following:
Media Realm: defines a UDP port range for RTP/SRTP (media) traffic on a specific
logical IP network interface of the SBC.
SIP Interface: defines a listening port and type (UDP, TCP, or TLS) for SIP signaling
traffic on a specific logical IP network interface of the SBC.
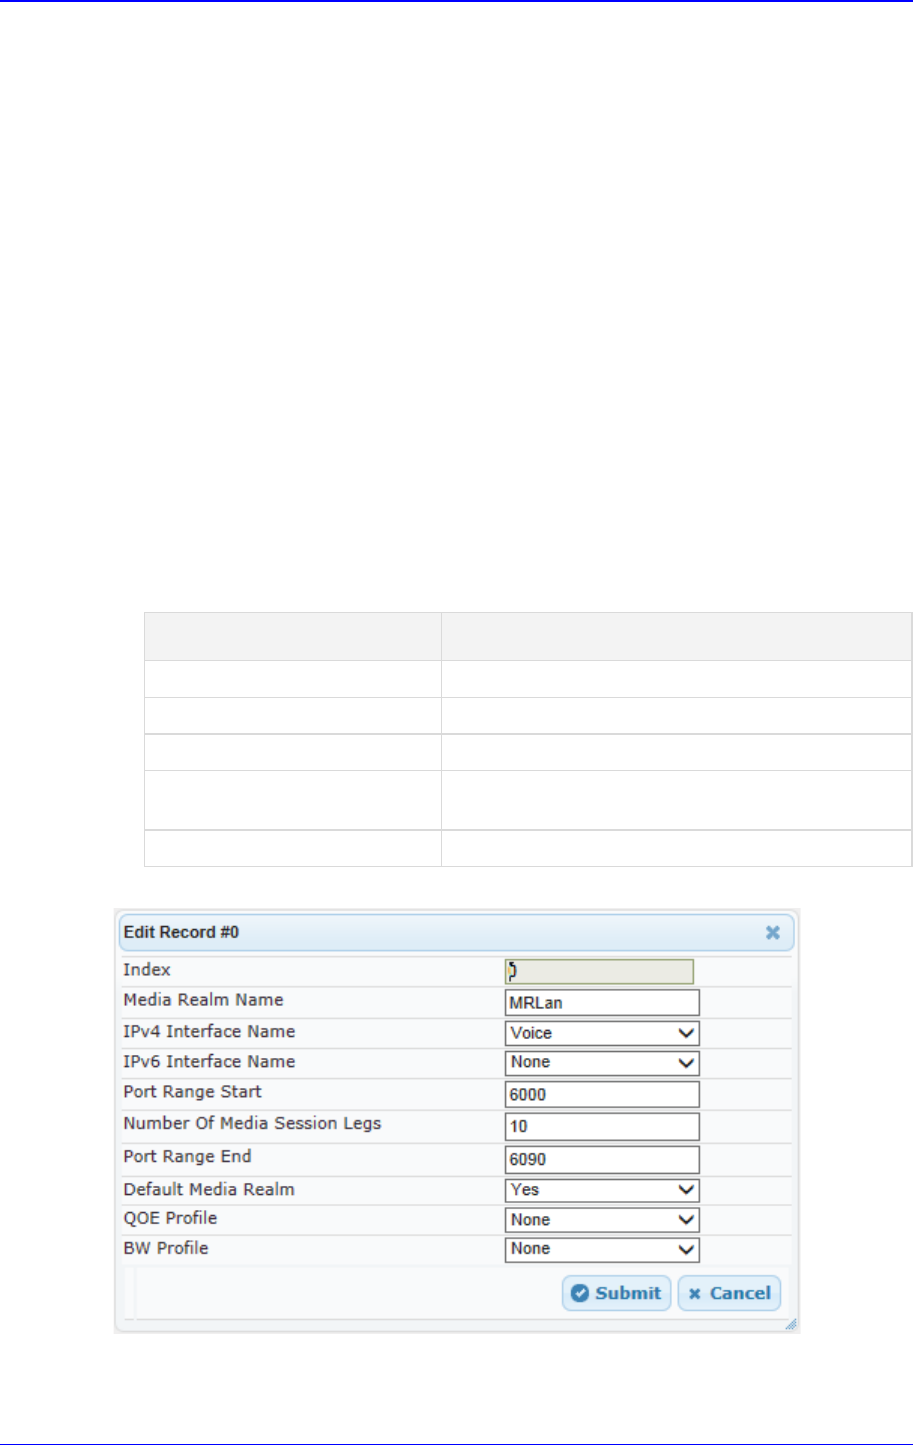
3.4.1 Step A: Configure Media Realms
This step describes how to configure Media Realms. The simplest configuration is to create
two Media Realms - one for internal (LAN) traffic and one for external (WAN) traffic.
To configure Media Realms:
1. Open the Media Realm Table page (Configuration tab > VoIP menu > VoIP Network
> Media Realm Table).
2. Modify the existing Media Realm for LAN traffic:
Parameter Value
Index
0
Media Realm Name MRLan (descriptive name)
IPv4 Interface Name
Voice
Port Range Start 6000 (represents lowest UDP port number used for
media on LAN)
Number of Media Session Legs 10 (media sessions assigned with port range)
Figure 3-7: Configuring Media Realm for LAN
Microsoft Office 365 Exchange UM with IP PBX
AudioCodes Mediant SBC 28 Document #: LTRT-40524
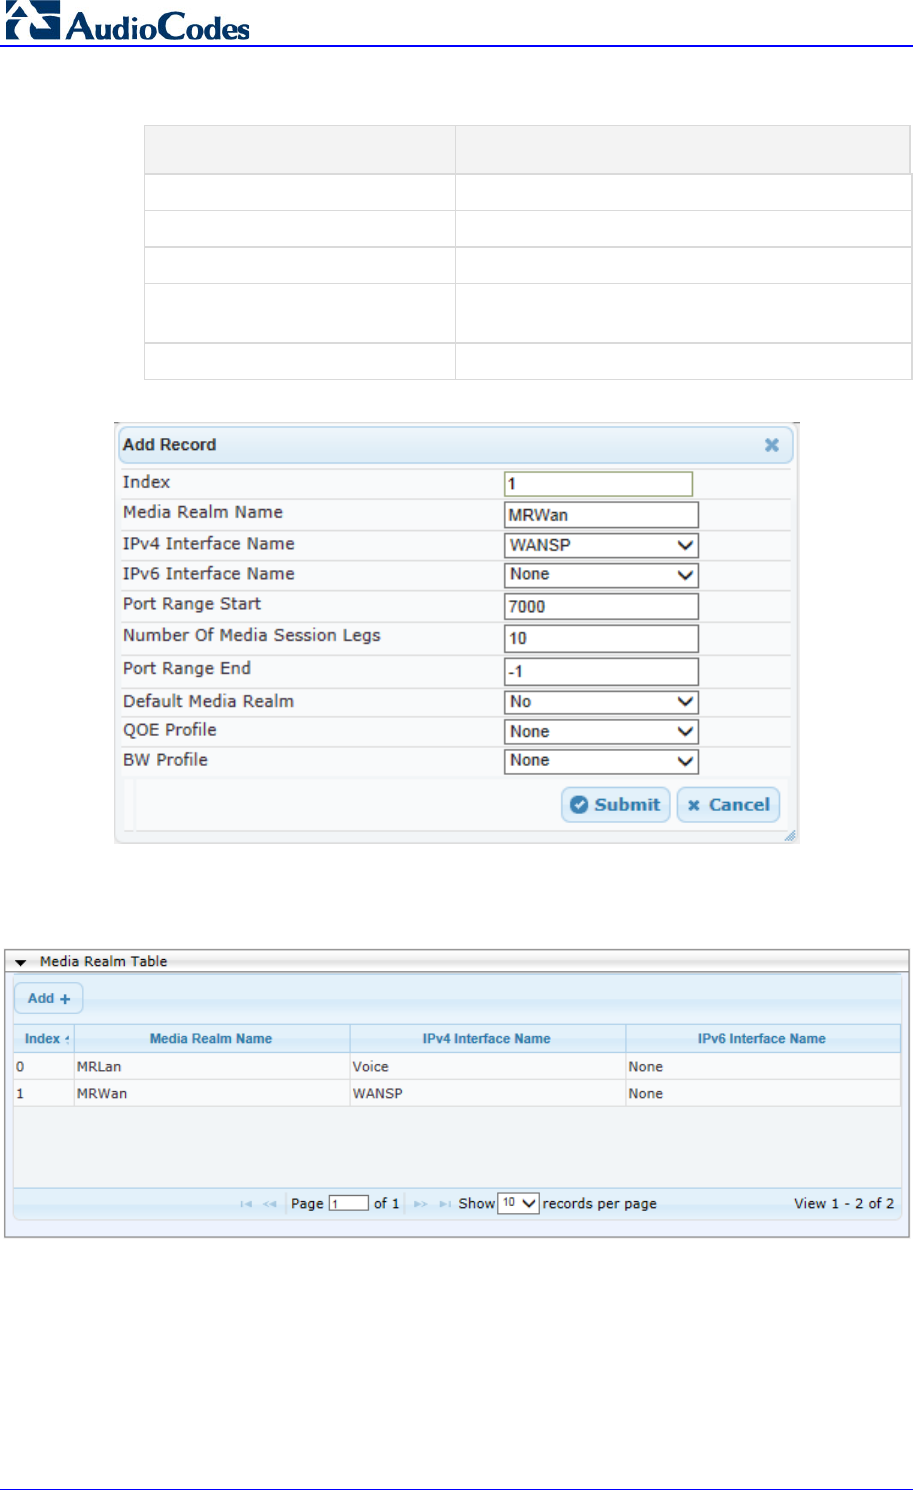
3. Configure a Media Realm for WAN traffic:
Parameter Value
Index
1
Media Realm Name MRWan (arbitrary name)
IPv4 Interface Name
WANSP
Port Range Start 7000 (represents lowest UDP port number used
for media on WAN)
Number of Media Session Legs 10 (media sessions assigned with port range)
Figure 3-8: Configuring Media Realm for WAN
The configured Media Realms are shown in the figure below:
Figure 3-9: Configured Media Realms in Media Realm Table
Configuration Note 3. Configure AudioCodes SBC
Microsoft Office 365 Exchange UM with IP PBXs 29 AudioCodes Mediant SBC
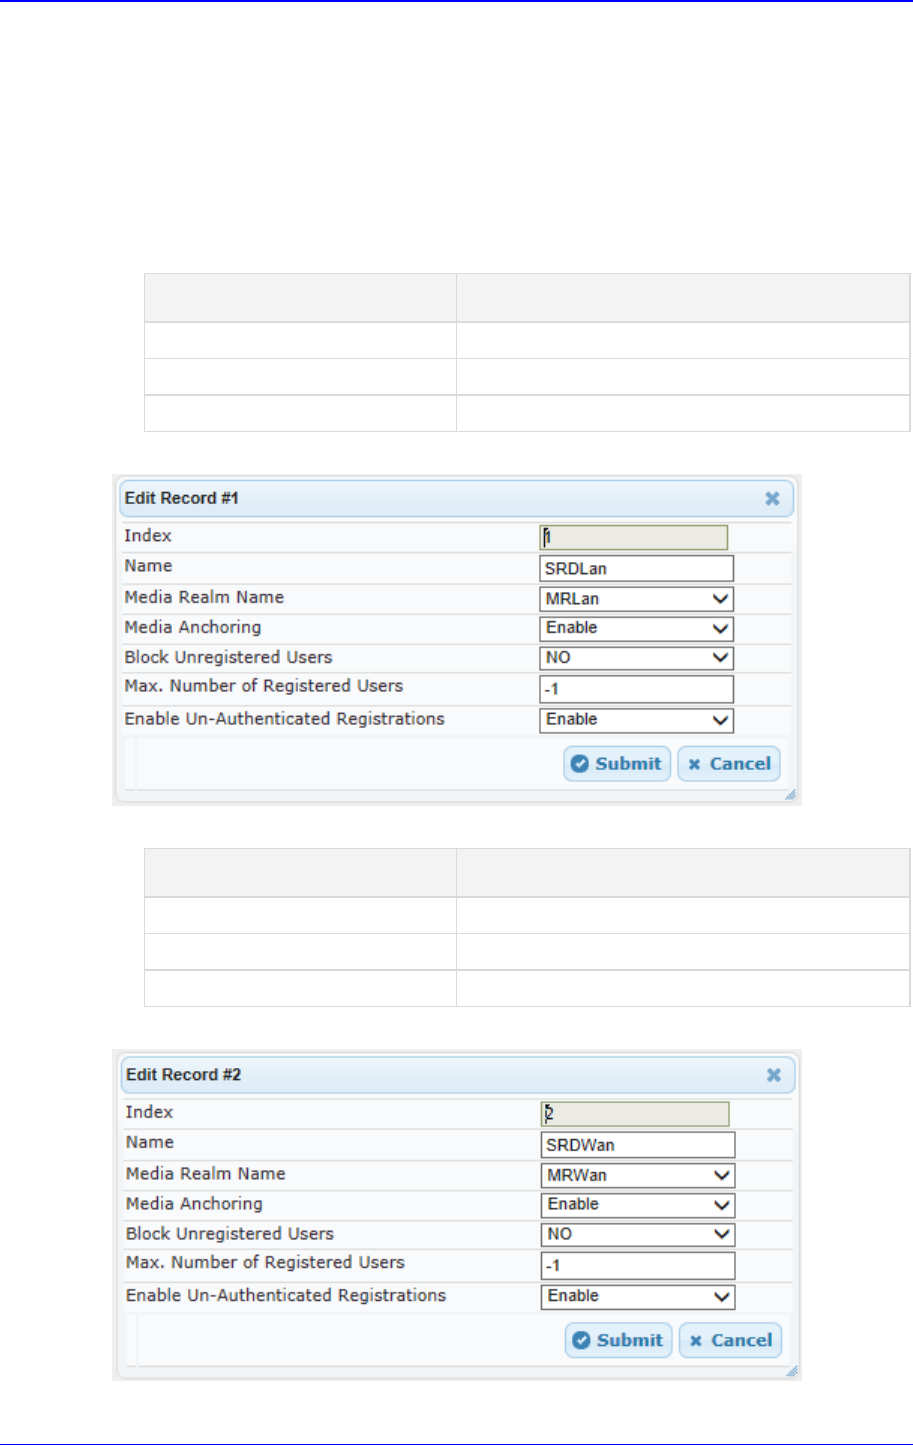
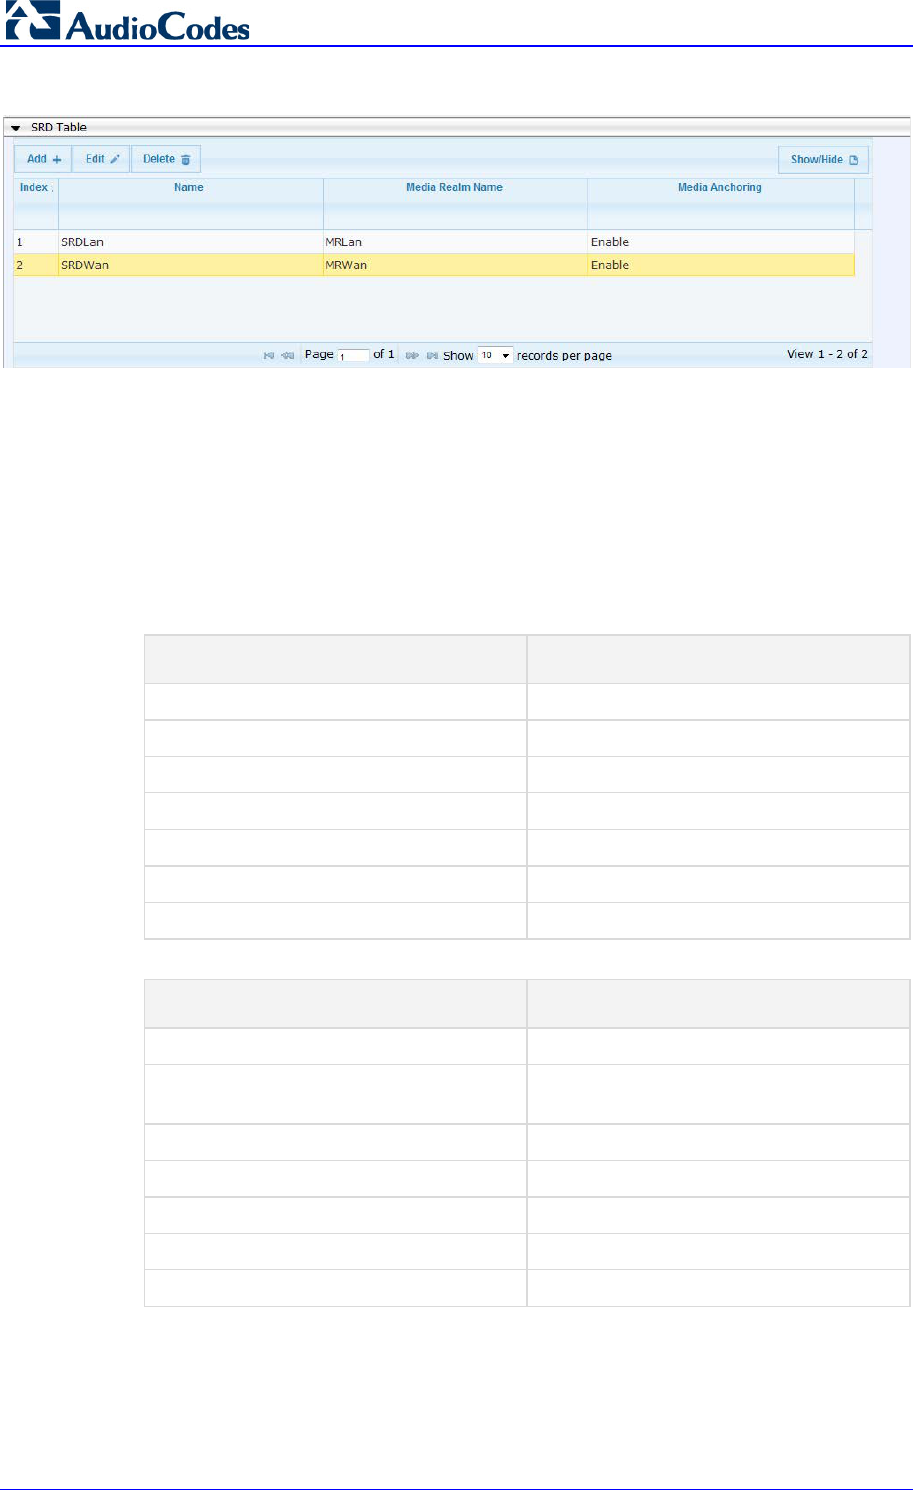
3.4.2 Step B: Configure SRDs
This step describes how to configure the SRDs.
To configure SRDs:
1. Open the SRD Settings page (Configuration tab > VoIP menu > VoIP Network >
SRD Table).
2. Configure an SRD for the SBC's internal interface:
Parameter Value
SRD Index
1
SRD Name SRDLan (descriptive name for SRD)
Media Realm Name MRLan (associates SRD with Media Realm)
Figure 3-10: Configuring LAN SRD
3. Configure an SRD for the SBC's external interface:
Parameter Value
SRD Index
2
SRD Name
SRDWan
Media Realm
MRWan
Figure 3-11: Configuring WAN SRD
Microsoft Office 365 Exchange UM with IP PBX
AudioCodes Mediant SBC 30 Document #: LTRT-40524
Figure 3-12: Configured SRD Table
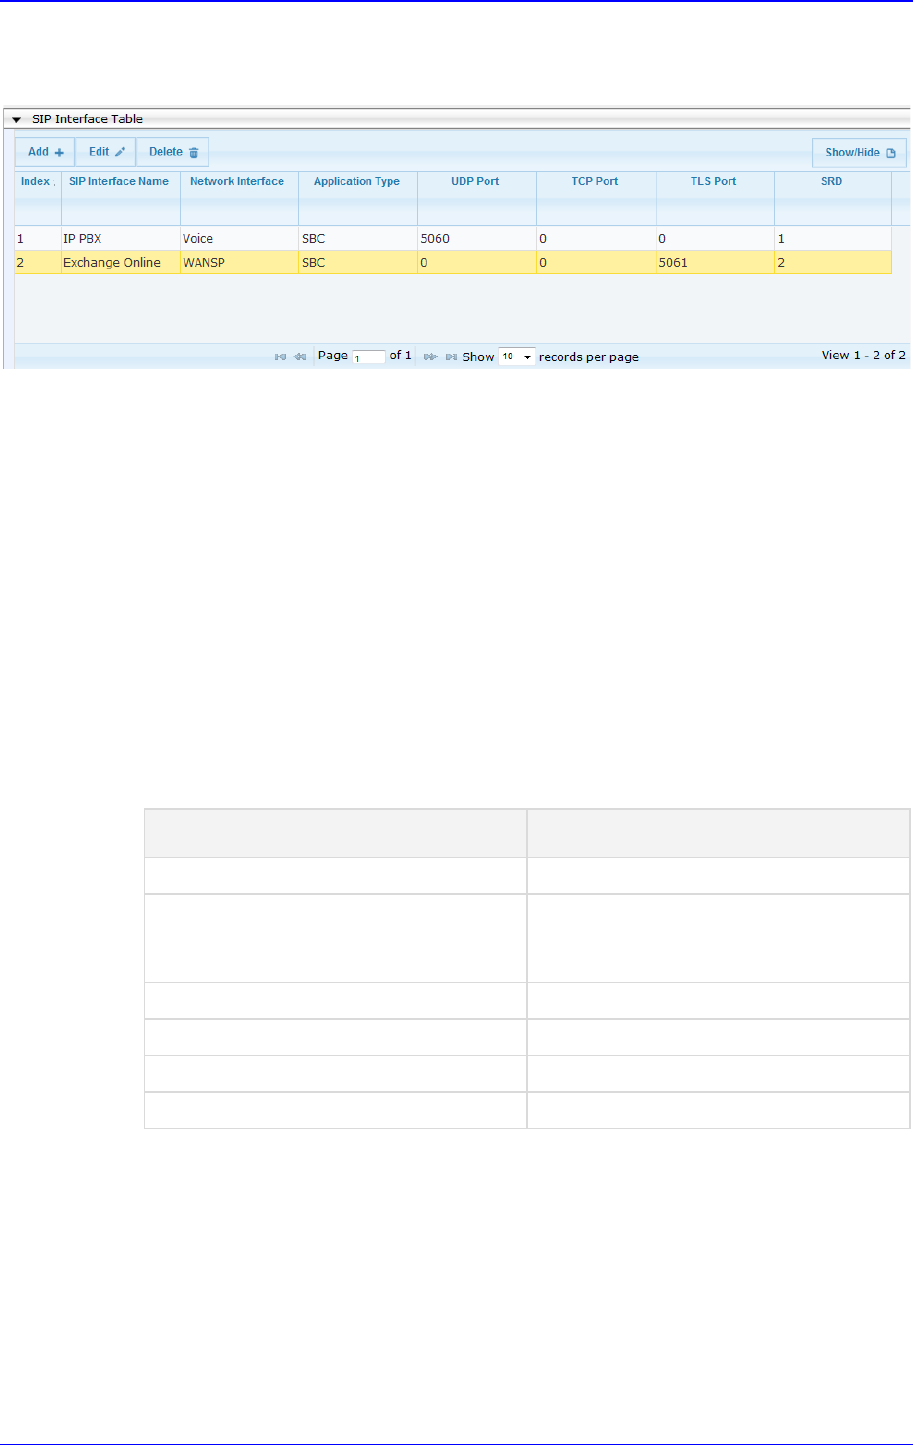
3.4.3 Step C: Configure SIP Signaling Interfaces
This step describes how to configure SIP Interfaces. For the interoperability test topology,
an internal and external SIP Interface must be configured for the SBC.
To configure SIP Interfaces:
1. Open the SIP Interface Table page (Configuration tab > VoIP menu > VoIP Network
> SIP Interface Table).
2. Configure a SIP interface for the LAN:
Parameter Value
Index
1
Interface Name IP PBX (arbitrary descriptive name)
Network Interface
Voice
Application Type
SBC
UDP Port
5060
TCP and TLS
0
SRD
1
3. Configure a SIP interface for the WAN:
Parameter Value
Index
2
Interface Name Exchange Online (arbitrary descriptive
name)
Network Interface
WANSP
Application Type
SBC
TLS Port
5061
UDP and TCP
0
SRD
2
Configuration Note 3. Configure AudioCodes SBC
Microsoft Office 365 Exchange UM with IP PBXs 31 AudioCodes Mediant SBC
The configured SIP Interfaces are shown in the figure below:
Figure 3-13: Configured SIP Interfaces in SIP Interface Table
3.5 Configure Proxy Sets
This step describes how to configure Proxy Sets. The Proxy Set defines the destination
address (IP address or FQDN) of the IP entity server. Proxy Sets can also be used to
configure load balancing between multiple servers.
For the interoperability test topology, two Proxy Sets need to be configured for the following
IP entities:
IP PBX
Exchange Online UM
These Proxy Sets will later be associated with IP Groups.
To configure Proxy Sets:
1. Open the Proxy Sets Table page (Configuration tab > VoIP menu > VoIP Network >
Proxy Sets Table).
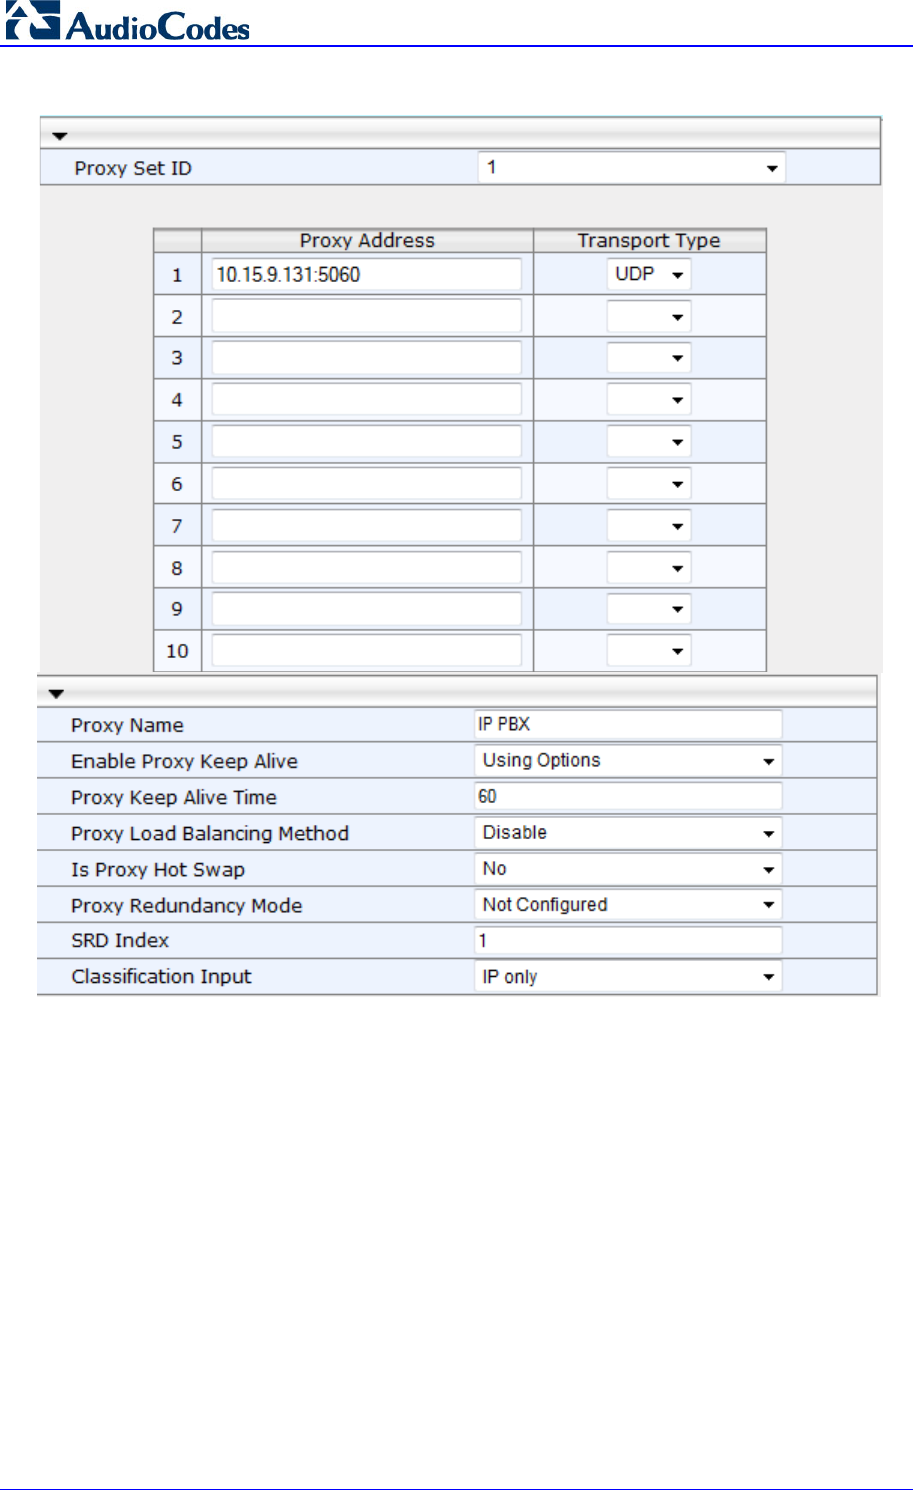
2. Configure a Proxy Set for IP PBX:
Parameter Value
Proxy Set ID
1
Proxy Address
10.15.9.131:5060
(IP PBX IP address / FQDN and
destination port)
Transport Type
UDP
Proxy Name IP PBX (arbitrary descriptive name)
Enable Proxy Keep Alive
Using Options
SRD Index
1
Microsoft Office 365 Exchange UM with IP PBX
AudioCodes Mediant SBC 32 Document #: LTRT-40524
Figure 3-14: Configuring Proxy Set for IP PBX
3. Click Submit.
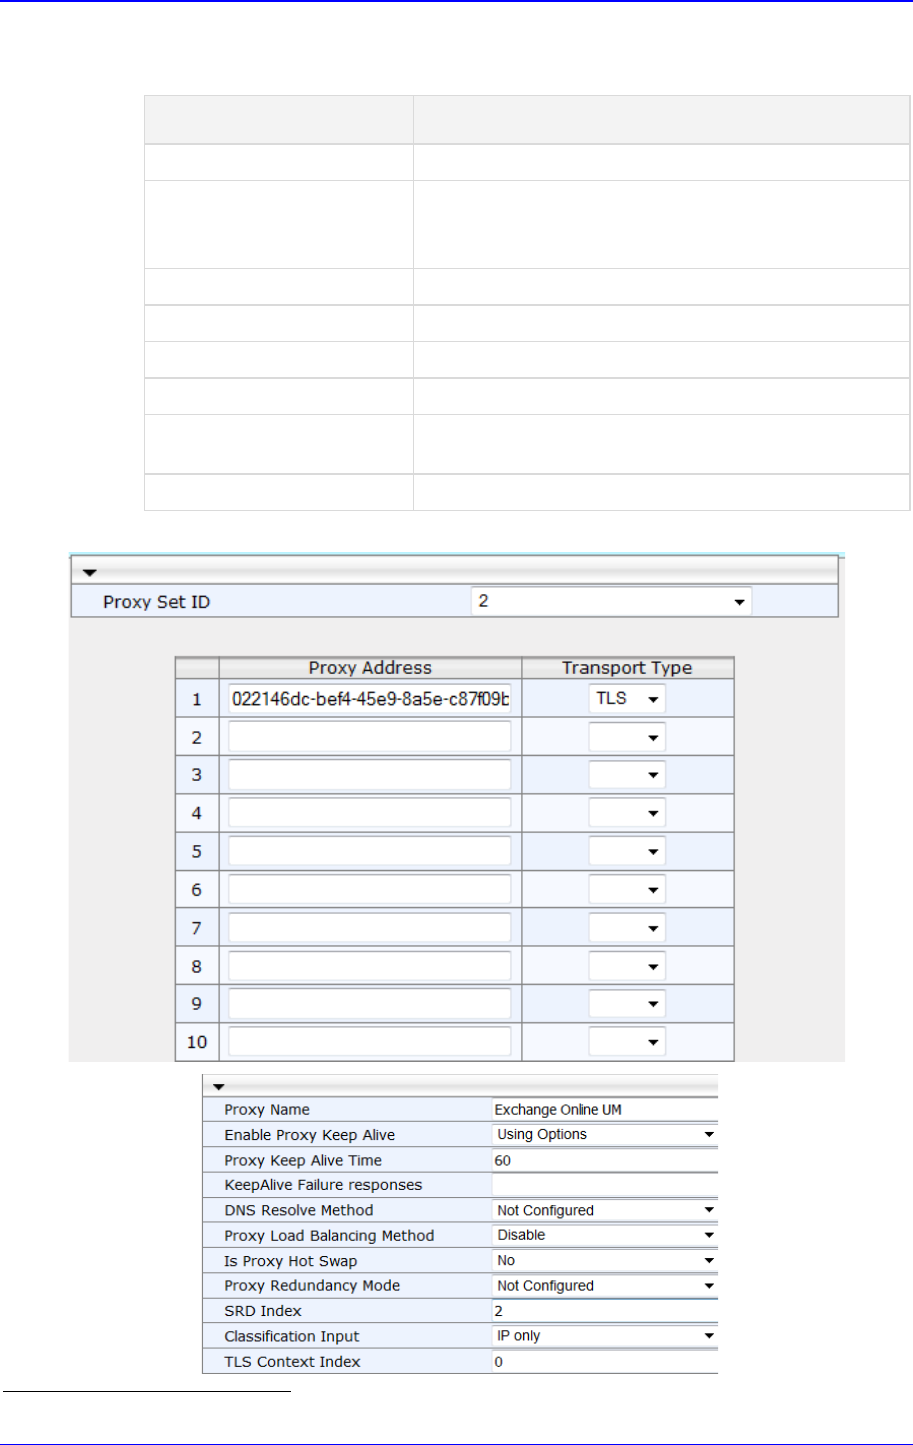
4. Configure a Proxy Set for Exchange Online UM.
Configure the SBC external interface to communicate with Office 365 Exchange UM.
For the Proxy Address of the external set, you must enter the Forwarding Address
assigned to the UM IP Gateway object created earlier (see Figure 2-10 on page 21).
Only the end of a sample address is visible in the figure below. The length of the
address is such that the view is clipped in the user interface, and only part of the
address is visible.
Configuration Note 3. Configure AudioCodes SBC
Microsoft Office 365 Exchange UM with IP PBXs 33 AudioCodes Mediant SBC
As secured communication is required, note that ":5061" must be appended to the
address
2
.
Parameter Value
Proxy Set ID
2
Proxy Address
022146dc-bef4-45e9-8a5e-
c87f09bfe19b.um.outlook.com:5061
(Exchange Online FQDN and destination port)
Transport Type
TLS
Proxy Name Exchange Online (arbitrary descriptive name)
Enable Proxy Keep Alive
Using Options
Is Proxy Hot Swap
Yes
SRD Index 2 (enables classification by Proxy Set for SRD of IP
Group belonging to Exchange Online)
TLS Context 0 – the “default” context
Figure 3-15: Configuring Proxy Set for Exchange Online
2
Port 5061 is used by Office 365 Exchange Online UM for all SIP/TLS traffic.

Microsoft Office 365 Exchange UM with IP PBX
AudioCodes Mediant SBC 34 Document #: LTRT-40524
5. Click Submit.
Note: In the latest versions of AudioCodes firmware, the “default” TLS Context
(context 0), is referenced from the SIP Interface, not in the Proxy Set as shown above
(using the context 0as the default setting).
Configuration Note 3. Configure AudioCodes SBC
Microsoft Office 365 Exchange UM with IP PBXs 35 AudioCodes Mediant SBC
3.6 Configure IP Groups
An SBC “IP Group” represents a SIP trunk or SIP-capable peer system. It is associated
with a Signaling Routing Domain (SRD). You will need to define two IP Groups, one
representing the internal SIP peer (i.e., IP PBX), and one representing Office 365
Exchange Online UM
3
.
3.6.1 Configure an Internal IP Group
To configure an internal IP Group:
1. Open the IP Group Table page (Configuration tab > VoIP menu > VoIP Network >
IP Group Table).
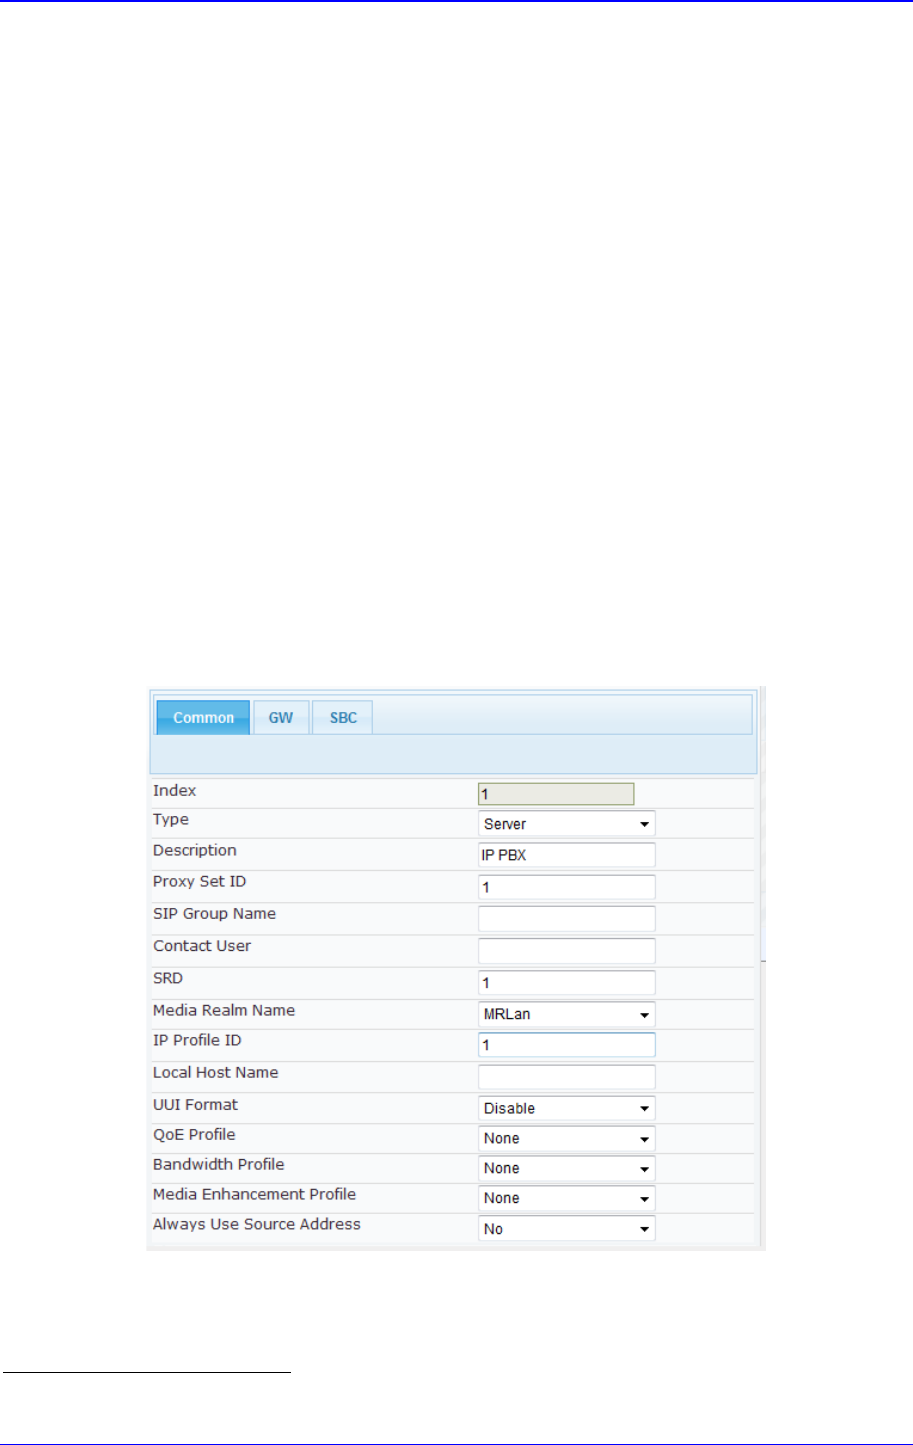
2. Add a new entry with index 1 to represent the internal SIP peer.
3. From the 'Type' drop-down list, select SERVER.
4. In the 'Description' field, add a name that will help to identify this as the internal group
(i.e., IP PBX).
5. In the 'Proxy Set ID', select 1 to associate this IP Group with Proxy Set 1.
6. In the ‘SRD’ field, Enter 1 to associate this IP Group with SRD 1
7. In the ‘IP Profile ID’ field, Enter 1 to associate this IP Group with IP Profile 1
8. From the 'Media Realm' drop-down list, select MRLan to associate this IP Group with
the LAN Media Realm (see Section 3.4.1 on page 27).
Figure 3-16: Internal IP Group Configuration
9. Click Submit.
3
If you intend to use a hosted fax service in conjunction with Office 365 Exchange Online UM, you will also need to create
an IP Group to represent the IP interface to the fax service.

Microsoft Office 365 Exchange UM with IP PBX
AudioCodes Mediant SBC 36 Document #: LTRT-40524
3.6.2 Configure an External IP Group
This section shows how to configure an external IP group.
To configure an external IP Group:
1. Open the IP Group Table page (Configuration tab > VoIP menu > VoIP Network >
IP Group Table).
2. Add a new entry with index 2 to represent the external SIP peer.
3. From the 'Type' drop-down list, select Server.
4. In the 'Description' field, add a name that will help to identify this as the external group.
5. In the 'Proxy Set ID' field, enter 2 to associate this IP Group with Proxy Set 2.
6. In the ‘SIP Group Name’ , Enter the Forwarding Address assigned to the UM IP
Gateway object.
7. In the ‘SRD’ field, Enter 2 to associate this IP Group with SRD 2
8. In the ‘IP Profile ID’ field, Enter 2 to associate this IP Group with IP Profile 2
9. From the 'Media Realm' drop-down list, select MRWan to associate this IP Group with
the WAN Media Realm.
Figure 3-17: External IP Group Configuration
10. Click Submit.
Configuration Note 3. Configure AudioCodes SBC
Microsoft Office 365 Exchange UM with IP PBXs 37 AudioCodes Mediant SBC
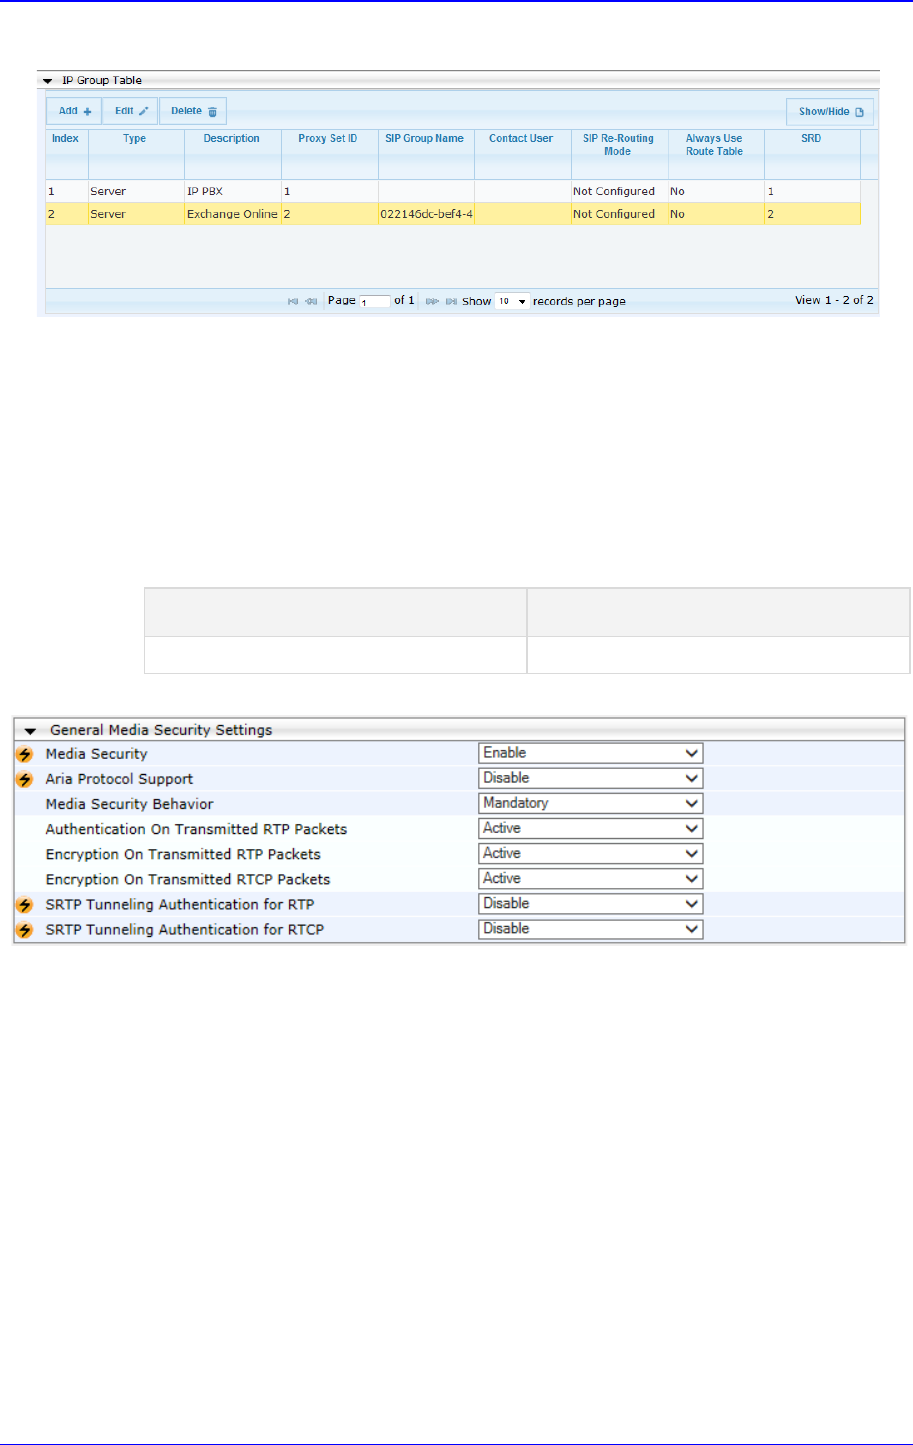
Figure 3-18: IP Group Table Configuration
3.7 Configure Media Security
This configuration forces the SBC to reject calls where the SIP peer does not use SRTP.
Office 365 Exchange UM requires that all (audio) media be secured with the SRTP protocol
(see SRTP reference on page 8).
To configure media security:
1. Open the Media Security page (Configuration tab > Media menu > Media Security).
2. Configure the parameters as follows:
Parameter Value
Media Security
Enable
Figure 3-19: Configuring SRTP
3. Click Submit.
4. Reset the SBC with a burn to flash for your settings to take effect (see Section 3.11 on
page 54).
3.8 Configure IP Profiles
This step describes how to configure IP Profiles. The IP Profile defines a set of call
capabilities relating to signaling (e.g., SIP message terminations such as REFER) and
media (e.g., coder and transcoding method).
In this interoperability test topology, IP Profiles need to be configured for the following IP
entities:
IP PBX - to operate in non-secure mode using RTP and UDP
Exchange Online UM - to operate in secure mode using SRTP and TLS
Note that the IP Profiles were assigned to these entities (i.e., IP Groups) in the step shown
in Section 0 on page 34.
Microsoft Office 365 Exchange UM with IP PBX
AudioCodes Mediant SBC 38 Document #: LTRT-40524
To configure IP Profiles:
1. Open the IP Profile Settings page (Configuration tab > VoIP > Coders and Profiles
> IP Profile Settings).
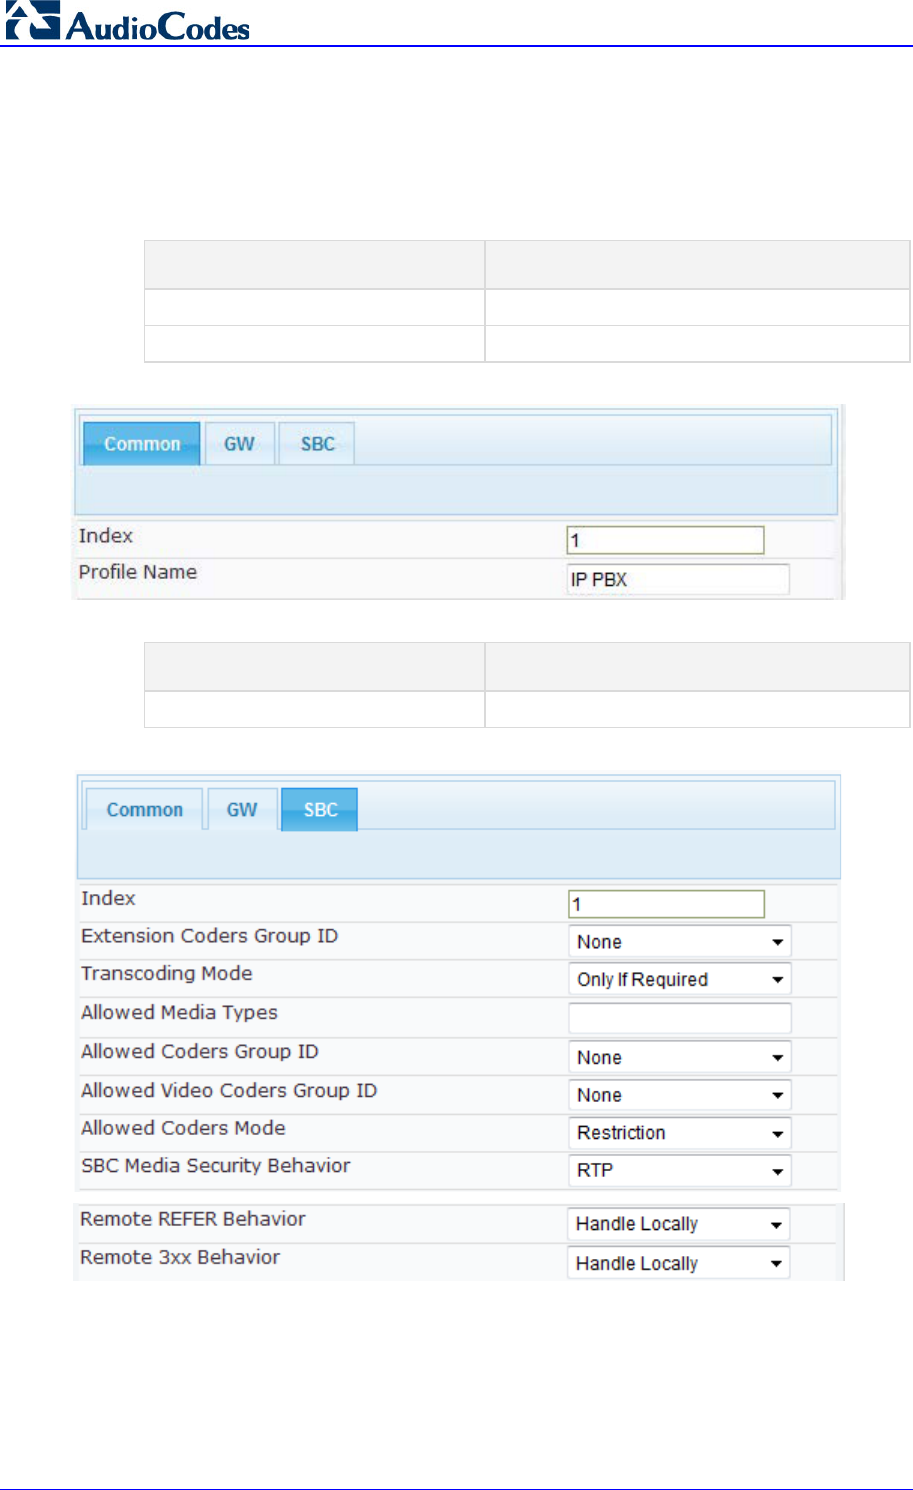
2. Click Add.
3. Click the Common tab, and then configure the parameters as follows:
Parameter Value
Index
1
Profile Name IP PBX (arbitrary descriptive name)
Figure 3-20: Configuring IP Profile for IP PBX – Common Tab
4. Click the SBC tab, and then configure the parameters as follows:
Parameter Value
SBC Media Security Behavior
RTP
Figure 3-21: Configuring IP Profile for IP PBC – SBC Tab
Configuration Note 3. Configure AudioCodes SBC
Microsoft Office 365 Exchange UM with IP PBXs 39 AudioCodes Mediant SBC
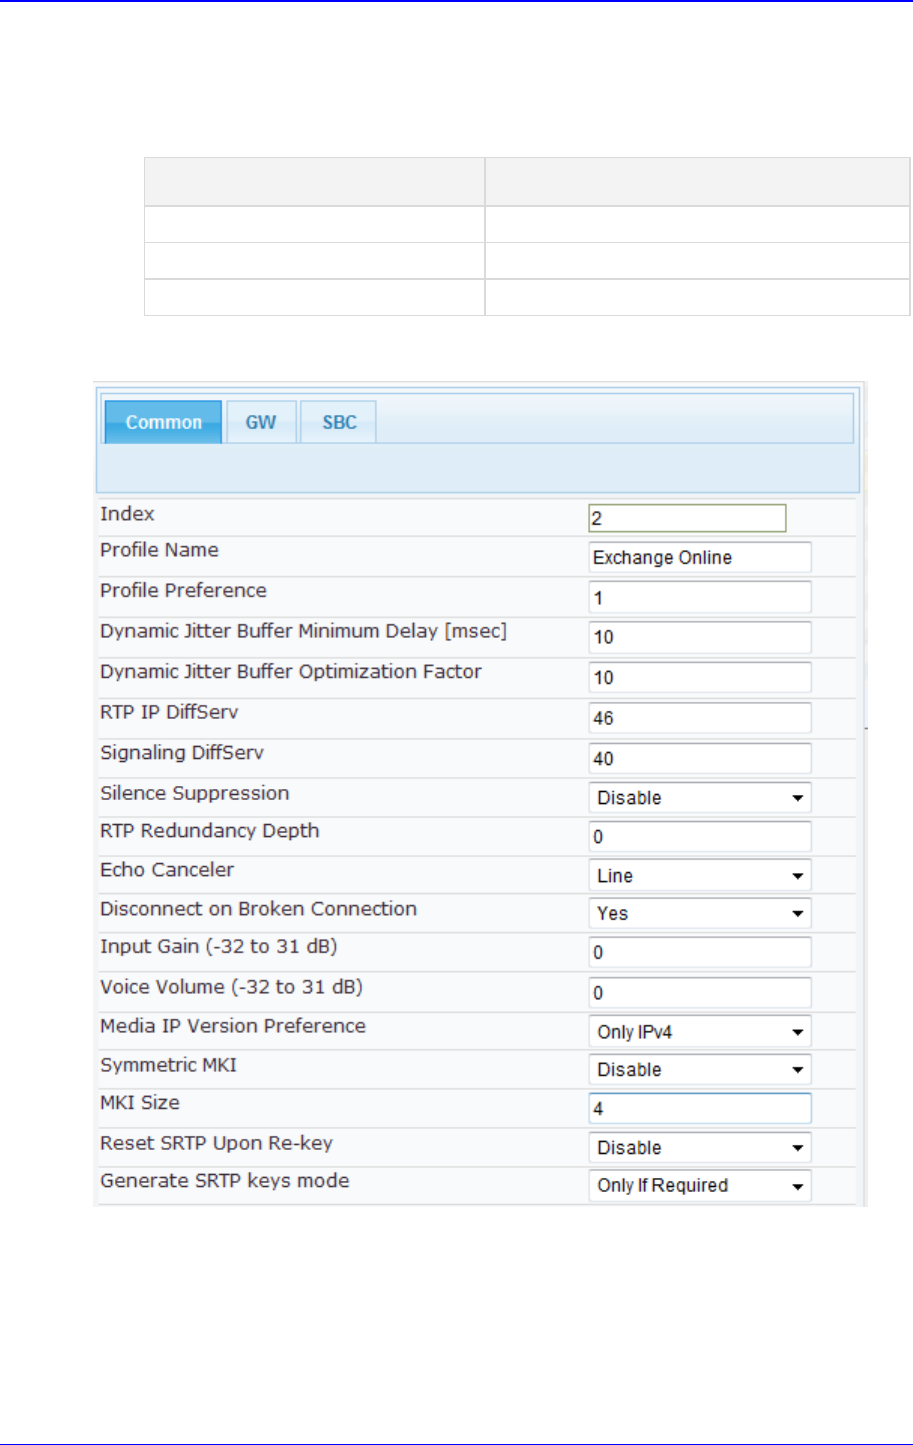
5. Configure an IP Profile for the Exchange Online UM:
6. Click Add.
7. Click the Common tab, and then configure the parameters as follows:
Parameter Value
Index
2
Profile Name Exchange Online (arbitrary descriptive name)
MKI Size
4
Figure 3-22: Configuring IP Profile for Exchange Online – Common Tab

Microsoft Office 365 Exchange UM with IP PBX
AudioCodes Mediant SBC 40 Document #: LTRT-40524
8. Click the SBC tab, and then configure the parameters as follows:
Parameter Value
Profile ID
2
SBC Media Security Behavior
SRTP
Enforce MKI Size
Enforce
Diversion Mode Add (required for forwarded calls)
Figure 3-23: Configuring IP Profile for Exchange Online – SBC Tab

Configuration Note 3. Configure AudioCodes SBC
Microsoft Office 365 Exchange UM with IP PBXs 41 AudioCodes Mediant SBC
3.9 Configure IP-to-IP Call Routing Rules
This step describes how to configure IP-to-IP call routing rules. These rules define the
routes for forwarding SIP messages (e.g., INVITE) received from one IP entity to another.
The SBC selects the rule whose configured input characteristics (e.g., IP Group) match
those of the incoming SIP message. If the input characteristics do not match the first rule in
the table, they are compared to the second rule, and so on, until a matching rule is located.
If no rule is matched, the message is rejected. As configured in Section 0 on page 34, the
routing rules use the configured IP Groups to denote the source and destination of the call.
IP Group 1 represents IP PBX, and IP Group 2 represents Exchange Online UM.
For the interoperability test topology, the following IP-to-IP routing rules need to be
configured to route calls between IP PBX (LAN) and Exchange Online UM (WAN):
Calls from Exchange Online as a results of Directory Search option (Transfer calls)
Calls from IP PBX to Exchange Online
Calls from Exchange Online to IP PBX
To configure IP-to-IP routing rules:
1. Open the IP-to-IP Routing Table page (Configuration tab > VoIP menu > SBC >
Routing SBC > IP-to-IP Routing Table).
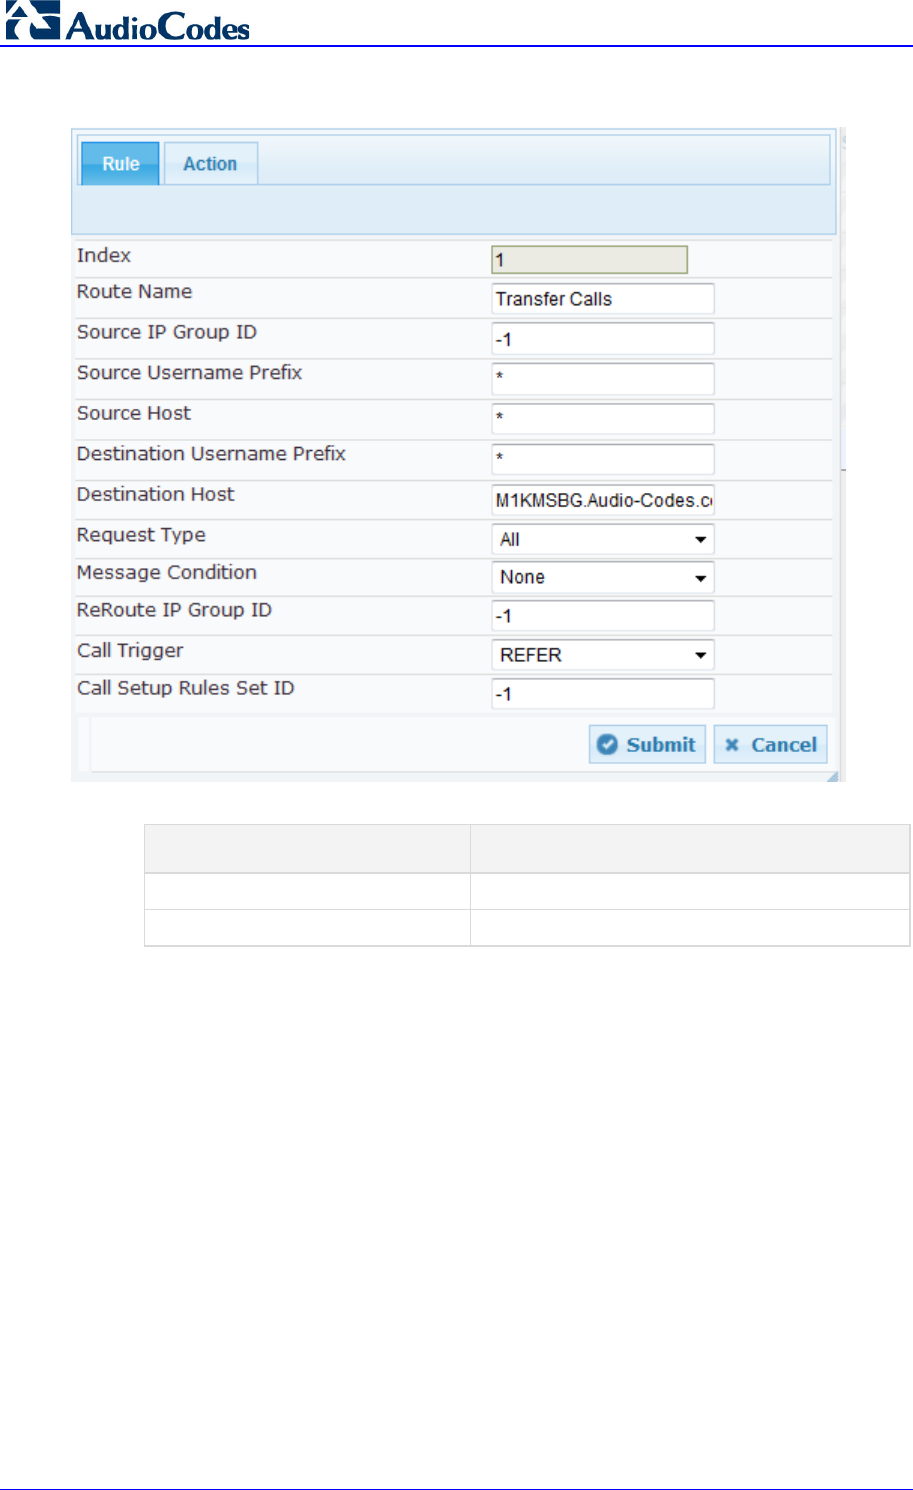
2. Configure a rule to route Transfer calls from Exchange Online
3. Click Add.
4. Click the Rule tab, and then configure the parameters as follows:
Parameter Value
Index
1
Route Name Transfer Calls (arbitrary descriptive
name)
Destination Host M1KMSBG.Audio-Codes.com (SBC
FQDN name)
Call Trigger
REFER
Microsoft Office 365 Exchange UM with IP PBX
AudioCodes Mediant SBC 42 Document #: LTRT-40524
Figure 3-24: Configuring IP-to-IP Routing Rule for Transfer Calls – Rule tab
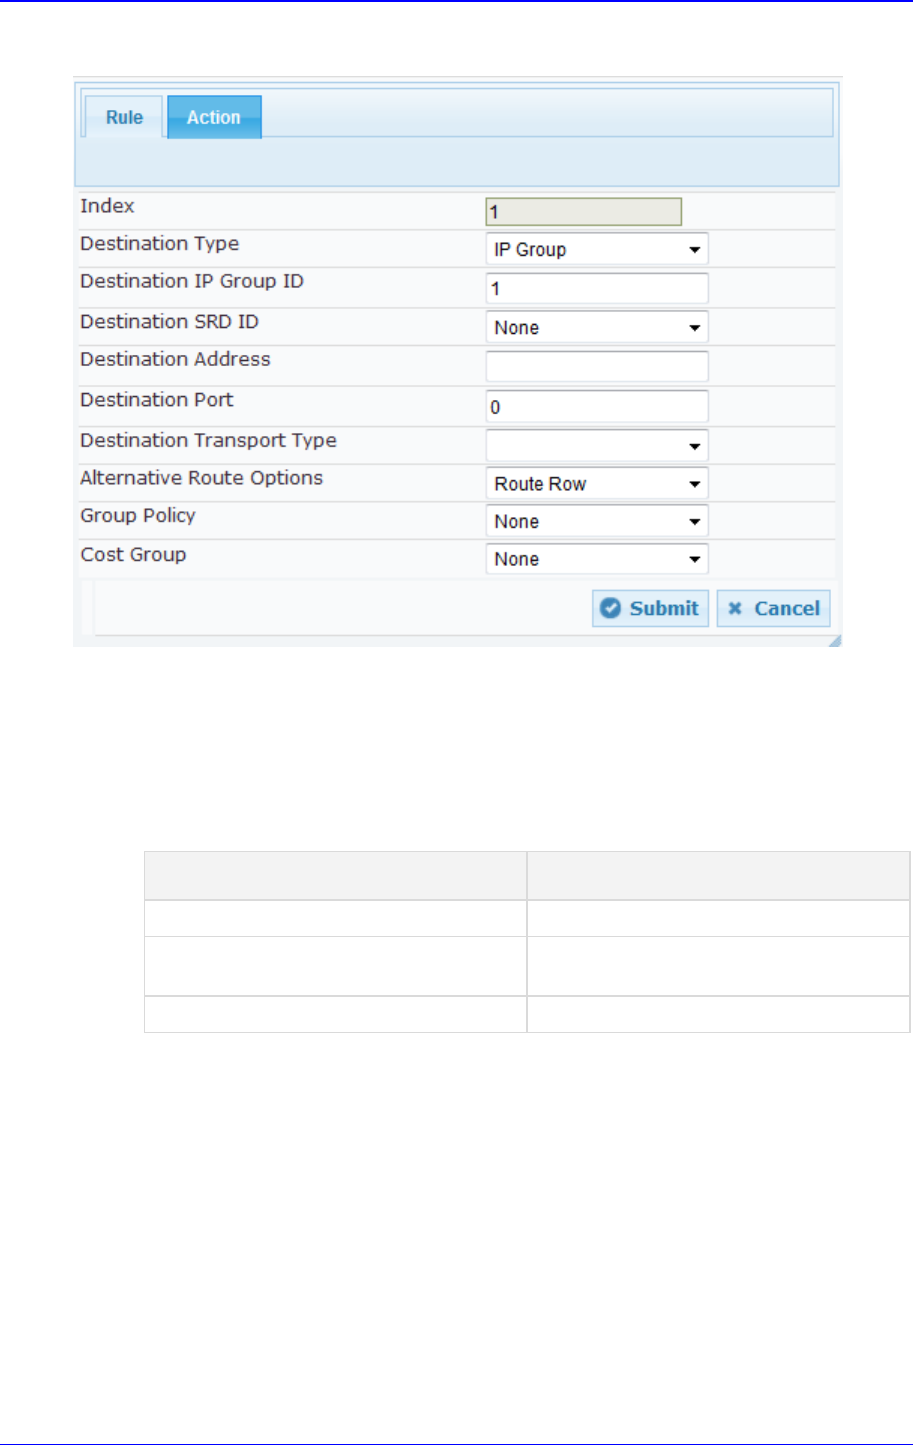
5. Click the Action tab, and then configure the parameters as follows:
Parameter Value
Destination Type
IP Group
Destination IP Group ID
1
Configuration Note 3. Configure AudioCodes SBC
Microsoft Office 365 Exchange UM with IP PBXs 43 AudioCodes Mediant SBC
Figure 3-25: Configuring IP-to-IP Routing Rule for Transfer Calls – Action tab
To configure IP-to-IP routing rules:
1. Open the IP-to-IP Routing Table page (Configuration tab > VoIP menu > SBC >
Routing SBC > IP-to-IP Routing Table).
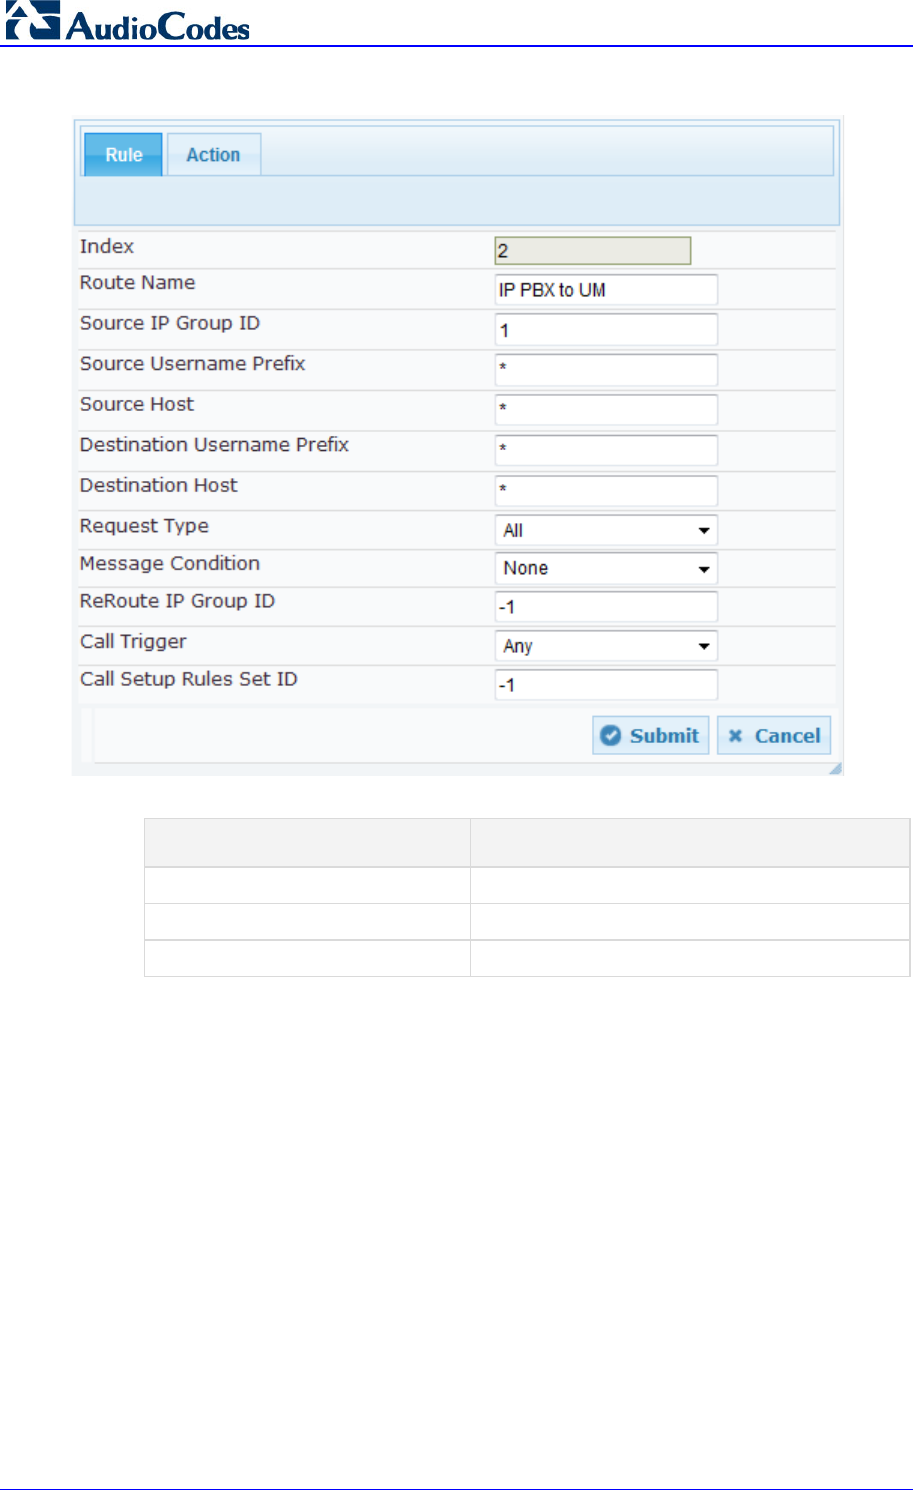
2. Configure a rule to route calls from IP PBX to Exchange Online
3. Click Add.
4. Click the Rule tab, and then configure the parameters as follows:
Parameter Value
Index
2
Route Name IP PBX to UM (arbitrary descriptive
name)
Source IP Group ID
1
Microsoft Office 365 Exchange UM with IP PBX
AudioCodes Mediant SBC 44 Document #: LTRT-40524
Figure 3-26: Configuring IP-to-IP Routing Rule for IP PBX to UM – Rule tab
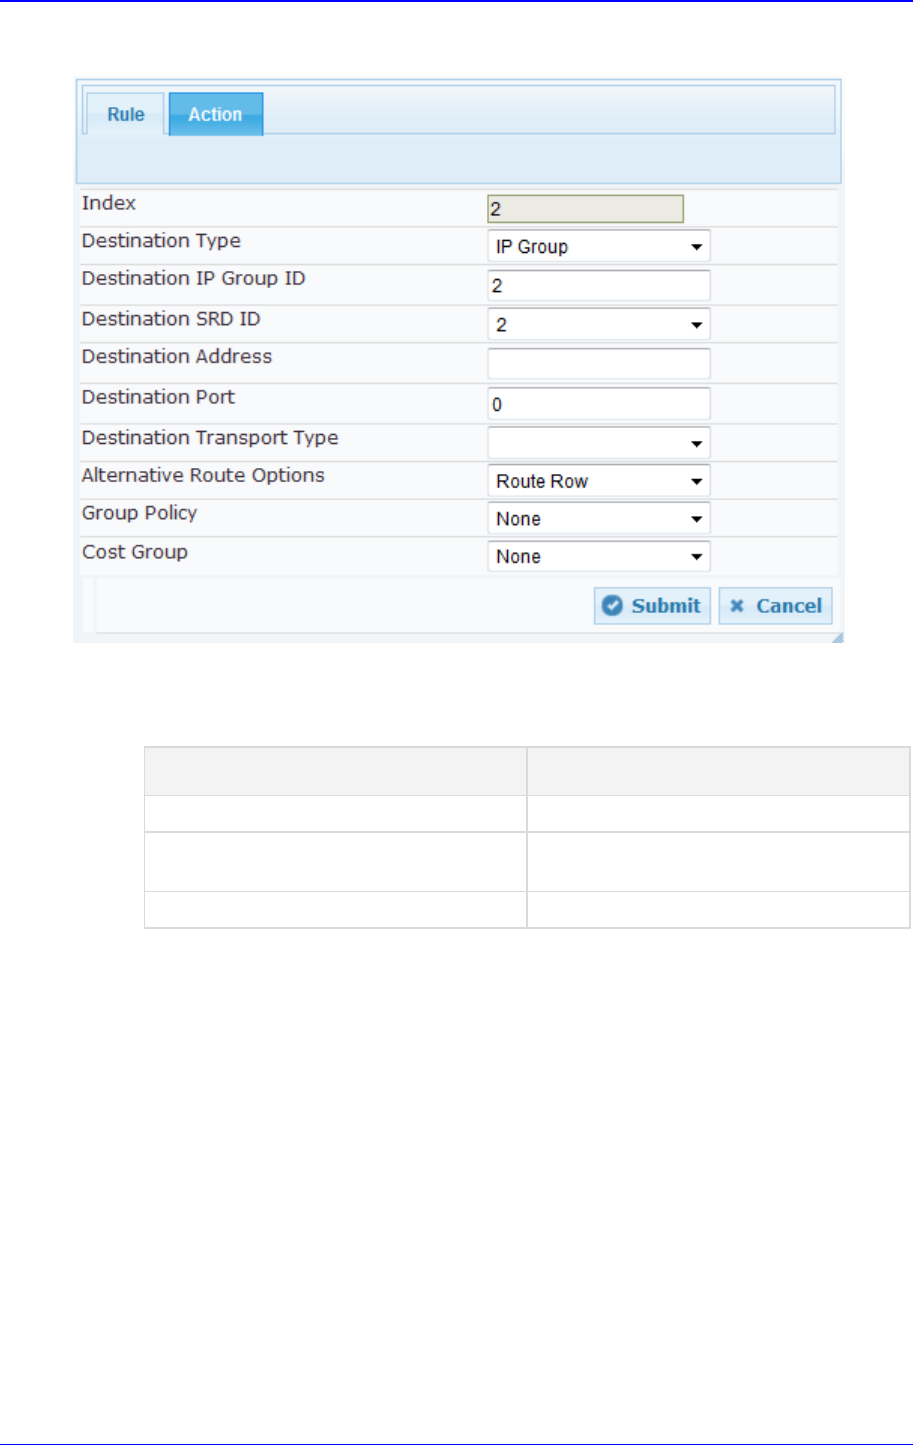
5. Click the Action tab, and then configure the parameters as follows:
Parameter Value
Destination Type
IP Group
Destination IP Group ID
2
Destination SRD ID
2
Configuration Note 3. Configure AudioCodes SBC
Microsoft Office 365 Exchange UM with IP PBXs 45 AudioCodes Mediant SBC
Figure 3-27: Configuring IP-to-IP Routing Rule for IP PBX to UM – Action tab
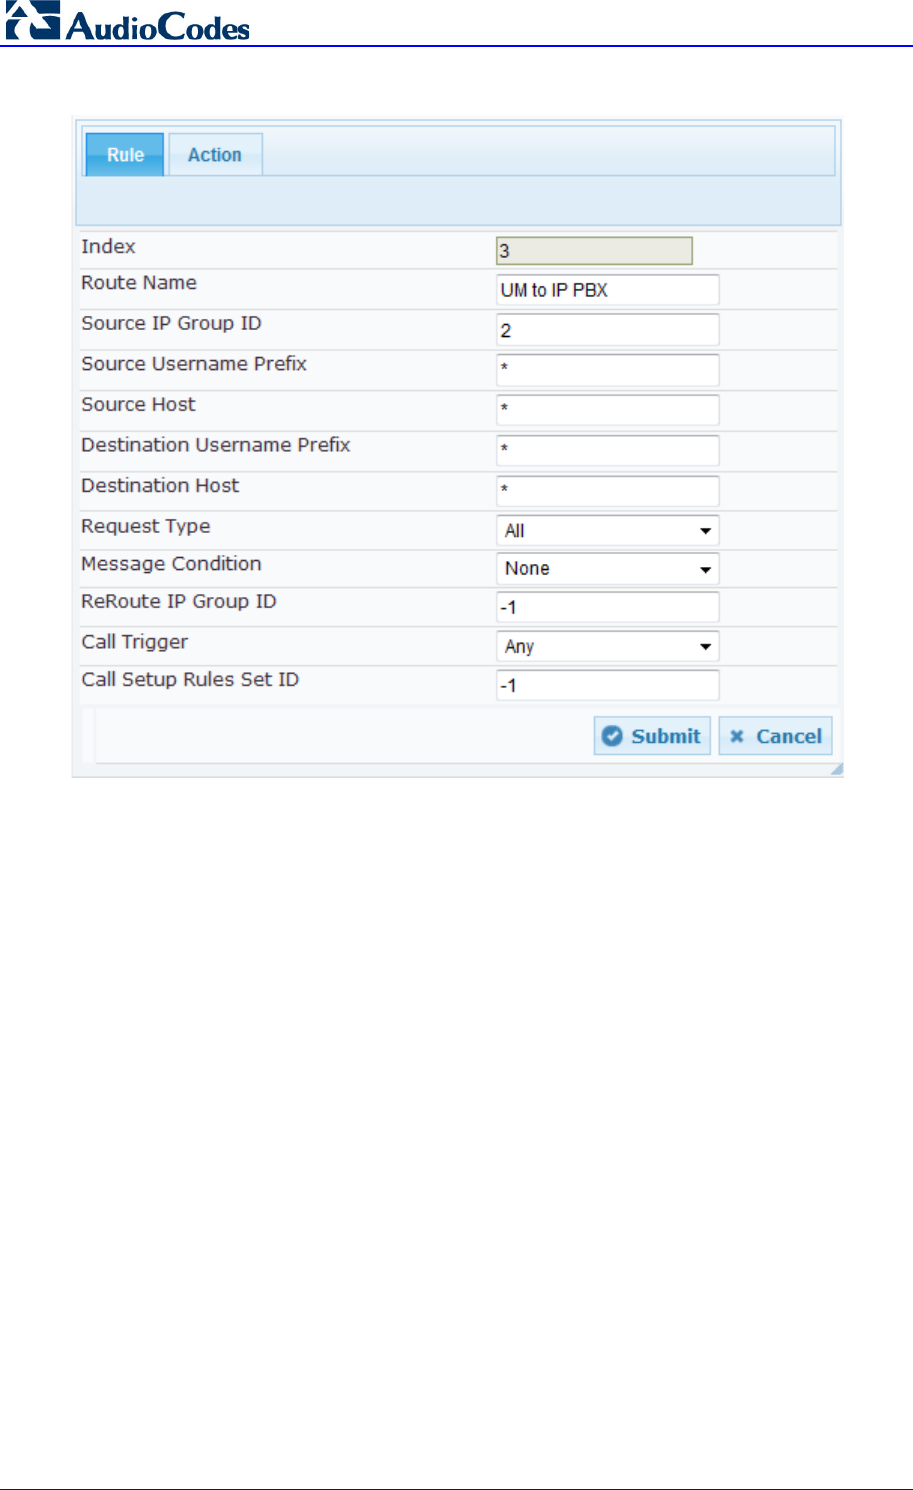
6. Configure a rule to route calls from Exchange Online to IP PBX
7. Click Add.
8. Click the Rule tab, and then configure the parameters as follows:
Parameter Value
Index
3
Route Name UM to IP PBX (arbitrary descriptive
name)
Source IP Group ID
2
Microsoft Office 365 Exchange UM with IP PBX
AudioCodes Mediant SBC 46 Document #: LTRT-40524
Figure 3-28: Configuring IP-to-IP Routing Rule for UM to IP PBX – Rule tab

Configuration Note 3. Configure AudioCodes SBC
Microsoft Office 365 Exchange UM with IP PBXs 47 AudioCodes Mediant SBC
9. Click the Action tab, and then configure the parameters as follows:
Parameter Value
Destination Type
IP Group
Destination IP Group ID
1
Destination SRD ID
1
Figure 3-29: Configuring IP-to-IP Routing Rule for UM to IP PBX – Action tab
The configured routing rules are shown in the figure below:
Figure 3-30: Configured IP-to-IP Routing Rules in IP-to-IP Routing Table
Note: The routing configuration may change according to your specific deployment
topology. If you have a more complex routing environment such as a hybrid Exchange,
and you need to have call routing based on LDAP queries, refer to the SBC's User's
Manual.
Microsoft Office 365 Exchange UM with IP PBX
AudioCodes Mediant SBC 48 Document #: LTRT-40524
3.10 Configure Certificates
As described under Section 2 on page 11, communication between the SBC and Office
365 Exchange Online UM requires the use of a digital certificate signed by a Certificate
Authority (CA). The SBC is supplied with a self-signed certificate, which cannot be used
because it is not signed by a supported CA.
Before you configure certificates, ensure that the DNS (see Section 2.1 on page 11) and
NTP (see Section 3.2 on page 26) settings have been configured correctly. If this is the
case, proceed as follows.
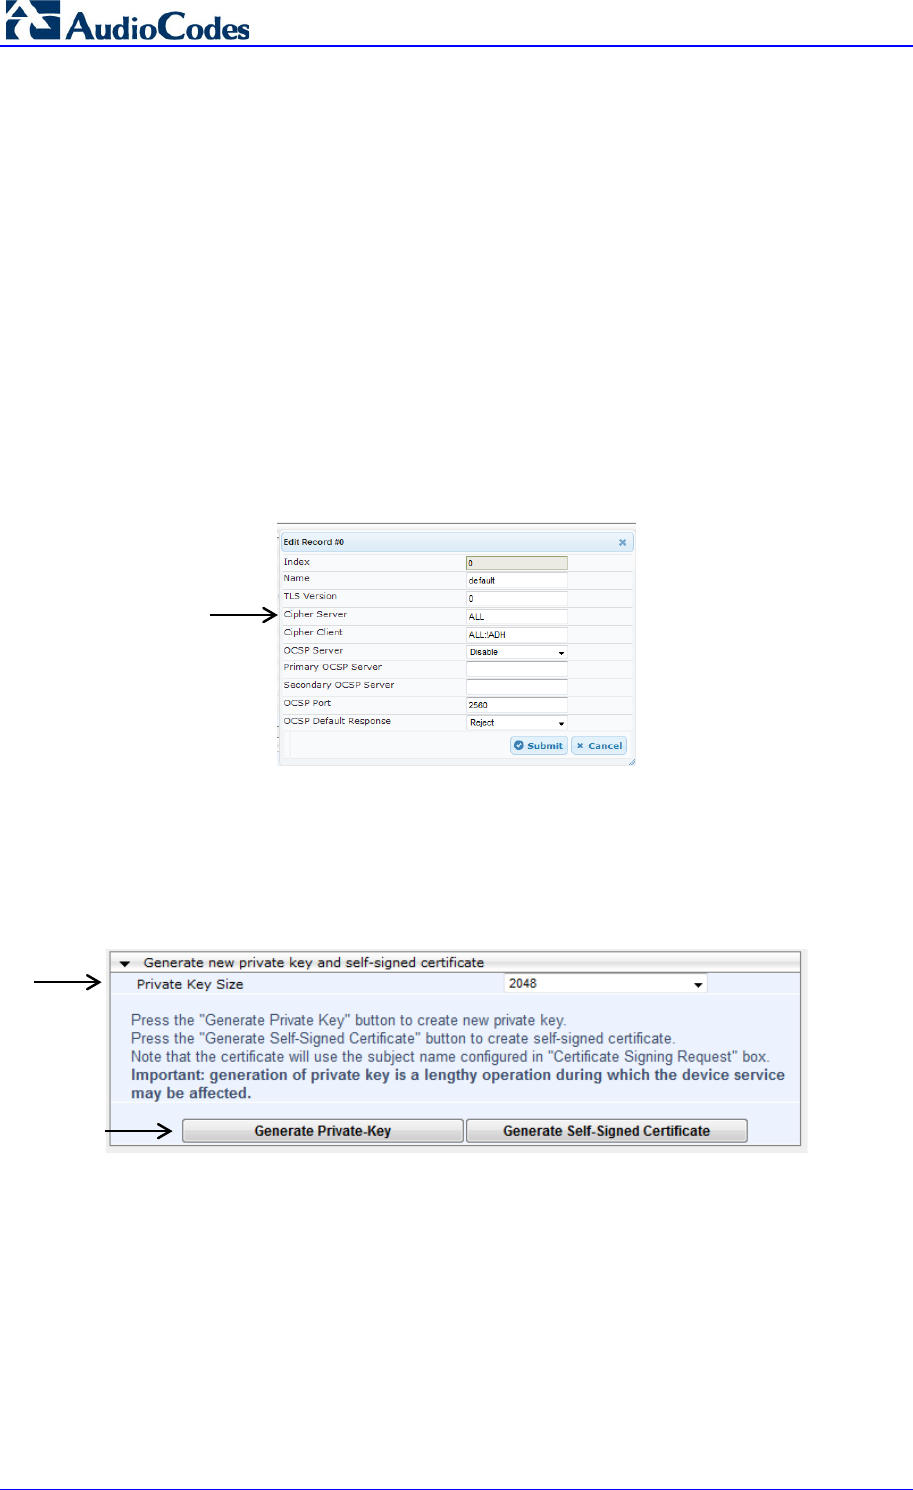
3.10.1 Configure the Cryptographic Setting
To configure cryptographic settings:
1. Open the TLS Contexts table (Configuration tab > System menu > TLS Contexts).
2. Select the default TLS Context row (Index 0), and then click Edit.
3. In the 'Cipher Server' field, enter "ALL", as shown below:
4. Click Submit to apply your settings.
5. Select the default TLS Context, and then click the TLS Context Certificate button,
located below the table.
6. From the 'Private Key Size' drop-down list, select 2048 and then click Generate
self-signed.
Figure 3-31: Cryptographic Configuration
7. Reset the device with a flash-to-burn to save your settings.
Configuration Note 3. Configure AudioCodes SBC
Microsoft Office 365 Exchange UM with IP PBXs 49 AudioCodes Mediant SBC
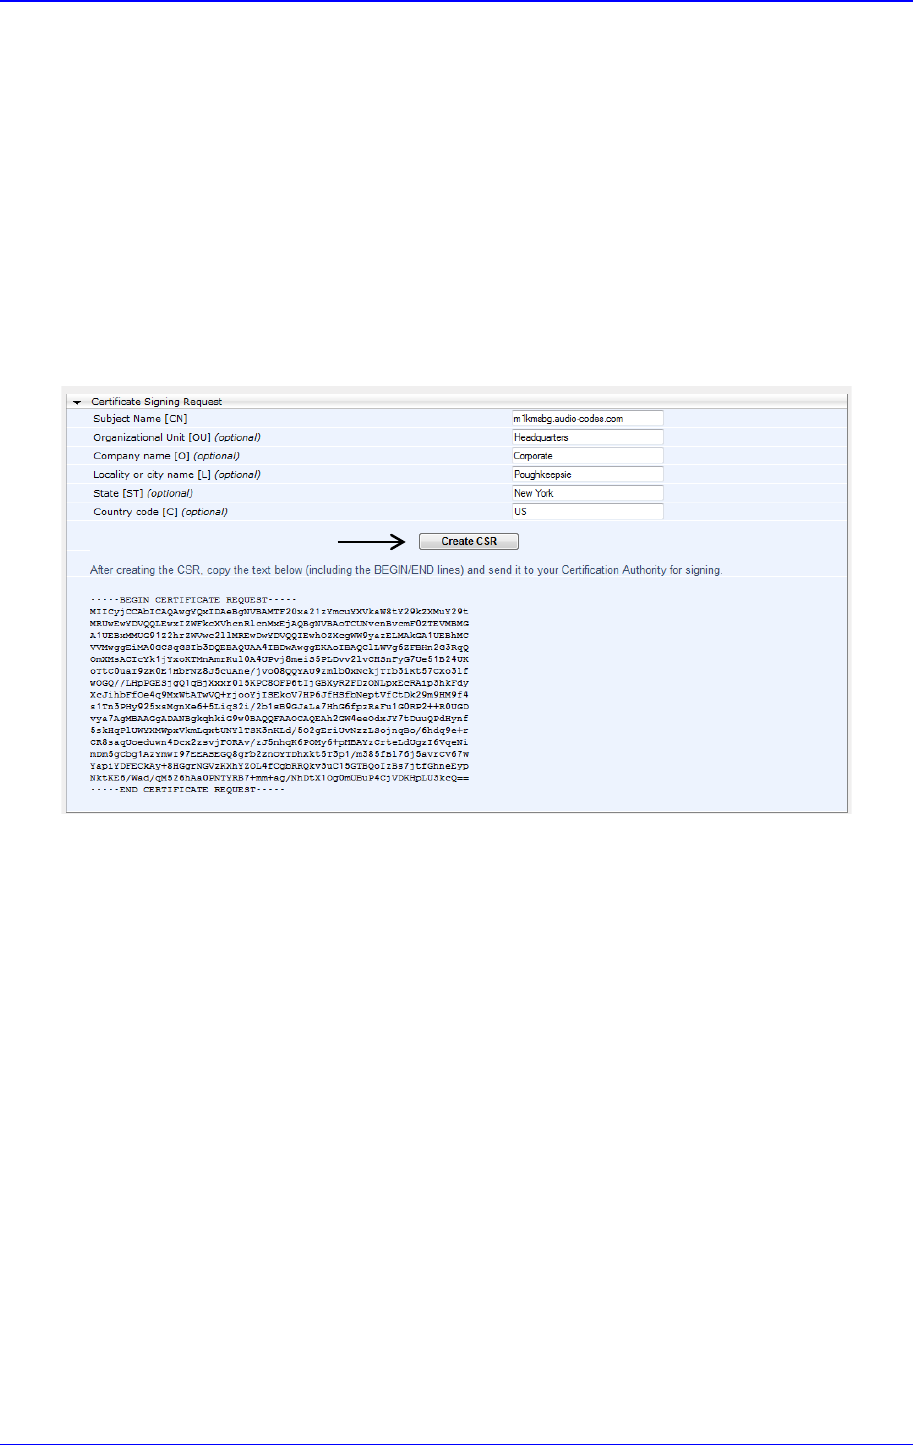
3.10.2 Generate a Certificate Signing Request (CSR)
To generate certificate signing requests:
1. Open the TLS Contexts page (Configuration tab > System menu > TLS Contexts).
2. Select the default TLS Context (index 0), and then click the TLS Context Certificate
button, located below the table.
3. In the 'Subject Name' field, enter the DNS name assigned to your device (see
Section 2.1 on page 11).
4. Fill in all other certificates details.
5. Click Create CSR; a text rendering of the certificate signing request is displayed:
Figure 3-32: Generating Certificate Signing Requests
6. Copy all the text of the certificate request (including the "BEGIN" and "END" sections
and dashes) and send it to the Certificate Authority (CA) as part of their certificate
generation process (see Section 2 on page 11).
Microsoft Office 365 Exchange UM with IP PBX
AudioCodes Mediant SBC 50 Document #: LTRT-40524
3.10.3 Load the Certificate
You will receive the certificate from the Certification Authority (CA) as a text file (or in a
form that can be saved as a text file). The AudioCodes devices use Privacy Enhanced
Mail (PEM) format for individual keys and certificates. This is also known as Base64
encoded DER certificate and is a text format (ASCII) file. There are many other commonly
used formats. Most are these formats are binary formats that are not compatible with
AudioCodes devices. There are also other text formats that are not PEM. The best practice
is to load the certificate using the procedure below. If the certificate loaded to the device is
in the incorrect format, the loading operation will fail. In this case, follow the instruction for
converting the certificate to the PEM (Base64 encoded DER) and then try to reload the
certificate.
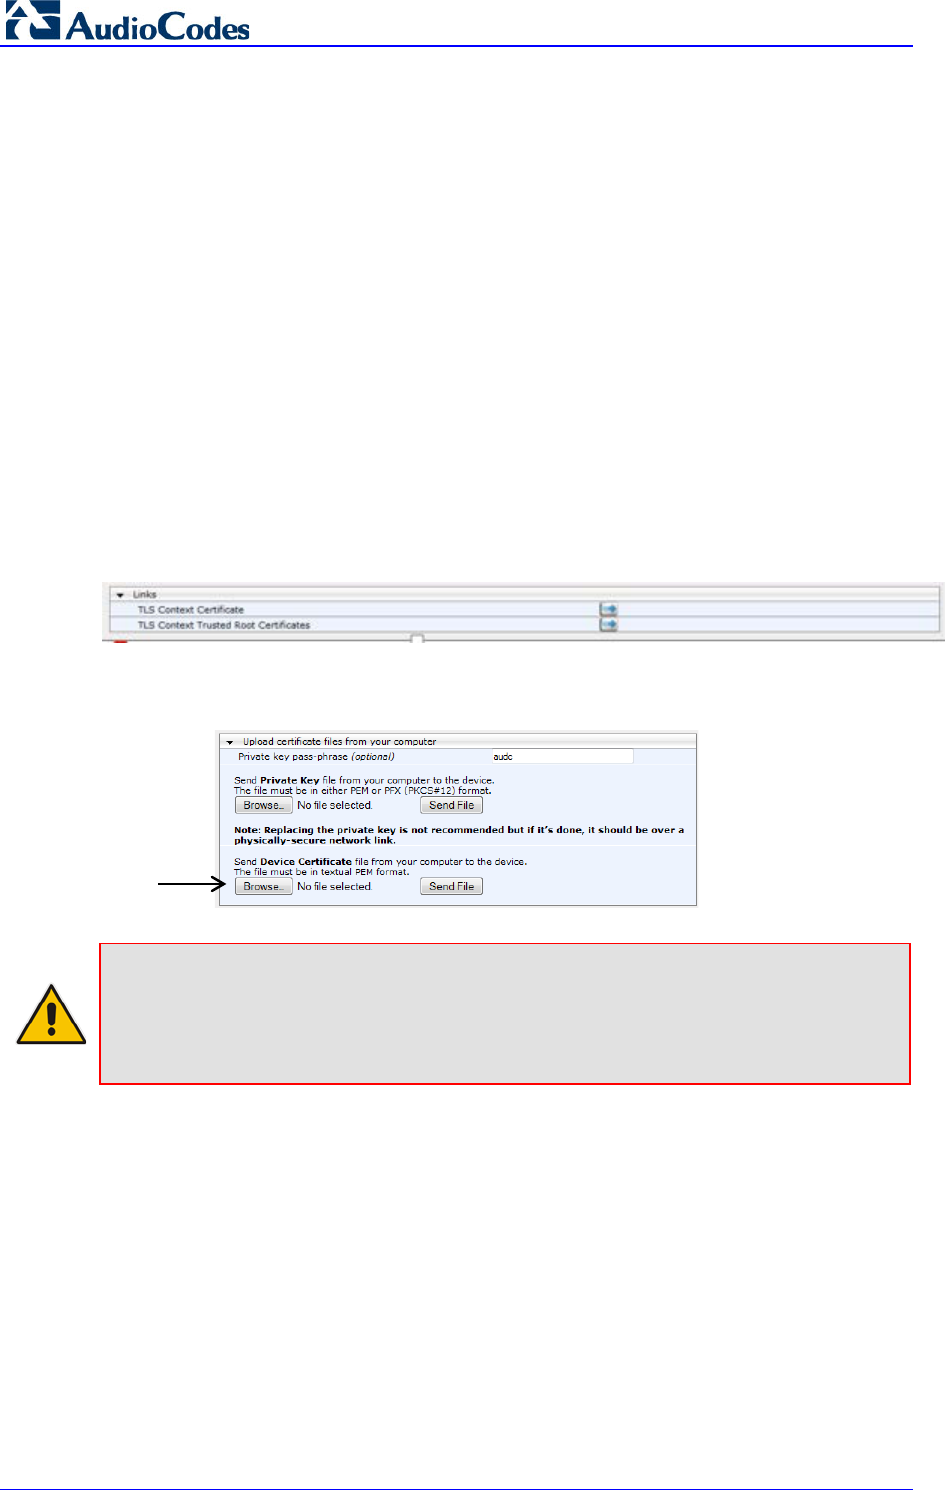
To load the certificate:
1. Open the TLS Contexts table (Configuration tab > System menu > TLS Contexts).
2. Select the default TLS Context (index 0), and then click the TLS Context Certificate
button, located below the table.
Figure 3-33: Upload Certificate Files from your Computer
3. In the Upload certificate files from your computer group, locate the text “Send
Device Certificate file from your computer to the device". Click the Browse button
below this text, navigate to the certificate file, and then click Send File.
Note: If the certificate file loaded to the device is not in the proper PEM format, the
procedure may fail the first time you attempt to load this file to the device. A built in
Microsoft application is available on most Windows computers which allows you to
export most types of certificate files and convert them by specifying a Base64 encoded
DER certificate.
Configuration Note 3. Configure AudioCodes SBC
Microsoft Office 365 Exchange UM with IP PBXs 51 AudioCodes Mediant SBC
3.10.3.1 Convert Certificates to DER (PEM)
This procedure describes how to convert certificates to DER (PEM). This procedure is only
applicable if you encountered an error loading the certificate file to the device. Such an
error indicates that you have attempted to load an incompatible certificate file to the device.
To makes your certificate file compatible, you need to convert the file to Base64 encoded
DER (PEM).
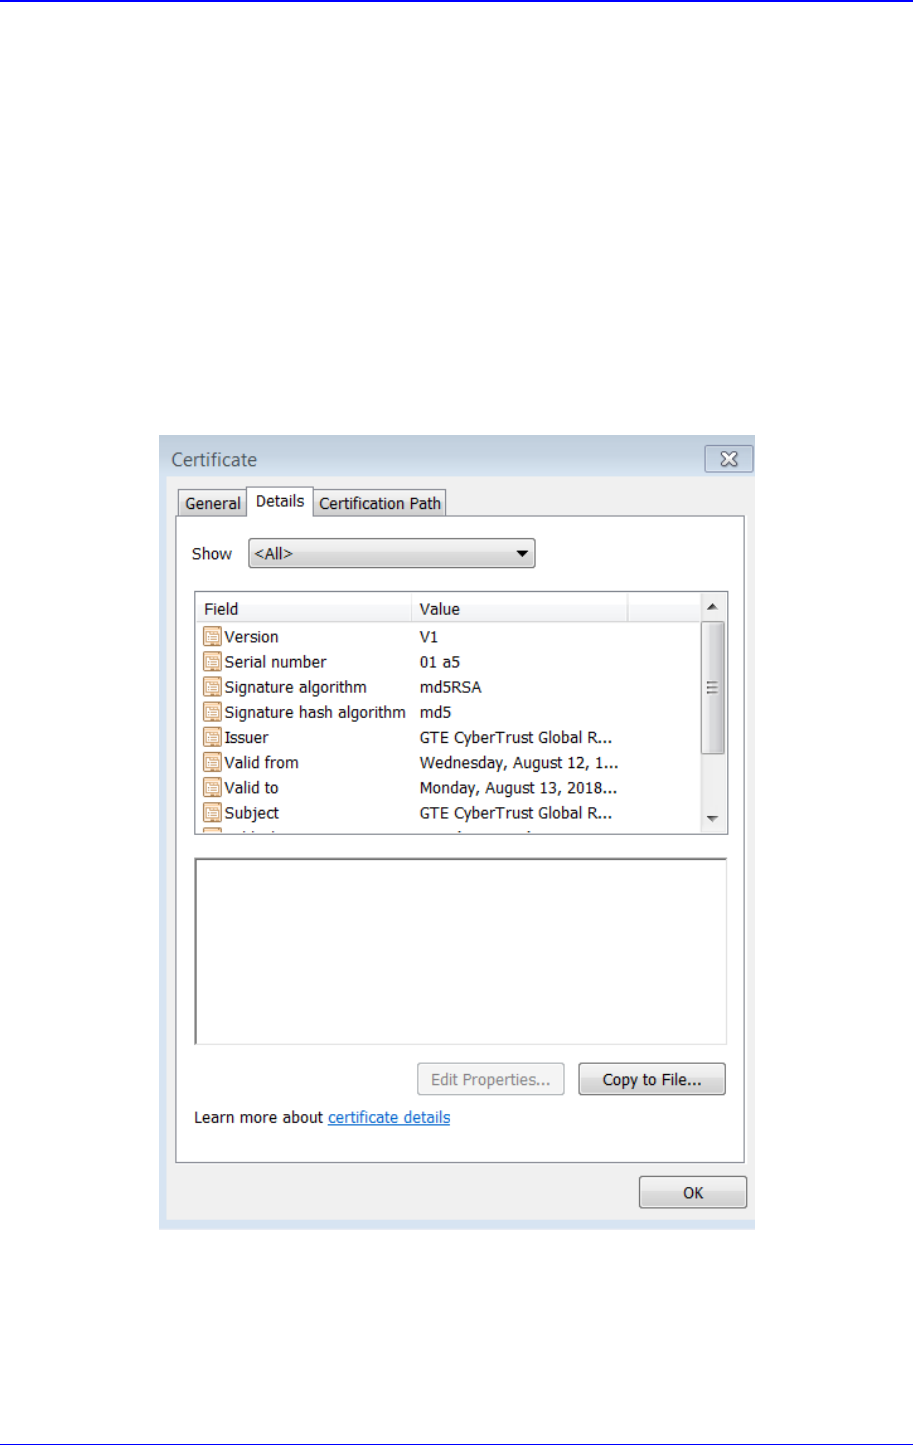
To convert an incompatible certificate to Base64 encoded DER (PEM):
1. Make a copy of the original certificate file that you received from the CA in a working
directory.
2. Double-click the copied certificate or open the file with the Windows Certificate
application.
3. Select the Details tab and click the Copy to File button.
Figure 3-34: Copy to File
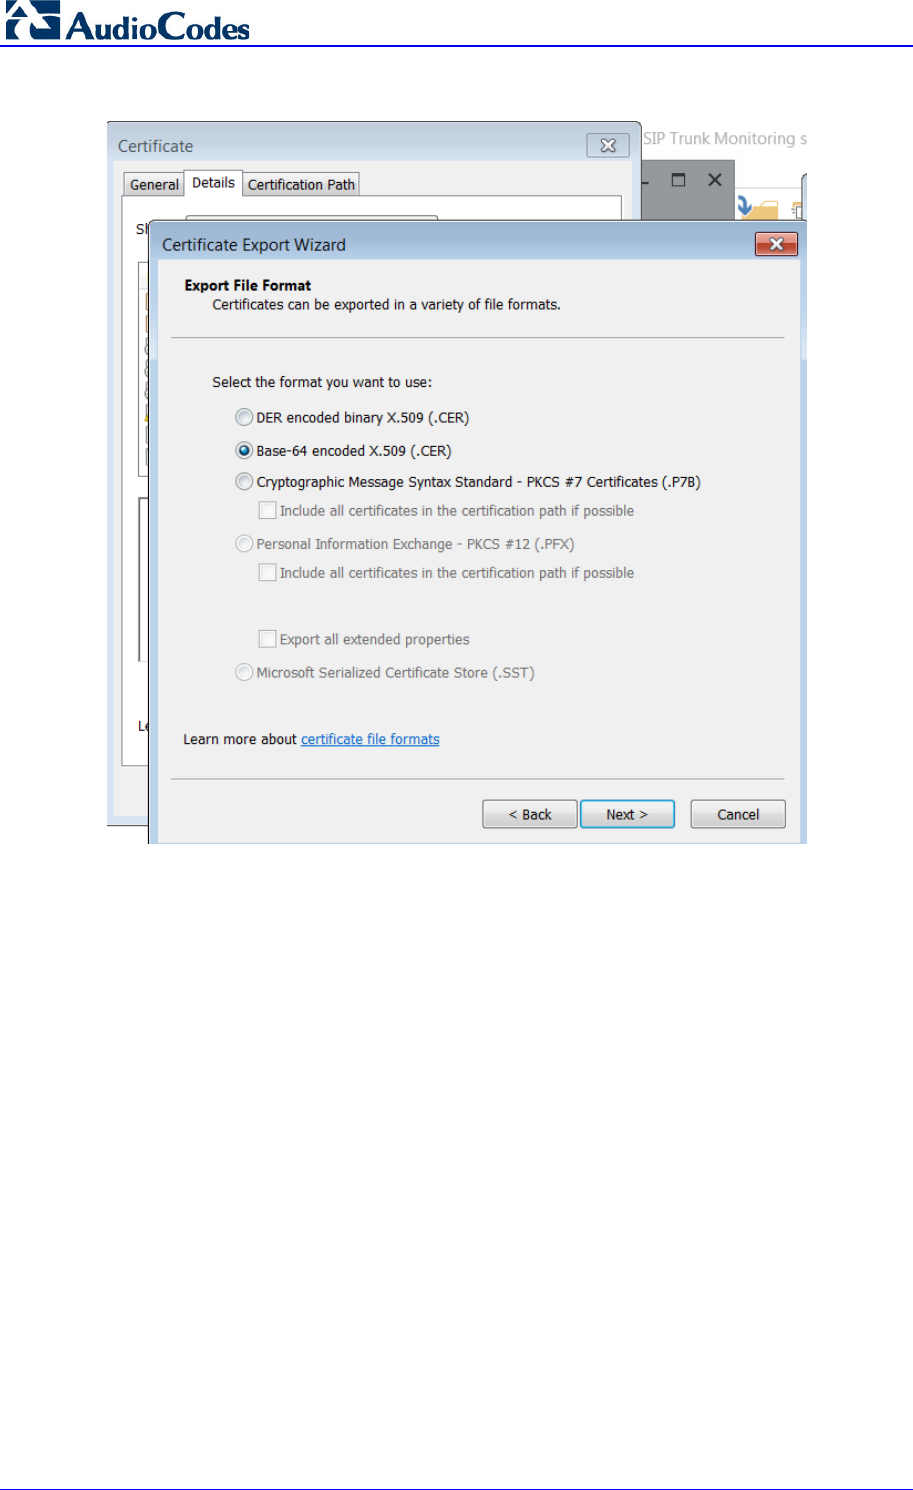
4. Use the export wizard to export the file into the Base-64 encoded X.509 format. Use a
new name or extension, for example if the certificate has a CER extension it can be
saved in the PEM format.
Configuration Note 3. Configure AudioCodes SBC
Microsoft Office 365 Exchange UM with IP PBXs 53 AudioCodes Mediant SBC
3.10.4 Intermediate and Trusted Root Certificates
In addition to the CA providing the requested device certificate, it also provides the
certificates in its root chain. In some cases, these intermediate and root certificates may be
referenced and downloaded in a separate part of the CA web site. The exact number and
details of these files varies according to the CA.
In addition, the TLS Context Trusted Root Certificate store on the AudioCodes device must
be populated with additional publically available MS Office 365 required certificates. If any
of the CA Intermediate or Trusted Root Certificates are missing, the TLS connection will
quickly be failed by Office 365 with an immediate socket closed log and Proxy Set failure
on the AudioCodes device. The mandatory certificates required by Office 365 are as
following:
GTE CyberTrust Root CA (www.digicert.com/digicert-root-certificates.htm)
Baltimore CyberTrust root CA (www.digicert.com/digicert-root-certificates.htm)
As described in Section 3.10.3 above, binary or non-PEM format certificates will need to be
exported to Base-64 encoded (PEM).
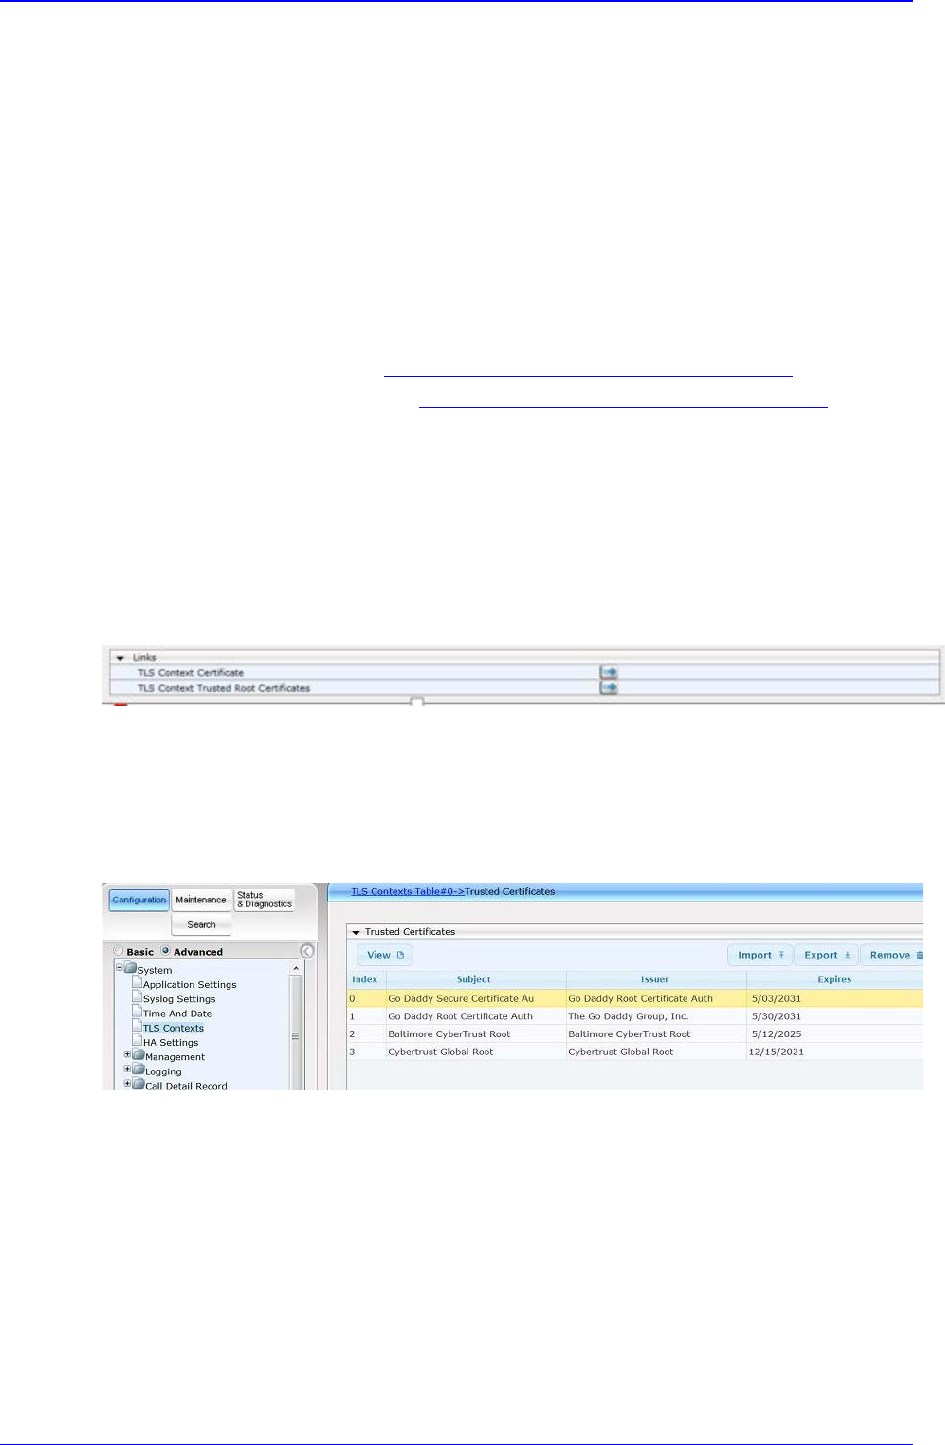
To load the Intermediate and Trusted Root certificates:
1. Open the TLS Contexts table (Configuration tab > System menu > TLS Contexts).
2. Select the default TLS Context (index 0), and then click the TLS Context Trusted
Root Certificates button, located below the table.
Figure 3-36: TLS Context Certificate
3. Select the Import button, browse on your desktop and Add each file into the table of
Trusted Certificates.
As stated above, the exact number and details of these files varies according to the CA. In
the example below, the two mandatory CA entries are shown (GTE CyberTrust Root CA
and Baltimore CyberTrust) as well as two other entries.
Figure 3-37: Trusted Certificates Table-Example
Microsoft Office 365 Exchange UM with IP PBX
AudioCodes Mediant SBC 54 Document #: LTRT-40524
3.11 Reset the SBC
After completing configuration of the SBC as shown in this section, save ("burn") the
configuration to the SBC's flash memory with a reset for the settings to take effect.
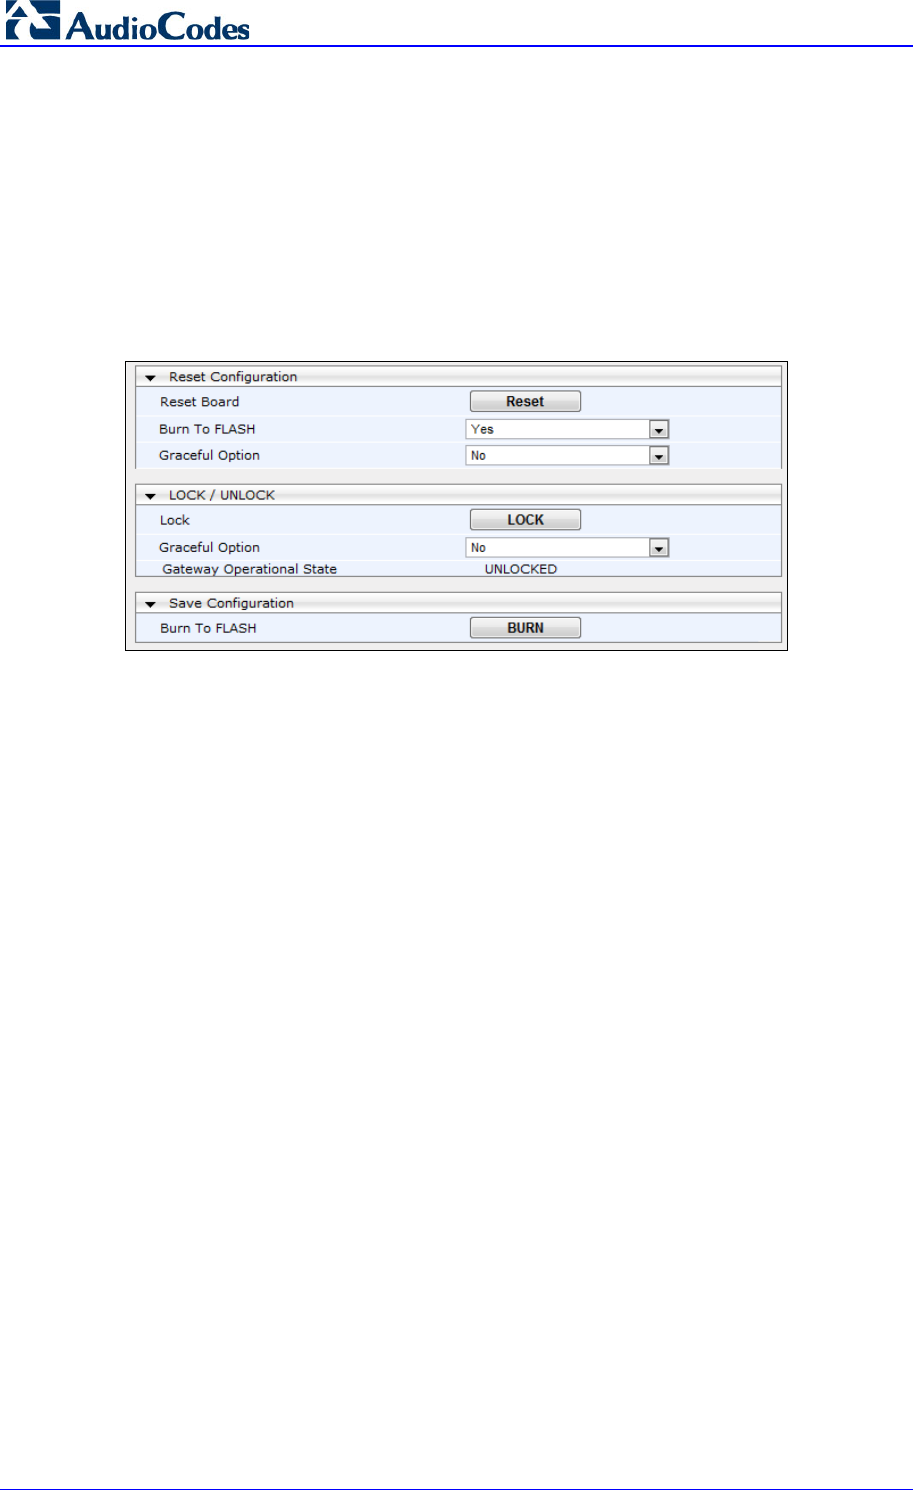
To save the configuration to flash memory:
1. Open the Maintenance Actions page (Maintenance tab > Maintenance menu >
Maintenance Actions).
Figure 3-38: Resetting the SBC
2. Ensure that the 'Burn to FLASH' field is set to Yes (default).
3. Click the Reset button.

Configuration Note 3. Configure AudioCodes SBC
Microsoft Office 365 Exchange UM with IP PBXs 55 AudioCodes Mediant SBC
This page is intentionally left blank.