
Secure Transfers
Contents
SSL-Based Services: HTTPS and FTPS 2
Generating A Certificate 2
Creating A Self-Signed Certificate 3
Obtaining A Signed Certificate 4
Enabling Secure Services 5
SSL/TLS Security Level 5
A Note About Ports 6
Connecting Via Web Browser 7
Connecting Via FTP Client 8
Additional Web (HTTP) Options 8
SFTP 9
Public/Private Key Authentication Over SFTP 9
© Maxum Development Corp.
! Secure Transfers
SSL-Based Services: HTTPS and FTPS
Rumpus supports SSL (Secure Sockets Layer) encryption for both Web and FTP file transfers. Virtually all
modern Web browsers support HTTPS (secure HTTP), and many standard FTP clients support FTPS
(secure FTP). In both cases, all critical information is encrypted, including file data, usernames and
passwords, directory listing contents, and file management activity.
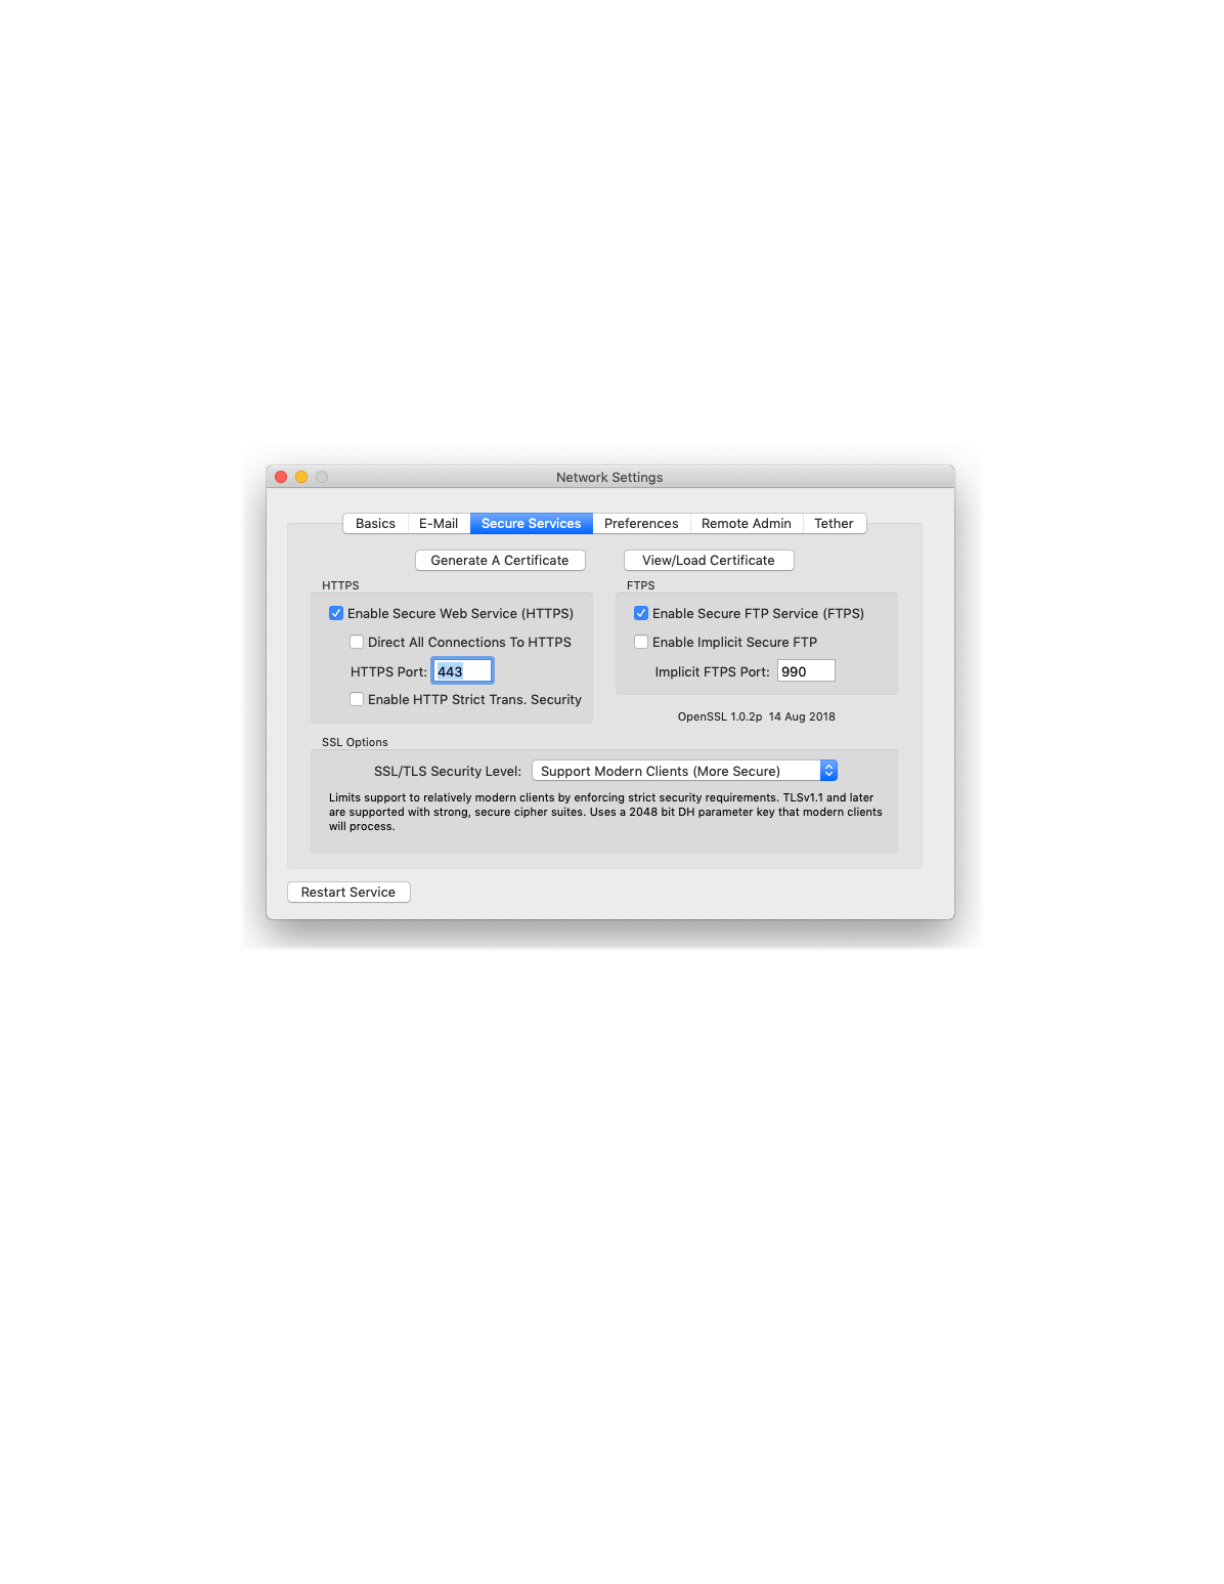
To configure secure services in Rumpus, open the “Network Settings” window and flip to the “Secure
Services” tab.
Configuring secure services
Generating A Certificate
SSL encryption is based on “public key/private key” cryptography. Your server will need 2 “keys”, one
public and one private, which will be used to encrypt data. When clients connect, they will download the
public key and use it to encode data being uploaded to your server (or decode downloaded data). Only
the matching private key can be used to decode the data (or encode data sent by the server).
All of this work is performed automatically by software running on the client computer, so no extra effort
will be required on the part of your external users. However, as the server administrator, you are
responsible for generating a “certificate” which includes the public key and other data about your
organization, and a matching private key. The process of installing a certificate and private key is very
particular and can be frustrating, but Rumpus includes tools to make the job easier.
Maxum Development Corp.! "2

! Secure Transfers
To create a certificate and private key, click the “Generate A Certificate” button.
The certificate generation sheet
Creating A Self-Signed Certificate
The easiest way to install a certificate is to generate your own “self-signed” certificate. Because you will
be creating this type of certificate yourself, with no 3rd party vouching for your server’s authenticity, a
self-signed certificate will not automatically be trusted by Web browsers and FTP clients. Using a self-
signed certificate still provides strong data encryption and a high level of security, but clients will usually
display a warning when they connect, informing the user that no recognized authority has verified the
server’s authenticity.
In most cases, when first setting up a server or new secure services, installing a self-signed certificate is a
good way to get started.
To create and install the certificate, choose the “Generate A Self-Signed (Untrusted) Certificate” option,
and complete the remaining fields describing your organization. Once the simple form is complete, click
“Generate Certificate” and Rumpus will create and install the certificate and private key. The certificate
will include the public key which matches the private key generated at the same time.
Maxum Development Corp.! "3

! Secure Transfers
Obtaining A Signed Certificate
To allow Web browsers and FTP clients to automatically accept your certificate, the certificate must be
purchased from a recognized authority. There are many authorities, including Thawte, GoDaddy,
QualitySSL, VeriSign, and others. Google “SSL certificate” for additional information and numerous
provider options.
When you purchase a certificate, the provider will ask you for a “CSR”, or “Certificate Signing Request”.
To generate the CSR, click the “Generate Certificate” button, select the “Generate A CSR For Purchase Of
A Trusted Certificate” option, and complete the form. Rumpus will generate a private key and a
matching CSR, then display the CSR. You can copy and paste the CSR from the text area on the display,
or you can click the “Save CSR To Text File” to save it for uploading. Use whichever method is easiest
based on how the CSR will be sent to your chosen authority.
Important! Signing authorities do not provide you with a private key. What you get
back from the authority will be an SSL certificate, which will need to
match the private key generated along with the CSR. Do not use the
“Generate Certificate” function after generating your CSR. If you do, a
new private key will be created and installed, and it will not match the
certificate sent by the authority.
After completing the application and sending the CSR, you will receive a certificate from the authority.
Click the “View/Load Certificate” button and then click “Load Certificate”. Select the certificate file sent
to your organization by the authority. The authority may also provide an “intermediate” (also known as
“chaining”) certificate. Rumpus will allow you to select it, as well.
Alternatively, you can copy and paste the certificate directly into the Certificate text area. Be sure to paste
in the entire certificate, including the “--- Begin ---” and “--- End ---” lines. If your authority provided you
with an intermediate certificate, paste it into the Certificate text area, too, immediately following your
own. In this case, the “--- Begin ---” line of the intermediate chain certificate will immediately follow the
“--- End ---” line of your own.
The authority should never send you a private key (it is, after all, private). The private key is generated
by Rumpus and should never leave the server. It should be kept safe and secret. Do not load any
information sent to you by the authority as the Certificate Key.
Maxum Development Corp.! "4

! Secure Transfers
Enabling Secure Services
Once a certificate and key have been installed (by either method), enabling secure services is as easy as
checking a couple of checkboxes.
To enable secure Web connections, turn on the “Enable Secure Web Service” option. Then, if you need to
force all Web connections to the secure channel, turn on the “Direct All Web Connections To HTTPS”
option.
There are 2 methods of establishing secure FTP service, and both are supported by Rumpus. The first
method is called simply “FTPS”, or sometimes “FTP with TLS/SSL”. FTPS sessions are carried out over
the usual FTP port (by default, 21). In this case, clients essentially connect using standard FTP, and then
“upgrade” to a secure connection as soon as the session begins. This is the more modern, and preferred
mechanism for providing secure FTP service.
The second option is referred to as “Implicit FTPS”. Implicit FTPS connections use an alternate port (990,
by default) which is distinct from standard FTP. While this method is less common and no longer
recommended, it is provided for backward compatibility with older clients. For newly deployed FTPS
servers, consider leaving “Implicit Secure FTP” off and recommending to clients that they use the more
common form of FTPS.
SSL/TLS Security Level
The SSL/TLS protocol that implements secure connections between two computers has continually
evolved since first introduced decades ago. Specifically, various problems with the protocol have been
corrected, key strength has improved, etc. So, to provide the optimum level of security, the most up-to-
date SSL capabilities should be used.
However, clients (Web browsers, primarily) that were released before recent improvements in SSL/TLS
lack these more advanced features. Allowing these older clients to connect constitutes a security threat,
because by allowing old clients to connect and use weaker and potentially buggy security protocols, those
sessions are potentially vulnerable.
So there is a basic choice you need to make as the server administrator, between supporting older clients
and enforcing more modern security protocols. In Rumpus, you make this choice using the "SSL/TLS
Security Level" option on the Network Settings window, Secure Services tab.
Maxum Development Corp.! "5

! Secure Transfers
Keep in mind that even older SSL protocols are far more secure than plain text connections, so if you need
to support a wide variety of clients (Windows XP users, for example), setting the security level to
"Support Ancient Clients (Least Secure)" should not necessarily be considered "insecure". Highly
sophisticated attacks against your server may be possible in this case, but if the content of your server
doesn't warrant extremely high security, this may be a perfectly acceptable trade-off that allows virtually
anyone, even those using very old computers, to access the server with security that is much better than
plain HTTP.
On the other hand, if the content on your server is sensitive, or you are at a high risk of being hacked,
choosing "Require Up To Date Clients (Most Secure)" is probably the right choice. In this case, Rumpus
restricts clients to only the most secure cipher suites, stronger keys, etc. which ensures the greatest level of
security between the client and server, but requires that clients also be running software capable of these
advanced algorithms.
In between these extremes fall two other choices. "Support Older Clients" eliminates many of the most
likely possible SSL exploits and implements reasonably strong keys, while allowing the large majority of
clients in use today to connect to the server securely. "Support Modern Clients" provides excellent
security by requiring strong, modern cipher suites and very strong key lengths, while still supporting
access by a wide range of modern devices.
A Note About Ports
By default, HTTP service is provided on port 80, FTP on port 21, HTTPS on port 443 and Implicit FTPS
on port 990. (Standard FTPS, as an extension to non-secure FTP, uses 21.) It is important to note,
however, that these are merely defaults. There is nothing special about port 80, 21, 443 or 990. In
particular, ports 443 and 990 are not intrinsically secure. For example, secure HTTP service is not created
merely by running a Web service on port on port 443.
Do not set the “HTTP Port Number” (on the “Options” tab of the Web Settings window) to 443 or set the
“HTTPS Port” to 80. The HTTP and HTTPS servers are separate, and if they are assigned the same port
number, a conflict will arise. Similarly, make sure that the “Implicit FTPS Port” does not conflict with the
standard FTP port specified on the FTP Settings window.
Of course, there are a number of reasons for running any of these services on non-standard ports, and
changing ports is fully supported in Rumpus. However, it’s important to note that port selection does not
determine whether or not data is encrypted or secured. When possible, use the default port for each
offered service (HTTP, HTTPS, FTP and Implicit FTPS), and be sure that each service is assigned a unique
port number to avoid conflicts.
Maxum Development Corp.! "6
! Secure Transfers
Connecting Via Web Browser
Even if your users primarily access your Rumpus server via FTP, we recommend that you first test your
SSL encrypted server using a Web browser. Browsers almost universally support HTTPS (HTTP
encrypted using SSL), and do so in a standard way that is simpler than FTP. Once you have confirmed
that the SSL is functioning correctly via Web browser, you can then move on to connecting with a
compatible FTP client.
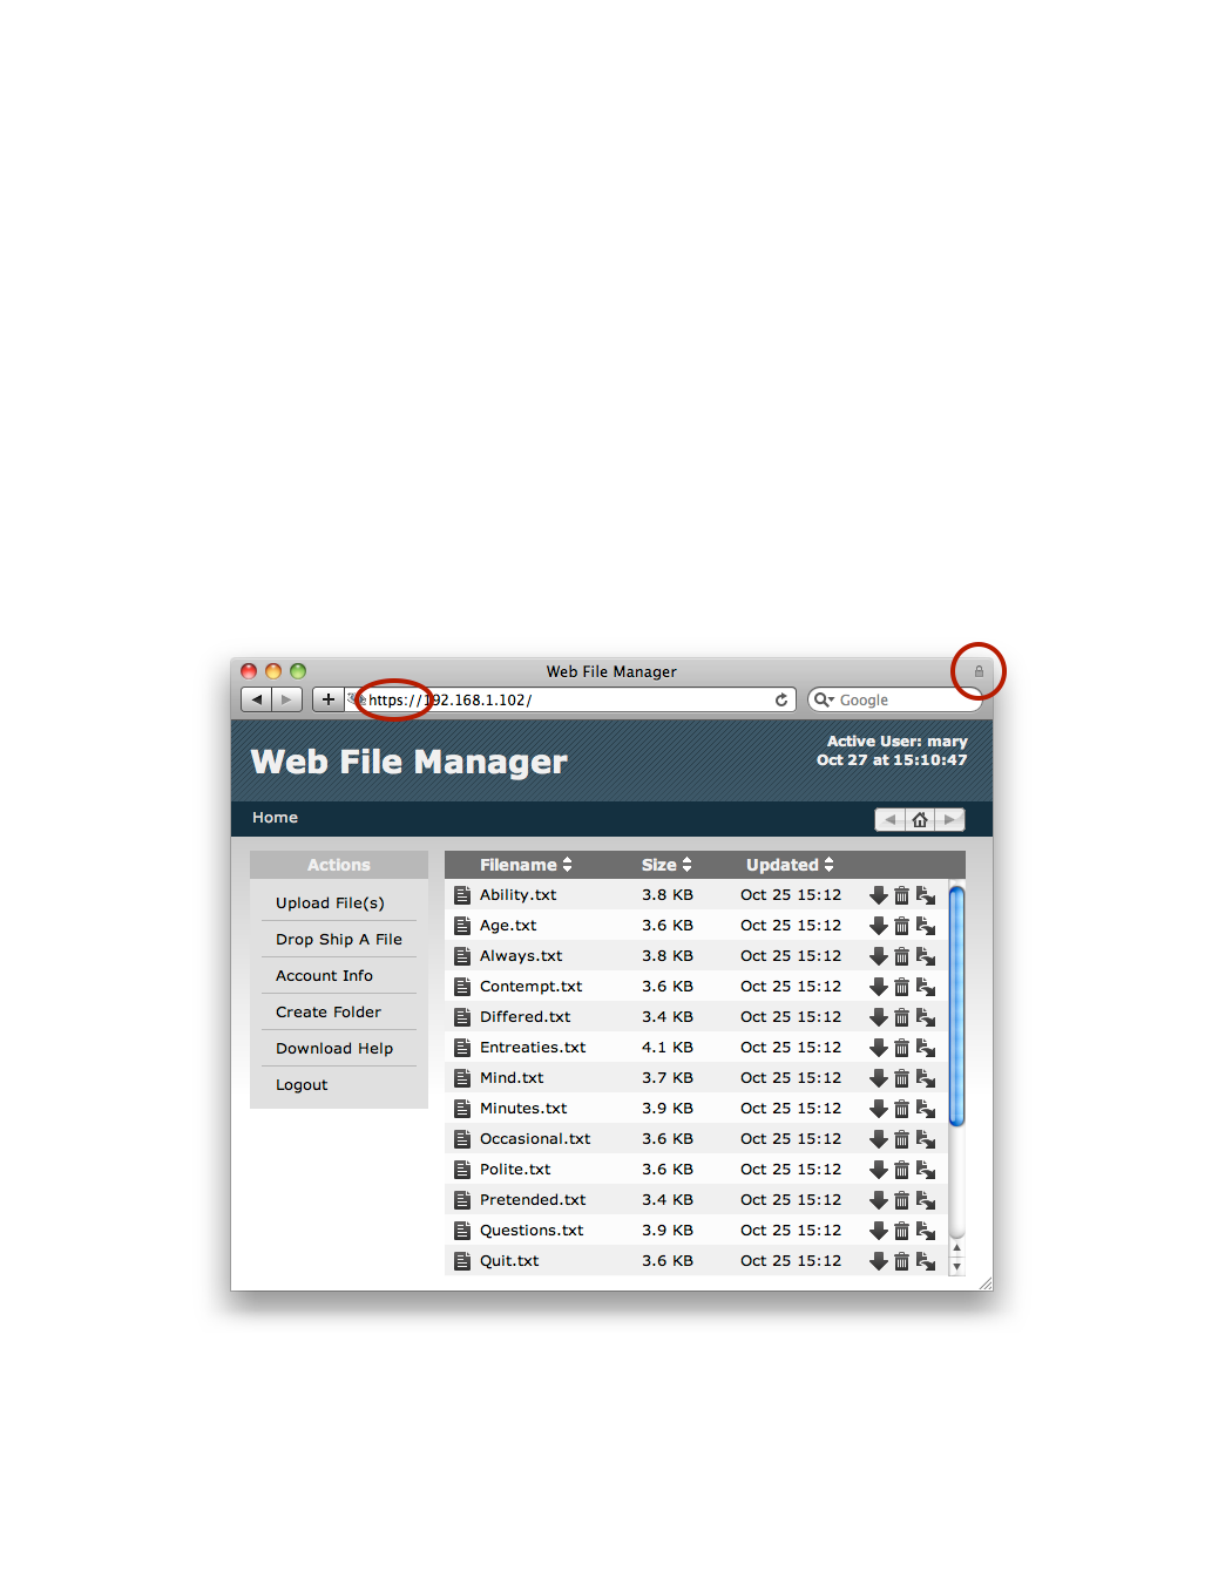
On another computer on your network, open a Web browser and enter the connection URL as:
https://your.server.address/
Note the “s” in “https://”, which tells the browser to make the connection via the SSL encrypted
channel. Most Web browsers will display a lock icon somewhere on the display to indicate that the
connection is secure. The WFM session will continue normally, the lock icon being the primary visible
evidence that data is now being transferred securely.
Client connections via “https” will be secured
Maxum Development Corp.! "7

! Secure Transfers
Connecting Via FTP Client
While many FTP clients support FTPS, not all do, so the first step in establishing a secure FTPS connection
is to confirm that you are using an FTPS-compatible client. On the Mac, both Fetch and Transmit, as well
as several other popular clients, support FTPS.
In most cases, the option to connect securely is provided on the connection window, along with the server
name, username and password. The option may be labelled “Connect using”, and will usually be called
either “FTPS” or “FTP with TLS/SSL”. An option called “FTP with Implicit SSL” may also be offered,
and may be used if Implicit FTP has been enabled in Rumpus.
Additional Web (HTTP) Options
When you enable HTTPS, there are two additional options that improve security on servers that accept
and store sensitive data.
Direct All Connections To HTTPS!
When this option is enabled, users who connect via HTTP (non-secured Web session) will be
automatically redirected to HTTPS. In other words, all users will automatically be connected securely,
even if the user accesses the server by it's non-secure URL. Unlike FTP, where "redirection" isn't possible,
Web users who connect on an unencrypted channel will be gracefully guided to a secure session. Most
users, in fact, may not even realize the change has been made. The only down-side to this is that some
clients may be able to connect via HTTP but not HTTPS, due to firewall restrictions, for example. This not
very common on modern networks, though, since so many Web sites only allow HTTPS sessions.
Note: Do note enable this option until HTTPS access has been set up, tested, and is known to be working
as expected. If HTTPS is not working perfectly, enabling this option will essentially prevent any user from
accessing the system, since all users will be redirected to the non-functioning HTTPS service.
Enable HTTP Strict Transport Security!
If your server has HTTPS enabled, and requires all users to connect securely (which means that you have
most likely enabled "Redirect All Connections To HTTPS"), you may also choose to enable Strict Transport
Security. The feature prevents several classes of potential attacks for users on public networks by alerting
the browser to the fact that all connections to the server must be performed securely.!
Maxum Development Corp.! "8

! Secure Transfers
SFTP
It is important to understand the difference between FTPS, which is SSL-encrypted FTP, and SFTP, which
is the file transfer module that is part of the SSH protocol. Rumpus supports both FTPS and SFTP, but the
two protocols are entirely different, which is an important point when clients attempt to connect since
many clients support both. FTPS is built on top of SSL, and is described in the sections above.
Despite the fact that SFTP is a technically very different from FTP, it is configured in Rumpus on the FTP
Settings window, SFTP tab.
Like SSL, SSH requires the use of a private/public key pair. Keys are typically associated with a user
account defined on the server, but since Rumpus provides service for any number of users, it requires it’s
own “host key” and then requires each user to authenticate by specifying their name and password. To
generate a host key for Rumpus, just click the “Generate Key Files” button, which causes both RSA and
DSA keys to be stored in the Rumpus configuration folder (“/usr/local/Rumpus/”).
With keys generated, click “Enable SFTP Service” to turn on the SFTP engine in Rumpus. The port used
for SFTP (by default, 22) and the number of SFTP users allowed to access the server at any one time, are
also configurable.
All regular Rumpus privileges and other functions are applied as you would expect. SFTP users will
have access only to their own Home Folder, their user account privileges will be enforced (including
assigned Folder Sets), uploaded files will trigger Event Notices, etc. In short, enabling SFTP simply
provides an alternative to regular FTP, offering greater security, but in all other ways behaving in exactly
the same manner.
Public/Private Key Authentication Over SFTP
"Authentication" is essentially any mechanism that securely identifies a client. We most often think of
authentication as being performed via username and password. For example, when you run a Rumpus
server, whether the client connects via Web, FTP, WebDAV, or any other protocol, a username and
password is required to log in. The username and password serves to securely and uniquely identify the
person accessing the server, authenticating them and granting the privileges associated with that user
account.
SFTP supports another method: Public/Private Key Authentication. In this case, clients can connect
without a username and password, as long as the client possesses a carefully guarded key file that is used
in place of the username and password. It can be handy, especially for automated clients or clients who
will be frequently accessing the server, as it improves security and simplifies the login process.
Maxum Development Corp.! "9

! Secure Transfers
Public/Private key authentication requires 2 key files: a public key which will be stored on the server and
a private key which will be kept on the client. It is crucial that the private key be carefully guarded and
kept only on the client computer that is authorized to access the Rumpus server. Like a stolen username
and password, if a private key is obtained by a non-authorized person, it can be used to access the
Rumpus server with authorization rights associated with that key.
Setup Details
First, on the server, create a user account for the client that will authenticate using the public/private
key pair. While a username and password won't be necessary, an account is required so that you can
define access permissions, the Home Folder for the client, Event Notices to be triggered, etc. For
example, you might create a user account in Rumpus named "AcmeWidgets", with a long random
password (so that the account isn't accidentally used via username/password authentication) and all
other account settings specified for the client's access.
The private key/public key pair will be generated on the client, so that the client can keep the private
key private. There are a variety of tools for generating SSH keys. Which is best depends on the
platform and experience of the client. On a Mac/Unix system, an SSH pair can be generated in the
Terminal with the command:
ssh-keygen -t rsa
Maxum Development Corp.! "10
Quick Setup Steps
When a client sends you a public key and asks that you install it so they can access the
server, follow these steps:
1. Create a user account on the Define Users window, with the Home Folder,
privileges, and other user settings set to properly control the client's access. Use the
password generator to assign a long random string, preventing the account from
being used via standard name/password login.
2. Open the Rumpus config folder (choose "Open Config Folder" from the "File" menu
in Rumpus) then move into the "sshkeys" folder.
3. Copy the public key into that folder and name it the same as the user account you
defined in Rumpus, with ".pub" appended to the name (as in "AcmeWidgets.pub").
4. Click "Stop Server" and "Start Server" to ensure that the Rumpus service loads the
new key.
These steps are described in more detail, including generating a private/public key pair
yourself, below.

! Secure Transfers
You will next be prompted for a filename. Have the client supply a filename that matches the user
account name in Rumpus. In the example above, the filename would be "AcmeWidgets". Next, you'll
be prompted for a passphrase, which for these purposes should be left blank.
The result will be 2 files, in this case, "AcmeWidgets" and "AcmeWidgets.pub". "AcmeWidgets", the
private key file, should be kept secure on the client computer. Have the client send
"AcmeWidgets.pub" to you, the Rumpus server administrator. Note that while it is a "public" key, it
should be maintained with a reasonable level of care as well. It is conceivable that if the public key
were to be installed on some other server, and the client was tricked into connecting to that other
server, the client could unknowingly transfer sensitive data to that server. This scenario is generally
not likely, but it is best to ensure that the public key is sent only to the Rumpus administrator, for use
only on the server to which the client plans to connect.
When you, as the Rumpus administrator, receive the key, put it on the server. In Rumpus, choose
"Open Config Folder" from the "File" menu and move down into the "sshkeys" folder. Put the public
key file in that folder. Note that the filename must match exactly the user account name in Rumpus,
and must end in ".pub". So, in the "Acme Widgets" example, the public key file must be placed in the
"sshkeys" folder in the Rumpus config folder, and must be named exactly "AcmeWidgets.pub".
Rumpus supports up to 32 loaded public keys. After installing a public key, click "Stop Server" and
"Start Server" to force Rumpus to identify and load the new key before having the client connect.
Connecting
The client can now connect using their private key to authenticate. For example, on Mac/Unix
systems in the Terminal, and SFTP session can be initiated using:
SFTP -i AcmeWidgets 192.168.1.123
In this example, "AcmeWidgets" represents the name of the private key file and "192.168.1.123"
represents the server name or IP address to which the connection should be made.
Note: The public and private key represent two pieces that make a whole, and should be kept
separate. On the client, do not keep the public and private key together in the same place. This is
more than just good security practice, as the SFTP utility will not correctly connect to the server when
the public key and private key are kept in the same folder.
As always, if you have problems or questions, please contact Maxum Technical Support at
Maxum Development Corp.! "11
