On-Premise Installation Guide for MobileIron Core and Enterprise Connector 11.1.0.0| 2
Copyright © 2009 - 2021 MobileIron, Inc. All Rights Reserved.
Any reproduction or redistribution of part or all of these materials is strictly prohibited. Information in this publication
is subject to change without notice. MobileIron, Inc. does not warrant the use of this publication. For some phone
images, a third-party database and image library, Copyright © 2007-2009 Aeleeta's Art and Design Studio, is used.
This database and image library cannot be distributed separate from the MobileIron product.
“MobileIron,” the MobileIron logos and other trade names, trademarks or service marks of MobileIron, Inc.
appearing in this documentation are the property of MobileIron, Inc. This documentation contains additional trade
names, trademarks and service marks of others, which are the property of their respective owners. We do not
intend our use or display of other companies’ trade names, trademarks or service marks to imply a relationship
with, or endorsement or sponsorship of us by, these other companies.

On-Premise Installation Guide for MobileIron Core and Enterprise Connector 11.1.0.0| 3
Contents
Contents 3
Pre-deployment tasks 7
New customer resources 7
New customer checklists 7
Customer contact details 8
Technical/network environment 9
Email infrastructure environment 10
Employees and devices 10
MobileIron product functionality 11
MobileIron application and control 11
Deployment components 12
Change firewall rules 12
Windows device support requirements 12
Create DNS A record 12
Obtain a TLS/SSL SAN certificate 13
Connecting to the Windows store 13
AppConfig Community Repository outbound firewall port setting 13
Internal corporate network rules 14
External and Internet rules 17
Additional firewall rules 20
Enroll in the Apple certificate and iDEP programs 23
Develop and distribute in-house apps 23
Requesting an MDM certificate 23
Uploading an MDM certificate 24
Purchase third-party trusted certificates 25
Preparing for Android Enterprise device support 25

On-Premise Installation Guide for MobileIron Core and Enterprise Connector 11.1.0.0| 4
Preparing for Windows device support 27
Windows device support requirements 27
Setting up autodiscovery 27
Create DNS A record 27
Obtain a TLS/SSL SAN certificate 28
Connecting to the Windows Store 28
Installing MobileIron Core 29
MobileIron Core appliance setup 29
Hardware appliances 29
Maximum number of supported devices 30
Virtual Core requirements 30
Storage devices 33
Guaranteed minimum memory and CPU for Core (VMware, Hyper-V) 34
Minimum specification (VMware, Hyper-V) 34
Gather required MobileIron Core information 34
Installing VMware ISO 36
Installing Hyper-V ISO 37
Install MobileIron Core ISO onto an appliance 39
Preparing a USB flash drive for installation 39
Installing MobileIron Core ISO 40
Signing in to the MobileIron Core System Manager 42
Configuring email integration 42
Email configuration window 43
Changing port settings 43
Setting up local admin users 44
Restricting access to Core components 44
Rolling out MobileIron Core 44
Updating MobileIron software 44
Installing Enterprise Connector 45

On-Premise Installation Guide for MobileIron Core and Enterprise Connector 11.1.0.0| 5
About the Enterprise Connector 45
Installation and configuration tasks 45
Virtual Enterprise Connector requirements 46
Storage devices 46
Enterprise Connector components 46
Gather required Enterprise Connector information 49
Configuring the Enterprise Connector on MobileIron Core 50
Assigning the Connector role 50
Adding Enterprise Connector entries on MobileIron Core 51
Installing the Enterprise Connector ISO package 52
Installing with the Configuration Wizard 54
Configuring Enterprise Connectors 55
Verifying the MobileIron Core connection 56
Understanding global statistics 57
Configuring LDAP servers 58
Manually upgrading Enterprise Connector 59
Local user authentication to Enterprise Connector 60
Enterprise Connector user authentication overview 60
Certificates required for certificate authentication to Enterprise Connector 61
Certificate attribute mapping used in certificate authentication to Enterprise Connector 61
Using $EDIPI$ in certificate authentication to Enterprise Connector 62
Adding local users to Enterprise Connector 63
Add New User window in Enterprise Connector 63
Configuring password authentication to Enterprise Connector 64
Configuring certificate authentication to Enterprise Connector 64
Replacing the certificate for authentication in Enterprise Connector 65
Appliance specifications 67
MobileIron M2600 Series appliance 67
M2600: front panel 68

On-Premise Installation Guide for MobileIron Core and Enterprise Connector 11.1.0.0| 6
M2600: back panel 69
MobileIron M2500 Series appliance 70
MobileIron M2250 Series appliance 70
M2250: front panel 72
M2250: back panel 73
MobileIron M2200 Series appliance 73
M2200: front panel 75
M2200: back panel 76
VMware Tools setup 77
Outbound HTTP proxy set up 78

1
On-Premise Installation Guide for MobileIron Core and Enterprise Connector 11.1.0.0| 7
Pre-deployment tasks
This document provides you with all the information required to install MobileIron Core starting with the pre-
deployment tasks described in this chapter. This chapter includes the following topics:
New customer resources
New customer checklists
Deployment components
Change firewall rules
Internal corporate network rules
External and Internet rules
Additional firewall rules
Enroll in the Apple certificate and iDEP programs
Purchase third-party trusted certificates
Preparing for Android Enterprise device support
Preparing for Windows device support
New customer resources
The following resources for new customers are available online:
l Deployment Toolkit
l Develop Your Project Plan
l How to Get Trained with MobileIron University (MIU)
l How to Open a Support Case
l Software Download Link
New customer checklists
New customer checklist can be used as a guideline for deploying your MobileIron system. New customers receive
the following checklists and are reproduced here for your convenience:
l
Use this form to provide contact information for employees who will be involved in the engagement:
Customer contact details
l
Complete these forms to allow MobileIron and their partners to adequately size and scope your deployment
environment for Core and Sentry:

On-Premise Installation Guide for MobileIron Core and Enterprise Connector 11.1.0.0| 8
o
Technical/network environment
o
Email infrastructure environment
o
Employees and devices
o
MobileIron product functionality
o
MobileIron application and control
Customer contact details
FIGURE 1. CUSTOMER CONTACT DETAILS
Role Contact Information
Primary customer contact
(Project Manager)
Name:
Telephone:
Email:
Location:
Primary technical contact
(MobileIron administrator)
Name:
Telephone:
Email:
Location:
Primary security contact Name:
Telephone:
Email:
Location:
Primary networking/firewall
team contact
Name:
Telephone:
Email:
Location:
Primary application team
contact
Name:
Telephone:
Email:
Location:

On-Premise Installation Guide for MobileIron Core and Enterprise Connector 11.1.0.0| 9
Role Contact Information
Other technical contact(s) Name:
Telephone:
Email:
Location:
Executive sponsor Name:
Telephone:
Email:
Location:
Technical/network environment
FIGURE 2. TECHNICAL/NETWORK ENVIRONMENT DETAILS
Item Question Response
1 Will you be deploying physical hardware or vir-
tual appliances?
2 Is this a fresh install, or a re-use of a POC envir-
onment or system previously installed?
3 What type of load balancing and/or redundancy
requirements do you have for your MobileIron
platform?
4 Do you have any special network requirements
around your DMZ environment with regard to
firmware rules, communication protocols, or
integration restrictions?
5 What is your Active Directory/LDAP
environment?
Is it accessible from the DMZ for user
authentication?
6 Are you using a single, multiple, or federated
domain?
7 Do you have an internal or hosted certificate
infrastructure, and if so, which one (i.e.
Microsoft with SCEP/NDES, Synmantec Web
Services, OpenTrust)?

On-Premise Installation Guide for MobileIron Core and Enterprise Connector 11.1.0.0| 10
Email infrastructure environment
FIGURE 3. EMAIL INFRASTRUCTURE ENVIRONMENT DETAILS
Item Question Response
1 What type of email system do you use (i.e.
Exchange, Office 365, Google Mail)?
2 Is the email infrastructure distributed and/or
have redundancy?
3 How many unique domains do you support that
are in scope for this engagement?
4 Do you plan on using email attachment control?
5 Do you plan on using Kerberos Authentication?
Employees and devices
FIGURE 4. EMPLOYEES AND DEVICES DETAILS
Item Question Response
1
How many total employees do you have?
2 How many total devices are in scope for this cur-
rent engagement?
3 Do you plan to support employee-owned
devices, corporate-owned devices, or both?
4 How many devices do you plan to have under
MobileIron management within 6 months?
5 How many devices do you plan to have under
MobileIron management within 6 months?
6 Estimate the devices in the deployment scope
by OS type and by geographic region (see work-
sheet, below).
Device Type Region Android iOS Windows
Phone
Windows
10
OSX Other
Employee
and
Corporate
Owned
Devices
North
America
Europe
APJ

On-Premise Installation Guide for MobileIron Core and Enterprise Connector 11.1.0.0| 11
MobileIron product functionality
FIGURE 5. MOBILEIRON PRODUCT FUNCTIONALITY DETAILS
Item Question Response
1 What are the top 3 business objectives you
would like to address with MobileIron?
2 What type of device registration and provisioning
do you plan to implement (i.e. BYOD portal, self-
registration, by invitation)?
3 What MobileIron platform products are in the cur-
rent scope for the project deployment (i.e.
Web@Work, Docs@Work, AppConnect,
AppTunnel)?
4 What MobileIron platform products are going to
be used long term (i.e. Web@Work, Doc-
s@Work, AppConnect, AppTunnel)?
5 Do you intend to deploy WiFi or VPN
configurations?
6 Do you intend to use shared devices or kiosk
devices?
MobileIron application and control
FIGURE 6. MOBILEIRON APPLICATION AND CONTROL INFORMATION
Item Question Response
1 Do you intend to deploy and manage apps?
2 Will you be developing internally-developed
apps?
3 Will you deploy an AppConnect-enabled app
(internally developed) or MobileIron Partner
apps?
4 Will you be leveraging Apple's DEP Program?

On-Premise Installation Guide for MobileIron Core and Enterprise Connector 11.1.0.0| 12
Deployment components
Installing the MobileIron solution includes installation of:
l
MobileIron Core
l MobileIron Sentry (optional)
MobileIron Core provides the core functionality of the solution, while MobileIron Sentry provides either
integration with ActiveSync email services or app tunneling services. The Sentry is available in two configurations:
Standalone and Integrated (email services only). The following diagram shows Standalone Sentry. (Refer to the
Standalone Sentry Guide for details about Standalone Sentry.)
For Firewall rules see:
l
Internal corporate network rules
l
External and Internet rules
l
Additional firewall rules
Change firewall rules
This section describes the configuration settings relating to the firewall.
l
Windows device support requirements
l
Connecting to the Windows store
l
AppConfig Community Repository outbound firewall port setting
NOTE: For configuration settings relating to the Deployment components, see Internal Corporate
Network Rules for firewall rules required for the internal corporate network. See External / Internal
rules for which ports to open and also see Additional firewall rules.
Windows device support requirements
Autodiscovery allows Windows devices to seamlessly register with MobileIron. The following set up is required for
using autodiscovery with Windows devices:
l
Create DNS A record to point to MobileIron Core
l
Obtain a TLS/SSL SAN certificate from a trusted Certificate Authority (CA)
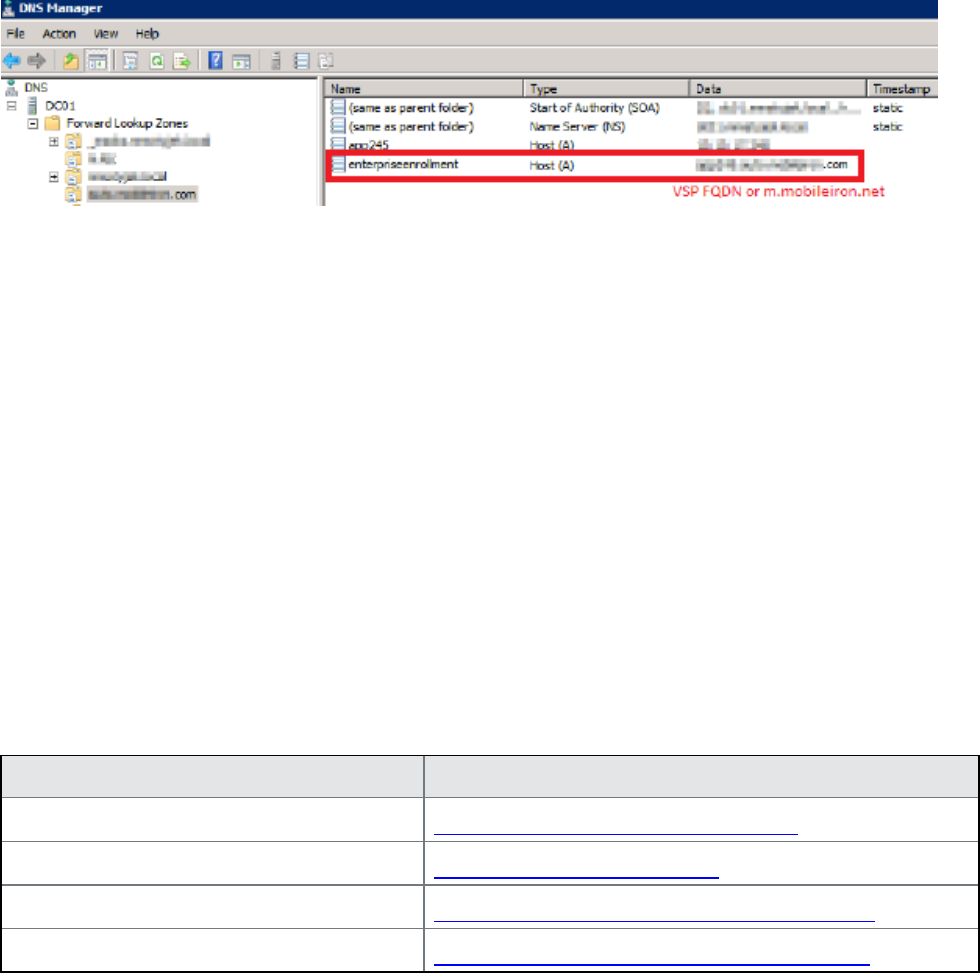
Create DNS A record
Create a DNS A record that refers DNS requests for enterpriseenrollment.YourCompanyDomainName.com to
the MobileIron Core IP address.

On-Premise Installation Guide for MobileIron Core and Enterprise Connector 11.1.0.0| 13
NOTE: YourCompanyDomainName must match the domain of the email addresses used for registering
with MobileIron.
FIGURE 7. ENTERPRISE ENROLLMENT
Obtain a TLS/SSL SAN certificate
For Windows devices, a Subject Alternative Name (SAN) TLS/SSL certificate from a trusted Certificate Authority
(CA), such as Verisign or GoDaddy, is required. If you use a self-signed (localCA) certificate, device enrollment will
fail.
l The TLS/SSL certificate provides trusted and secured connection without certificate warnings.
l A SAN certificate, also known as a multi-domain certificate or a unified communication certificate, is valid
for two or more hosts. The SAN certificate must cover the MobileIron Core hostname and enterprise
enrollment.YourCompany-Domain name.com.
Connecting to the Windows store
You can set up recommended apps that device users can download from the Apps@Work app. For Windows
devices, your firewall must allow connections to the following hosts:
Purpose Host connection
Windows 10 app store search https://storeedgefd.dsx.mp.microsoft.com
Windows 10 VPN for Cisco AnyConnect https://www.windowsphone.com
Windows Phone 8 App store detail URL http://marketplaceedgeservice.windowsphone.com
Windows Phone 8 app store icon URL http://cdn.marketplaceimages.windowsphone.com
TABLE 1. WINDOWS HOST CONNECTIONS YOUR FIREWALL MUST ALLOW
AppConfig Community Repository outbound firewall port setting
Core requires outbound firewall access on TCP port 443 to
https://appconfig.cdn.mobileiron.com/com.example.OneTouchConfiguration/current/appconfig.xml for the
Managed App Configuration UI to render properly.

On-Premise Installation Guide for MobileIron Core and Enterprise Connector 11.1.0.0| 14
Purpose Host connection
Android Help@Work https://webapi.teamviewer.com/api/v1/
Appthority https://api.appthority.com/applications/bulk_query
Azure active directory https://graph.windows.net/%s/devices/deviceId_%s?api-version=1.6
BlueCoat https://mobility.threatpulse.com:9443
Business Store Portal
(BSP)
https://onestore.microsoft.com
Business Store Portal
(BSP)
https://bspmts.mp.microsoft.com/V1
For the Find My Phone
mapping and other
options
https://api.mqcdn.com/sdk/mapquest-js/v1.0.0/mapquest.css
GlobalSign https://system.globalsign.com/cr/ws/GasOrderService
iOS Managed AppConfig
community
https://appconfig.cdn.mobileiron.com
Microsoft Graph https://login.microsoftonline.com/{tenant_id}/oauth2/authorize
Samsung E-FOTA https://eu-api.samsungknox.com
SymantecManagedPKI pki-ws.symauth.com
Windows device
attestation
https://has.spserv.microsoft.com/HealthAttestation/ValidateHealthCertificate/v1
TABLE 2. ADDITIONAL OUTBOUND ACCESS LINKS
Internal corporate network rules
The following table outlines the firewall rules required for internal corporate network access for:
l
MobileIron Core Appliance (physical or virtual) - All ports (except UDP) should be bi-directional to allow
information / data exchange between systems.
l Sentry Appliance (physical or virtual, ActiveSync / AppTunnel) - the Sentry must be able to resolve the
Core hostname (via DNS lookup) or a hostfile entry must be added.
MobileIron Core Appliance and the Sentry Appliance items communicate with each other.

On-Premise Installation Guide for MobileIron Core and Enterprise Connector 11.1.0.0| 15
Requirement Description Port
Traffic from Internal Corporate Network to MobileIron Core
MobileIron Core is in the DMZ
MobileIron administrator access
(System Manager)
Open HTTPS 8443 from the corporate
network to the MobileIron Core appliance
HTTPS 8443
MobileIron administrator access Open HTTPS 443 and SSH 22 from the
corporate network to the MobileIron Core
appliance
HTTPS 443, SSH 22
MobileIron Enterprise Connector
(Optional LDAP Proxy)
Open HTTPS 443 from Enterprise Con-
nector to MobileIron Core
HTTPS 443
MobileIron Reporting Database
(Optional)
Ensure that HTTPS 7443 from the
MobileIron Reporting Database to
MobileIron Core is open. It is open by
default.
HTTPS 7443
Self-service user portal Open HTTPS 443 from the corporate net-
work to the MobileIron Core appliance
HTTPS 443
Traffic from MobileIron Core to Internal Corporate Network
MobileIron Core is in the DMZ
LDAP / Active Directory LDAP User Lookup and Authentication TCP 636 (secure) -or-
TCP 389
SMTP Relay for SMS and Email Noti-
fications
Open TCP 25 (if not in DMZ) and define
the SMTP relay server
TCP 25
DNS Lookup Open
Open UDP 53 (if not in DMZ) and define
DNS server(s)
NOTE: TCP is needed in case of
large DNS Queries
UDP 53
NTP Time Synchronization Service Open UDP 123 (if not in DMZ) and define
NTP server(s)
UDP 123
Certificate / SCEP Server SCEP Proxy Configuration HTTP 443
MobileIron Core access to MobileIron
Sentry
Open HTTPS 9090 (primary access) and
HTTPS 443 (view of Sentry certificate)
to the MobileIron Sentry appliance
HTTPS 9090 and
HTTPS 443
MobileIron Sentry access to MobileIron Open HTTPS 8443 to the MobileIron HTTPS 8443
TABLE 3. INTERNAL CORPORATE NETWORK RULES

On-Premise Installation Guide for MobileIron Core and Enterprise Connector 11.1.0.0| 16
Requirement Description Port
Core Core appliance (HTTPS 8443 is the
default, but HTTPS 443 is also sup-
ported.)
Traffic from Internal Corporate Network to MobileIron Standalone Sentry
Standalone Sentry is in the DMZ
MobileIron administrator access Open HTTPS 8443 from the corporate
network to Sentry (System Manager
access)
HTTPS 8443
MobileIron administrator access Open SSH 22 from the corporate net-
work to Sentry
SSH 22
Traffic from MobileIron Standalone Sentry to Internal Corporate Network
Standalone Sentry is in the DMZ
CIFS-based Content Server Open TCP 445 if using Docs@Work
with CIFS-based content servers
TCP 445
Certificate / SCEP Server SCEP Server/CA Access (for CRL veri-
fication only)
HTTP 80 or HTTPS 443
App Server for AppTunnel Open HTTP 80 or HTTPS 443 to the app/-
content server if configuring this Sentry
for AppTunnel
HTTP 80 or HTTPS 443
(typically)
Exchange ActiveSync Open HTTP 80 or HTTPS 443 to the Act-
iveSync server if configuring this Sentry
for email service
HTTP 80 or HTTPS 443
DNS Lookup Open UDP 53 (if not in DMZ) and define
DNS server(s)
UDP 53
NTP Time Synchronization Open UDP 123 (if not in DMZ) and define
NTP server(s)
UDP 123
LDAP / Active Directory Open TCP/UDP 389 Kerberos LDAP
ping (optional for Kerberos-constrained
delegation)
TCP/UDP 389
SMTP Relay for Sentry Console Email
Notifications
Open TCP 25 (if not in DMZ) and define
SMTP relay server
TCP 25
Kerberos Server Open TCP 88 (for Kerberos-constrained
delegation)
TCP 88
TABLE 3. INTERNAL CORPORATE NETWORK RULES (CONT.)

On-Premise Installation Guide for MobileIron Core and Enterprise Connector 11.1.0.0| 17
Related topics
l For firewall rules required for Internal rules/outside rules, see External and Internet Rules.
l For additional firewall rules, see Additional Firewall Rules.
External and Internet rules
The following table outlines the firewall rules required for external and internet access for:
l
MobileIron Core Appliance (physical or virtual)
NOTE: All ports (except UDP) should be 'bi-directional' to allow information / data exchange
between systems.
l
Sentry Appliance (physical or virtual, ActiveSync / AppTunnel)
NOTE: The Sentry must be able to resolve the Core hostname (via DNS lookup) or a hostfile entry
must be added.
l MobileIron Access
MobileIron Core Appliance and the Sentry Appliance items communicate with each other.
Requirement Description Port
Traffic from Internet/Outside to MobileIron Core
MobileIron Core is in the DMZ
iOS end-user
devices
Open HTTPS 443 for iOS device access to the MobileIron Core to
support MDM. If you are not using iOS MDM, then this port is not
required.
HTTPS 443
End-user devices Open HTTPS 443 or HTTP 8080 from the internet to the MobileIron
Core appliance (for client provisioning traffic)
NOTE: Using HTTPS 443 for provisioning requires signed
certificates. Using HTTP 8080 is recommended only for
evaluations, and not for production systems.
HTTPS 443
HTTP 8080
(evals only)
End-user devices Open TCP 9997 from the internet to the MobileIron Core appliance (for
TLS secured client sync traffic)
TCP 9997
MTD Threat
Management
Console
Open port 8883 inbound from MTD Threat Management Console to
MobileIron Core.
Port 8883
Traffic from MobileIron Core to Internet/Outside
MobileIron Core is in the DMZ
TABLE 4. EXTERNAL AND INTERNET RULES

On-Premise Installation Guide for MobileIron Core and Enterprise Connector 11.1.0.0| 18
Requirement Description Port
MobileIron Access access-na1.mobileiron.com
access-eu1.mobileiron.com
HTTPS 443
Android Enterprise https://accounts.google.com/o/oauth2/token
https://www.googleapis.com/androidenterprise
HTTPS 443
MobileIron Gateway
and Apple APNS
(HTTPS)
l support.mobileiron.com:
For software update repository and upload of Showtech log,
open access to these IP addresses:
o
52.53.85.126
o
54.151.9.59
We also recommend, but do not require that you open these
addresses, as well:
o
54.176.117.219
o
54.176.235.82
o
54.193.230.188
o
54.241.222.178
o
54.241.114.195
o
54.177.110.251
o
50.18.43.125
l
Open HTTPS 443 to:
o
appgw.mobileiron.com,
o
coresms.mobileiron.com,
o
coreapns.mobileiron.com,
o
clm.mobileiron.com,
o
api.push.apple.com,
o
coregcm.mobileiron.com
o
corefcm.mobileiron.com (199.127.90.0/23)
for location/number lookup data, in-app registration,
APNS/FCM/GCM messaging, licensing, and support for
sending SMS.
l a.mobileiron.net for anonymized statistics collection. As the
IP range for CDN sites (for example:
supportcdn.mobileiron.com) may change from time to time,
whitelist the domain name instead of the IP in the firewall if
HTTPS 443
TABLE 4. EXTERNAL AND INTERNET RULES (CONT.)

On-Premise Installation Guide for MobileIron Core and Enterprise Connector 11.1.0.0| 19
Requirement Description Port
there is an option to do so. Otherwise, use
support.mobileiron.com to download the updates instead of
supportcdn.mobileiron.com.
l api.push.apple.com to use APNSv2.
Apple APNS and
MDM Services
Open ports and 2195, 2196, 2197 (TCP) between Core and Apple’s
APNS network (17.0.0.0/8) for support of APNS for iOS devices. If
you are not using iOS MDM, then this port is not required.
l TCP 2195:gateway.push.apple.com
l TCP 2196: feedback.push.apple.com
l TCP 2197: api.push.apple.com (optional, alternative for HTTPS
443)
HTTPS 443
TCP 2195,
2196, 2197
iOS VPP and
Windows
notification /
check-ins
Open HTTPS 443 for the following access:
https://vpp.itunes.apple.com
(Known to be redirected to: www.apple.com,
securemetrix.apple.com)
*.wns.windows.com, *.notify.windows.com
HTTPS 443
iTunes,
Maps/Location,
Windows 10,
Windows 8.1
RT/Pro Apps
Open HTTPS 443 or HTTP 80 for the following access:
l itunes.apple.com, *.phobos.apple.com, and
*.mzstatic.com for performing iTunes App Store lookups.
l https://storeedgefd.dsx.mp.microsoft.com for Windows 10
app store lookups.
l http://marketplaceedgeservice.windowsphone.com,
http://cdn.marketplaceimages.windowsphone.com for
performing Windows 8.1 store lookups,Windows 8.1 store
search, app images and services.
l https://api.mqcdn.com for locating devices (IP addresses
vary. Perform an nslookup to determine the necessary IP
addresses.)
l http://store-images.microsoft.com/image/apps
http://developer.mapquest.com
http://store-images.s-microsoft.com/image/apps for
downloading Windows apps and graphics
l http://hoedus.mobileiron.com/v1/api/ for doing Google Play
Store lookups.
HTTPS 443
HTTP 80
Traffic from Internet/Outside to Standalone Sentry
Standalone Sentry is in the DMZ
TABLE 4. EXTERNAL AND INTERNET RULES (CONT.)

On-Premise Installation Guide for MobileIron Core and Enterprise Connector 11.1.0.0| 20
Requirement Description Port
End user devices to
access email via
MobileIron Sentry or
to Access backend
resources via
AppTunnel or
Tunnel
Open HTTPS 443 or HTTP 80 from the internet for ActiveSync client
traffic or open HTTPS 443 for AppTunnel or Tunnel traffic
NOTE: For the Sentry Appliance (physical or virtual
ActiveSync/AppTunnel), the Sentry must be able to
resolve Core hostname (via DNS lookup) or a hostfile
entry must be added.
HTTPS 443 or
HTTP 80
Traffic from Standalone Sentry to Internet/Outside
Standalone Sentry is in the DMZ
MobileIron software
upgrades
support.mobileiron.com (199.127.90.0/23) for software update
repository and SFTP upload of showtech log
NOTE: For the Sentry Appliance (physical or virtual
ActiveSync/AppTunnel), the Sentry must be able to
resolve Core hostname (via DNS lookup) or a hostfile
entry must be added.
HTTPS 443
TABLE 4. EXTERNAL AND INTERNET RULES (CONT.)
Related topics
l
For firewall rules required for the internal corporate network, see Internal corporate network rules.
l For additional firewall rules, see Additional firewall rules.
Additional firewall rules
The following table outlines additional firewall rules from the internal corporate network to the Internet.
l
Organizations with local network-connected Wi-Fi must mirror the external firewall port configuration on
their local DMZ firewall in order for Wi-Fi-connected devices to register and function day to day.
l
MobileIron Sentry does not support connection pooling via load balancer. Turn off your load balancer’s
connection pooling before deploying.

On-Premise Installation Guide for MobileIron Core and Enterprise Connector 11.1.0.0| 21
Requirement Description Port
iOS Features For Apple Activation Lock support, open HTTPS 443 to:
https://deviceservices-external.apple.com.
For Apple DEP support, open HTTPS 443 to:
https://mdmenrollment.apple.com.
These ports are not required if not using iOS MDM.
HTTPS 443
iOS (Wi-Fi Only)
Devices
Open TCP 5223 to open 17.0.0.0/8 and allow iOS devices using corporate
Wi-Fi to access the Apple APNS service. If you are not using iOS MDM,
then this port is not required.
For devices on closed networks:
l ax.init.itunes.apple.com: Current file-size limit for downloading
apps over the cellular network.
l ocsp.apple.com: Status of the distribution certificate used to sign
the provisioning profile.
TCP 5223
Android devices
To allow access to Google's FCM or GCM service: open TCP ports
5228, 5229, and 5230. GCM typically only uses TCP 5228, but it
sometimes uses TCP 5229 and TCP 5230. GCM does not provide specific
IPs, so you should allow your firewall to accept outgoing connections to all
IP addresses contained in the IP blocks listed in Google's ASN of 15169.
For older devices, consider open HTTPS 443, as well.
For Android Enterprise:
l https://www.googleapis.com/androidenterprise
l https://accounts.google.com/o/oauth2/token
For Help@Work for Android and iOS: In general, TeamViewer will
always work if Internet access is possible. As an alternative to HTTP 80,
HTTPS 443 is also checked. It is also possible to open only TCP 5938
(required for mobile connections).
TCP 5228
TCP 5229
TCP 5230
HTTPS 443
TABLE 5. ADDITIONAL FIREWALL RULES

On-Premise Installation Guide for MobileIron Core and Enterprise Connector 11.1.0.0| 22
Requirement Description Port
Docs@Work
License Server
Open HTTPS 443 to the following URLs to allow access to the
Docs@Work license server:
l https://api.polariskit.com/*
l https://enterprise.infraware.net/*
l https://pspdfkit-license-service-1.com/*
l https://pspdfkit-license-service-2.com/*
l https://pspdfkit-license-service-3.com/*
l https://pspdfkit-license-service-4.com/*
HTTPS 443
AppConfig
Community
Repository
Open port 443 (HTTPS) to the following URLs to allow access to the
Docs@Work license server:
l https://api.appthority.com/applications/bulk_query (Appthority)
l https://api.mqcdn.com/sdk/mapquest-js/v1.0.0/mapquest.css
(for the find my phone mapping and other options)
l pki-ws.symauth.com (SymantecManagedPKI)
l https://onestore.microsoft.com (BusinessStorePortal(BSP))
l https://bspmts.mp.microsoft.com/V1 (BusinessStorePortal(BSP))
l https://mobility.threatpulse.com:9443 (BlueCoat)
l https://login.microsoftonline.com/{tenant_id}/oauth2/authorize
(MicrosoftGraph)
l https://eu-api.samsungknox.com (Samsung E-FOTA)
l https://has.spserv.microsoft.com/HealthAttestation/
ValidateHealthCertificate/v1 (Windows device attestation)
l https://webapi.teamviewer.com/api/v1/
(AndroidHelp@Work)
l https://system.globalsign.com/cr/ws/GasOrderService
(GlobalSign)
l https://appconfig.cdn.mobileiron.com
(iOSManagedAppConfigcommunity)
l https://graph.windows.net/%s/devices/deviceId_%s?api-
version=1.6
(Azureactivedirectory)
HTTPS 443
TABLE 5. ADDITIONAL FIREWALL RULES (CONT.)
Related topics
l For firewall rules required for the internal corporate network, see Internal corporate network rules.
l For firewall rules required for Internal rules/outside rules, see External and Internet rules.
On-Premise Installation Guide for MobileIron Core and Enterprise Connector 11.1.0.0| 23
Enroll in the Apple certificate and iDEP programs
Managing iOS devices using Mobile Device Management (MDM) requires a certificate from Apple. MobileIron uses
Apple’s enhanced MDM certificate infrastructure to streamline the process of acquiring and uploading an MDM
certificate. You can now complete the following tasks from a single screen within the Admin Portal:
l generate a Certificate Signing Request (CSR)
l upload the CSR
l access the Apple Push Certificates Portal to request a certificate
l upload the MDM certificate
If you already have an MDM certificate, but have not uploaded it, you can upload it from the same screen.
Note The Following:
l If the Apple MDM certificate is created with a personal Apple ID, control of the certificate is retained by the
user. While administrators cannot control the certificate, they can revoke it.
l MobileIron recommends the account and credentials used to create the MDM certificate be documented
and stored in a secure location as this information will be required to generate a new MDM certificate when
the existing certificate expires.
l If you are configuring MobileIron Core to support only MAM-only devices, skip these steps. For more
information, see “Managing apps on MAM-only devices” in the MobileIron Core Apps@Work Guide.
Go to the following topics if you intend to do or have one of the following scenarios:
l Develop and distribute in-house apps
l Requesting an MDM certificate
l Uploading an MDM certificate
Develop and distribute in-house apps
If you intend to develop in-house apps for distribution, then you still need to participate in Apple’s iDEP program.
The enhanced MDM certificate infrastructure does not eliminate this requirement.
Requesting an MDM certificate
You can request a mobile device management (MDM) certificate from Apple.
NOTE: Make sure that appgw.mobileiron.com is reachable from MobileIron Core, as specified in
Change firewall rules.
On-Premise Installation Guide for MobileIron Core and Enterprise Connector 11.1.0.0| 24
Procedure
1. From the MobileIron Core Admin Portal, select Settings > System Settings > iOS > MDM.
2. Select the Enable MDM Profile option.
3. Click Install MDM Certificate to open the MDM Certificate Generation window.
4. Click I want to create a new MDM certificate.
5. Click Download Certificate Signing Request.
6. Click the Apple Push Certificates Portal link to start the process of requesting the MDM certificate.
7. When you receive the certificate, click Upload MDM Certificate to open the Upload MDM Certificate
window.
8. Click Browse to select the MDM certificate.
9. Click Upload Certificate.
Note The Following:
l Securely store, in an escrow-like account accessible to more than one individual, the username and
credentials used to register with Apple.
l Make a note of the date when the MDM certificate expires and set a reminder to renew the certificate
before it expires to avoid service outage.
l You have the option to create an alert which will notify you if the MDM certificate is revoked.
Uploading an MDM certificate
If you have already requested and received your MDM certificate from Apple, you can upload the certificate using
the following steps:
Procedure
1. Log into the Admin Portal.
2. Select Settings > System Settings > iOS > MDM.
3. Select the Enable MDM Profile option to open the MDM Certificate Generation window.
4. Select I already have an MDM Certificate, and want to upload it.
5. Note: If you already had a MDM certificate installed, you will see warning dialog. Click OK.
6. Click Upload MDM Certificate to open the Upload MDM Certificate window.
7. Click Browse to select the MDM certificate.
8. Click Upload Certificate.
On-Premise Installation Guide for MobileIron Core and Enterprise Connector 11.1.0.0| 25
Purchase third-party trusted certificates
MobileIron recommends using third-party certificates as follows:
l trusted TLS/SSL certificates for MobileIron Core and Standalone Sentry.
o
Core Portal HTTPS: External hostname of Core server.
Allows a client (such as a browser or app) to trust MobileIron Core over ports 443 and 8443. You must
use a publicly trusted certificate from a well-known Certificate Authority if you are using mutual
authentication.
o
Sentry: External hostname of Sentry server. Multiple sentries behind a load balancer will use the same
external certificate.
Allows a device to trust the Standalone Sentry.
l trusted TLS/SSL certificates for device enrollment
o
iOS Enrollment: External hostname of Core server. In most cases, the certificate will be the same as
the Core Portal HTTPS certificate.
Core uses this identity certificate to sign the Apple MDM configurations that it sends to iOS and
macOS devices.
o
Client TLS: External hostname of Core, often the same as the Core Portal HTTPS certificate.
Allows Mobile@Work for iOS and Android to trust MobileIron Core over port 9997 or port 443.
Note The Following:
l Obtain these certificates in advance to ensure appropriate lead time.
l Typically the Portal HTTPS, iOS Enrollment, and Client TLS certificates are the same certificate.
However, you can use different certificates. MobileIron recommends using separate certificates for
different use cases.
Related topics
“Certificates you configure on the System Manager” in the MobileIron Core System Manager Guide
Preparing for Android Enterprise device support
This section describes the minimum network requirements for Android Enterprise devices. Android devices
generally do not require you to open inbound ports on the firewall in order to function correctly. However, there are a
number of outbound connections that administrators need to be aware of when setting up their network
environments for Android Enterprise devices.
The list of network changes provided in the following table is not exhaustive and may change. It covers known
endpoints for current and past versions of enterprise management APIs and GMS apps.

On-Premise Installation Guide for MobileIron Core and Enterprise Connector 11.1.0.0| 26
NOTE: In addition to the ports listed in the following table, Android Enterprise devices require access to
MobileIron Core.
The following table lists the requirements for Android Enterprise devices.
Destination Host
Ports Purpose
play.google.com
android.com
google-analytics.com
googleusercontent.com
gstatic.com
*.gvt1.com
*ggpht.com
dl.google.com
android.clients.google.com
TCP/443
TCP, UDP/5228-
5230
Google Play and updates (APKs, app logos, etc.)
gstatic.com, googleusercontent.com -- contains
User Generated Content (for example, app icons in
the store)
*.gvt1.com, *.ggpht,
dl.google.com,android.clients.google.com --
Download apps and updates, PlayStore APIs
*googleapis.com TCP/443 MobileIron Unified Endpoint Management
(UEM)/Google APIs/PlayStore APIs
accounts.google.com TCP/443 Authentication
gcm-http.googleapis.com
gcm-xmpp.googleapis.com
android.googleapis.com
TCP/443, 5228-
5230,
5235, 5236
Google Cloud Messaging (for example, UEM
Console <-> DPC communication, like pushing
configs)
fcm.googleapis.com
fcm-xmpp.googleapis.com
TCP/443, 5228-
5230
Firebase Cloud Messaging (for example, Find My
Device, UEM Console <-> DPC communication,
like pushing configs)
pki.google.com
clients1.google.com
TCP/443 Certificate Revocation
clients[2...6].google.com TCP/443 Domains shared by various Google backend
services such as crash reporting, Chrome
Bookmark Sync, time sync (tlsdate), and many
others
TABLE 6. REQUIREMENTS FOR ANDROID ENTERPRISE DEVICES
Google does not provide specific IPs, so you should allow your firewall to accept outgoing connections to all IP
addresses contained in the IP blocks listed in Google's ASN of 15169 listed here https://bgp.he.net/AS15169#_
prefixes.
Note that IPs of Google peers and edge nodes are not listed in the AS15169 blocks. See peering.google.com for
more information about Google’s Edge Network.

On-Premise Installation Guide for MobileIron Core and Enterprise Connector 11.1.0.0| 27
NOTE: See External and Internet rules on page17 for firewall rules required for external and internet
access for MobileIron Core appliances and Sentry appliances.
Preparing for Windows device support
This section describes how to prepare for Windows device support, (Windows Mobile 8.1 and Window 10 devices).
This section includes:
l Windows device support requirements
l Setting up autodiscovery
l Connecting to the Windows Store
Windows device support requirements
The following table lists the requirements for Windows device support.
Requirements Required Optional
Publicly trusted certificate for registration (Portal certificate) X
Autodiscovery: If autodiscovery is not set up, the registration process requires
the device user to enter the MobileIron Core server address, that is, the FQDN for
your MobileIron Core
X
DNS A record X
SAN: Includes portal and enterpriseenrollment.
YourCompanyDomainName.com
X
TABLE 7. REQUIREMENTS FOR WINDOWS DEVICES
Setting up autodiscovery
Autodiscovery allows Windows devices to seamlessly register with MobileIron. The following set up is required for
using autodiscovery with Windows devices:
l Create DNS A record to point to MobileIron Core
l Obtain a TLS/SSL SAN certificate from a trusted Certificate Authority (CA)
Create DNS A record
Create a DNS A record that refers DNS requests for enterpriseenrollment.YourCompanyDomainName.com to
the MobileIron Core IP address.
NOTE: YourCompanyDomainName must match the domain of the email addresses used for registering
with MobileIron.
On-Premise Installation Guide for MobileIron Core and Enterprise Connector 11.1.0.0| 28
FIGURE 8. ENTERPRISE ENROLLMENT
Obtain a TLS/SSL SAN certificate
For Windows devices, a Subject Alternative Name (SAN) TLS/SSL certificate from a trusted Certificate Authority
(CA), such as Verisign or GoDaddy, is required. If you use a self-signed (localCA) certificate, device enrollment will
fail.
l The TLS/SSL certificate provides trusted and secured connection without certificate warnings.
l A SAN certificate, also known as a multi-domain certificate or a unified communication certificate, is valid
for two or more hosts. The SAN certificate must cover the MobileIron Core hostname and
enterpriseenrollment.YourCompany-Domain name.com.
Connecting to the Windows Store
You can set up recommended apps that device users can download from the Apps@Work app.
For Windows devices, your firewall must allow connections to the following hosts:
Purpose Host connection
Windows 10 app store search https://storeedgefd.dsx.mp.microsoft.com
Windows 10 VPN for Cisco AnyConnect https://www.windowsphone.com
Windows Phone 8 App store detail URL http://marketplaceedgeservice.windowsphone.com
Windows Phone 8 app store icon URL http://cdn.marketplaceimages.windowsphone.com
TABLE 8. WINDOWS HOST CONNECTIONS YOUR FIREWALL MUST ALLOW
NOTE: See External and Internet rules on page17 for which ports to open.
2
On-Premise Installation Guide for MobileIron Core and Enterprise Connector 11.1.0.0| 29
Installing MobileIron Core
This chapter includes the following sections:
l MobileIron Core appliance setup
l Virtual Core requirements
l Installing VMware ISO
l Installing Hyper-V ISO
l Install MobileIron Core ISO onto an appliance
l Signing in to the MobileIron Core System Manager
l Configuring email integration
l Changing port settings
l Setting up local admin users
l Restricting access to Core components
l Rolling out MobileIron Core
l Updating MobileIron software
NOTE: When you install MobileIron Core on either a virtual machine or physical appliance, by default
Core supports only Mobile Application Management (MAM), not Mobile Device Management
(MDM) on iOS devices. To enable MDM for iOS devices, after your installation is complete, see
“Managing Mobile Device Management (MDM) certificates for iOS and macOS” in Getting
Started with MobileIron Core.
MobileIron Core appliance setup
If you are installing a physical appliance, you will need to configure the system either with a standard VGA monitor
and keyboard, or via the serial console. To access to the serial console, you can use a PC or remote console
system. Use Putty or HyperTerminal if you are using a PC.
To set up console access:
1. Connect a console cable to the appropriate port on the back of the appliance.
2. Connect a serial cable to a PC or remote console system.
Hardware appliances
The following table describes which MobileIron appliances are supported on Core and Enterprise Connector .

On-Premise Installation Guide for MobileIron Core and Enterprise Connector 11.1.0.0| 30
TABLE 9. APPLIANCES SUPPORTED BY CORE AND ENTERPRISE CONNECTOR
Product Supported Compatible
Core and Enterprise
Connector
M2200 N/A
Core M2250, M2600 N/A
Maximum number of supported devices
The following table summarizes the maximum number of supported devices on each MobileIron appliance.
Model Maximum Number of
Devices
Testing Standard
M2600 200,000 The maximum number of supported devices, for each
appliance, is based on a rate of 1 device registration
per second. This maximum number of supported
devices will change, depending on individual use
cases and work load for each appliance.
NOTE: IPv4 is supported.
M2200/M2250 60,000
TABLE 10. DEVICE CAPACITY FOR CORE APPLIANCES
Virtual Core requirements
If you are installing a virtual MobileIron Core, you need to ensure that the minimum requirements are met. This
section lists the requirements for MobileIron Core.
Other topics in this section include:
l Storage devices
l Guaranteed minimum memory and CPU for Core (VMware, Hyper-V)
l Minimum specification (VMware, Hyper-V)
l Gather required MobileIron Core information
The following table lists the virtual Core requirements. (Alternative memory and CPU configurations are not
covered by the MobileIron product warranty.)

On-Premise Installation Guide for MobileIron Core and Enterprise Connector 11.1.0.0| 31
Components Requirements
Hard drive MobileIron recommends configuring only one hard drive on the virtual machine. System
performance is directly related to hard disk drive performance. MobileIron recommends
using only high-performance tier I storage products.
Backup VMware
MobileIron recommends taking periodic .vmdk backups of your MobileIron Virtual
Appliance as part of your system maintenance. Use VMware VCB or another VMware-
supported backup system. A backup of the full virtual disk is recommended; VMware
snapshots are not sufficient.
VMware
l
Download link or package (ISO) from MobileIron Support here:
https://support.mobileiron.com/support/CDL.html
l VMware ESXi 6.5, 6.7, 7.0
l 64-bit VM
l
Network adapter:
o
E1000
o
VMXNET 3
l
VM OS Type:
o
CentOS 7.4 (64-bit)
l
CPU Settings:
o
Shares: Normal
o
Reservation: Match the specification in Guaranteed minimum memory and
CPU for Core (VMware, Hyper-V).
o
Limit: Unlimited (maximum assigned)
l
Memory Settings:
o
Shares: Normal
o
Reservation: Match the specification in Guaranteed minimum memory and
CPU for Core (VMware, Hyper-V).
o
Alternate reservation: 50% of the specification in Guaranteed minimum
memory and CPU for Core (VMware, Hyper-V).*
* The alternative memory configuration is not covered by the MobileIron product
warranty.
o
Limit: Unlimited (maximum assigned)
l Boot from BIOS firmware
TABLE 11. VIRTUAL CORE REQUIREMENTS

On-Premise Installation Guide for MobileIron Core and Enterprise Connector 11.1.0.0| 32
Components Requirements
Note The Following:
l We currently support the LSI logic SAS or Parallel SCSI controllers; para-
virtualized controllers are not supported.
l Alternative memory and CPU configurations are not covered by the MobileIron
product warranty
Hyper-V
l
Download link or package (ISO) from MobileIron Support here:
https://support.mobileiron.com/support/CDL.html
l Microsoft Hyper-V Server 2008, Microsoft Hyper-V Server 2008 R2, or Microsoft
Hyper-V Server 2012, Microsoft Hyper-V Server 2012 R2, Microsoft Hyper-V
Server 2016
l Hyper-V MAC Address: Static allocation
l Generation 1 VM
l Boot from BIOS firmware
l Minimum 4 GB RAM
Note The Following:
l Microsoft Hyper-V Server 2008 requires legacy network adapter.
l New features in Microsoft Hyper-V Server 2016 (discrete device assignment,
shielded virtual machines, disk encryption, secure boot, etc.) are not supported.
KVM
l
Download link or package (ISO) from MobileIron Support here:
https://support.mobileiron.com/support/CDL.html
l
Minimum configuration of host machine:
o
Quad Core CPU, 2 GHz clock rate
o
16 GB RAM
o
8 GB guest memory
NOTE: Performance data for different CPU and RAM and memory
configurations is not available.
l
Supported KVM version: QEMU emulator version 2.0.0 (Debian 2.0.0+dfsg-
2ubuntu1.22)
MobileIron supports only this KVM version, but later versions are compatible.
l
Supported Virtual Machine Manager version: 0.9.5
MobileIron supports only this Virtual Machine Manager version, but later
versions are compatible.*
TABLE 11. VIRTUAL CORE REQUIREMENTS (CONT.)

On-Premise Installation Guide for MobileIron Core and Enterprise Connector 11.1.0.0| 33
Components Requirements
l
Supported Linux distribution: Ubuntu Server version 14.4 (3.19.0-25-generic
#26~14.04.1-Ubuntu SMP)
MobileIron supports only this Linux distribution, but other Linux distributions are
compatible.*
l In the Virtual Machine Manager, when creating a new virtual machine, select
Generic for the OS type and the Version.
l
Boot from BIOS firmware. For more information about setting up KVM, see:
https://help.ubuntu.com/community/KVM
* MobileIron defines supported and compatible as follows:
o
Supported product versions: The functionality of the product and version
with currently supported releases was systematically tested as part of the
current release and, therefore, will be supported.
o
Compatible product versions: The functionality of the product and
version with currently supported releases has not been systematically
tested as part of the current release, and therefore not supported. Based on
previous testing (if applicable), the product and version is expected to
function with currently supported releases.
NOTE: For more information about setting up KVM, see
https://help.ubuntu.com/community/KVM.
TABLE 11. VIRTUAL CORE REQUIREMENTS (CONT.)
Storage devices
The following table lists the requirements for storage devices.
Operation Min IOPS Bandwidth 90% Operations < xxx mS
Random Read 400 3 MBps 10 mS
Random Write 900* 15 MBps 4 mS
TABLE 12. STORAGE DEVICE REQUIREMENTS
Note The Following:
l MobileIron recommends configuring only one storage device per virtual machine.
l
RAID controller may have to be specifically configured in order to achieve high Random Write IOPS
(For example: Disk Cache: Enabled, Default Write: Write Back with BBU).
l System performance is directly related to storage device performance. MobileIron recommends using only
high-performance tier 1 storage products.

On-Premise Installation Guide for MobileIron Core and Enterprise Connector 11.1.0.0| 34
Guaranteed minimum memory and CPU for Core (VMware, Hyper-V)
The following table lists the guaranteed memory and CPU requirements for MobileIron Core.
Maximum
Devices
Memory Virtual CPU / Min
Clock Rate
Total Available
Storage Capacity
Min Storage
IOPS (Random
Read)
Min Storage
IOPS (Random
Write)
< 5,000 8 GB RAM* Qty 2 / 2.13 GHz
processors**
80 to 250GB SAS 400 1000
< 20,000 16 GB RAM* Qty 4 / 2.13 GHz
processors**
250 GB SAS 400 1000
< 50,000 32 GB RAM* Qty 8 / 2.13 GHz
processors**
500 GB SAS 400 1000
< 100,000 64 GB RAM* Qty 16 / 2.13
GHz
processors**
1TB SAS 400 1000
TABLE 13. MEMORY AND CPU FOR MOBILEIRON CORE (VMWARE, HYPER-V)
*Guaranteed resource allocation - no ballooning allowed
** Guaranteed resource allocation - no sharing allowed with other VMs
Minimum specification (VMware, Hyper-V)
The following minimum specification does not include significant use of the app store or Docs@Work.
Maximum
devices
Memory Virtual CPUs Disk
< 500 8 GB RAM* 1 x 2.13GHz processors** 80 to 250GB SAS
Random
Write
900* 15 MBps 4 mS
TABLE 14. MINIMUM SPECIFICATIONS
*Guaranteed resource allocation - no ballooning allowed
**Guaranteed resource allocation - no sharing allowed with other VMs
Gather required MobileIron Core information
Use the following table to gather and record MobileIron Core information before installation.

On-Premise Installation Guide for MobileIron Core and Enterprise Connector 11.1.0.0| 35
Item Description Values
Licensing agreement
information
The company name, contact person name, and contact
person email address for the end-user licensing agreement.
MobileIron Core
Server IP Address
Static IP address for portal access.
External Hostname Fully-qualified domain name for MobileIron Core.
Do not use an internal hostname. Managed devices
must be able to access Core from the Internet.
“enable secret”
password
The MobileIron password to be defined for enabling access
to Privileged and Configuration modes.
Administrator User
Name
The user name to define for the MobileIron Administrator. Do
not use root or ha_admin.
Administrator
Password
The MobileIron Administrator password must contain the
following elements:
l At least 8 characters.
l At least 1 alphabetic character.
l At least 1 numeric character.
l Cannot have 4 or more repeating characters.
l Cannot be the same as the user ID.
l May contain Unicode characters, except for CLI
access.
NOTE: Users cannot change a password more than
once during a 24 hour period.
Physical Interface The physical interface to use on the appliance. Enter a or b.
You can configure additional physical interfaces later using
the System Manager.
IP Address
Netmask
The IP address and netmask of the physical network
interface.
Default Gateway The IP address of the router used to forward traffic to
destinations outside of the local network or subnet.
TABLE 15. MOBILEIRON CORE INFORMATION

On-Premise Installation Guide for MobileIron Core and Enterprise Connector 11.1.0.0| 36
Item Description Values
Name Server 1, 2, 3 The IP address of a network name server (i.e., DNS server).
You must specify at least one name server.
Remote Shell via
SSH?
Specifies whether you want to configure remote shell access
via SSH.
NTP Server 1, 2, 3 Specifies the IP address of an optional reliable time source.
MobileIron recommends specifying an NTP server. If you do
not, you will have the opportunity to set the system clock and
date.
TABLE 15. MOBILEIRON CORE INFORMATION (CONT.)
Installing VMware ISO
Complete the following steps to install MobileIron Core using VMware ISO distribution.
Procedure
1.
If you have not done so already, create a VM that meets the specifications recommended by MobileIron.
See Virtual Core requirements for recommended specifications.
2. Place the ISO distribution in an existing vSphere datastore.
3.
In the vSphere Client, select the Edit Settings option for the VM you created.
On-Premise Installation Guide for MobileIron Core and Enterprise Connector 11.1.0.0| 37
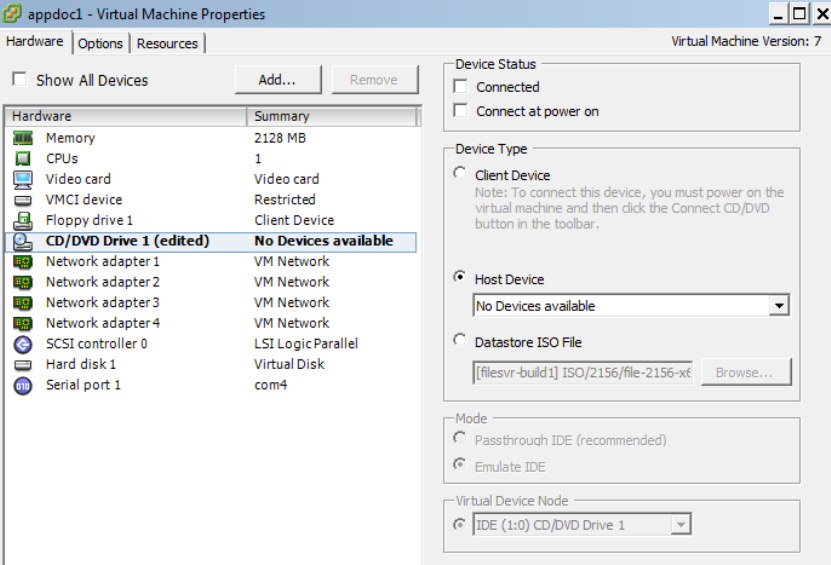
4. Select Datastore ISO File.
5. Click Browse to select the MobileIron Core ISO distribution.
6. Make sure the Connected and Connect at power on options in the Virtual Machine Properties window
are selected.
7. Select Host Device.
8. Click OK.
9.
Power on the VM.
The VM automatically installs and reloads after a few minutes, and the installation program starts. See
Installing MobileIron Core ISO for the next steps.
Installing Hyper-V ISO
Complete the following steps to install MobileIron Core using Hyper-V ISO distribution.
Procedure
1.
If you have not done so already, create a VM that meets specifications recommended by MobileIron. See
Virtual Core requirements for recommended specifications.
NOTE: Verify static and dynamic allocation of RAM. For example, if the suggested RAM is 8 GB as
per MobileIron guidelines, then set the RAM memory to a guaranteed allocation of 8 GB.
2. Place the ISO distribution in an existing datastore.
On-Premise Installation Guide for MobileIron Core and Enterprise Connector 11.1.0.0| 38
3. In Hyper-V Manager, right-click the name of the VM you created, then click Settings.
4. To install from an ISO image, select Image File, click Browse.
5.
From the Open dialog box, select the ISO file in the datastore.
6.
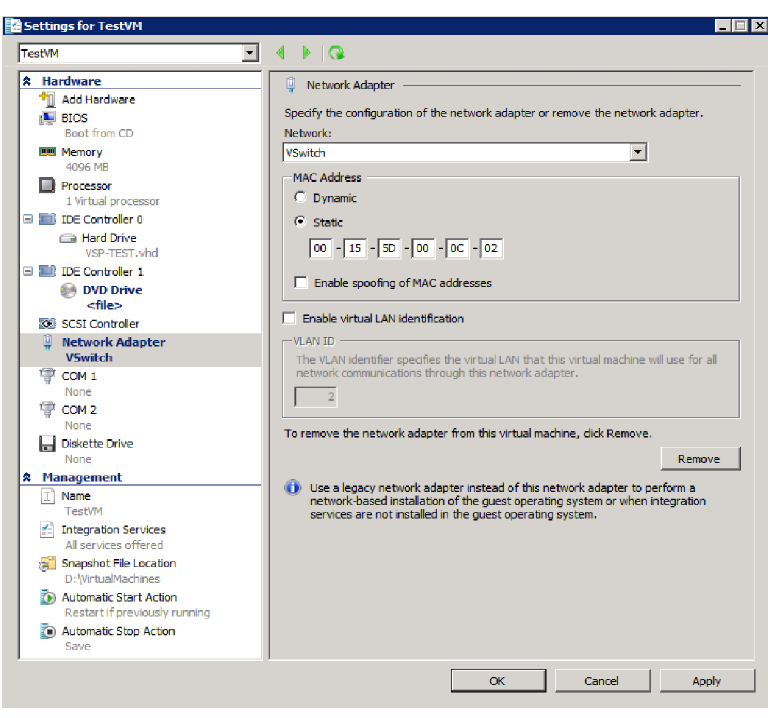
Set Hyper-V MAC setting from Dynamic to Static. To change the Hyper-V MAC settings, click on VM
settings > Network adapter. For MAC Address, select Static.
NOTE: At the very first boot, static MAC address will be shown as all 0 or empty. If you do not
know the MAC address, select MAC Address as ‘Dynamic’ to assign on its own. After ISO
installation, you can stop the VM and set it to static with the assigned/fetched MAC
address.
7. Click Apply, then OK.
8.
Start the VM.
The VM automatically installs and reloads after a few minutes, and the installation program starts. See
Installing MobileIron Core ISO for the next steps.

On-Premise Installation Guide for MobileIron Core and Enterprise Connector 11.1.0.0| 39
Install MobileIron Core ISO onto an appliance
You can install a MobileIron Core ISO onto a MobileIron appliance using a DVD or USB flash drive depending on
the appliance. This section describes the preparation and installation process.
The M2600 and M2250 appliances do not have a DVD drive. Therefore, use of a DVD with these appliances is not
supported. Installing the Core ISO on these appliances is done from a USB flash drive. USB flash drives are only
supported on M2250 and M2600 appliances.
The following describe the steps for installing the Core ISO:
l Preparing a USB flash drive for installation
l Installing MobileIron Core ISO
Preparing a USB flash drive for installation
Complete this procedure before installing Core software from a USB flash drive. This feature is supported only on
the M2250 and M2600 appliances.
Before you begin
Ensure that the USB flash drive meets the following minimum requirements:
l USB Standard 2 or 3
l USB Connector Type-A
l Minimum size 2 GB
Procedure
1.
Insert a USB flash drive into a Windows PC.
Use a USB flash drive with a minimum of 2 GB storage space.
2. Download the MobileIron Core ISO image to the same PC from the MobileIron Support site.
3.
Download a third-party bootable USB creation tool to the same PC to create a bootable USB flash drive.
MobileIron uses the following tool, which can be downloaded by going to: https://rufus.akeo.ie/.
4.
Run the tool and provide the following information when asked in the tool wizard:
l Location of the ISO.
l Location of the USB flash drive.
l Volume label name for the USB flash drive.
l You must use MOBILEIRON as the volume label name.
5. Complete the wizard to create a bootable USB flash drive.
6. See Installing MobileIron Core ISO for the installation steps.
NOTE: Select hw-m2250-m2600-usb-install when the installation program begins.

On-Premise Installation Guide for MobileIron Core and Enterprise Connector 11.1.0.0| 40
Installing MobileIron Core ISO
The following steps describe the installation of the Core software.
Before you begin
1. Connect a monitor and keyboard to the MobileIron appliance.
2. Power on the MobileIron appliance to boot the system.
3. If you are using a USB flash drive to install Core ISO to an M2250 or M2600 appliance, ensure that you
have prepared the USB flash drive as described in Preparing a USB flash drive for installation.
Procedure
1.
Insert the DVD or USB flash drive (containing the Core ISO image) into the appliance.
The option to install from an USB flash drive is available only on the M2250 and M2600 appliances.
2. Wait for the appliance to reboot for the installation program to begin after a few minutes.
3.
Enter the command for the installation you want to complete:
l vm-install: for a virtual MobileIron Core.
l hw-install: for any standard physical appliance.
l hw-m2250-m2600-install: for physical appliance installation on the M2250, or M2600 appliances.
l hw-m2250-m2600-usb-install: for installing Core from a USB flash drive onto the M2250 or M2600
appliances.
4.
Press ENTER to start the installation process.
After several minutes, the install program opens the configuration wizard Welcome message.
5. Type yes to display the end user license agreement.
6. Scroll through and read the agreement.
7. Type yes to accept the End User License Agreement.
8.
Enter the company name.
The company name you enter will serve as the default enterprise name used in SMS and email
communication.
9. Enter the name of the person in your organization who will serve as the contact point for MobileIron
communications.
10. Enter the email address for the contact person.
11.
Enter the password to assign.
The password must be between 6 and 20 characters.
12. Re-enter the password.
On-Premise Installation Guide for MobileIron Core and Enterprise Connector 11.1.0.0| 41
13.
Enter the user name you want to assign for the first administrative user.
Do not use root or or ha_admin.
14.
Enter the password you want to assign for the administrator.
This password must contain at least 8 characters and include numerals and capital letters.
15. Re-enter the administrator password.
16.
Enter the letter for the physical interface you want to use to connect to the management network.
a. for GigabitEthernet1
b. for GigabitEthernet2
17.
Enter the IP address that you created for MobileIron Core.
It will be associated with the physical interface you selected in the previous step.
18. Enter the netmask for use with the IP address you just entered, e.g., 255.255.255.0.
19. Enter the default network gateway for Core.
20.
Enter the external hostname (fully-qualified domain name) for the appliance.
Do not use an internal hostname. Managed devices must be able to access MobileIron Core from the
Internet.
21. Enter the IP address of the primary name server to be used by Core.
22.
Enter optional secondary and tertiary name servers as preferred.
Leave the fields blank and press Enter to skip specifying additional name servers.
23. Enter yes to enable remote access via SSH.
24.
Enter yes to configure an optional reliable time source at the Configure NTP prompt.
MobileIron recommends that you configure at least one time source to ensure proper synchronization of
time-based tasks.
l If you entered yes for configuring a time source, enter the IP address of the primary time source to use.
l If you specified a time source, you can enter secondary and tertiary time sources.
l If you do not specify at least one time source, then you have the option to configure the system clock.
25.
If prompted, enter yes to configure the system clock’s time and date.
l Use HH:MM:SS as the format for the time you enter.
l Use DD MM YYYY as the format for the date you enter.
26. Review the displayed command script.
27.
Enter yes to save the changes.
When the configuration is complete, the installation program displays the Configuration complete
message.
28. Enter reload to reboot the system and enable the portal service.
29. Enter yes when prompted to save the system configurations.
30.
Enter yes to proceed with reload.
On-Premise Installation Guide for MobileIron Core and Enterprise Connector 11.1.0.0| 42
A successful installation displays the MobileIron Core CLI banner on the console. The installation script
continues, displaying status on the console. This may take several minutes.
Signing in to the MobileIron Core System Manager
You can sign in to the MobileIron Core System Manager directly from a web browser or from the MobileIron Core
Admin Portal.
Procedure: From a browser
1. Open a supported browser.
2. Enter https://<fully-qualified_domain_name>:8443/mics.
3. Enter the administrator user name and password you specified in the configuration wizard.
Procedure: From the MobileIron Core Admin Portal
1. Log into the Core Admin Portal.
2. Click on the person icon at the top right of the Admin Portal page.
3. Select System Manager from the menu.
4. Log into System Manager to open the System Manager workspace.
Next steps
l Configuring email integration
l Changing port settings
l Setting up local admin users
l Restricting access to Core components
l Rolling out MobileIron Core
l Updating MobileIron software
Configuring email integration
Use the Email Settings screen in the System Manager portion of the portal to set up the SMTP server access
required for MobileIron email alerts, such as policy violation alerts. In the US and certain other countries, the SMTP
server settings are also required for alerts sent via SMS.
Procedure
To configure email integration:
1. Log into System Manager.
2. Go to Settings > Email Settings.

On-Premise Installation Guide for MobileIron Core and Enterprise Connector 11.1.0.0| 43
3. Edit the fields, as necessary.
4. Refer to the Email configuration window table for details.
5. Click the Test button to open the Test Email window.
6. Enter an email address and body for the test email.
7. Click Send.
8. Confirm that the email arrived.
9. Click Apply > OK to save the changes.
Email configuration window
The following table summarizes fields and descriptions in the Email Configuration window:
Fields Description
From Email Specify the email address to use in the From field for all administrative email
notifications.
Make sure that the email address has the right privileges to send emails to
internal and external email domains.
SMTP Server Specify the IP address or fully-qualified host name for the SMTP server the
MobileIron Server will use.
SMTP Server Port Specify the port configured for the SMTP server.
Protocol If the SMTP server you are configuring is a secured server, that is, it uses the
SMTPS protocol, then select the SMTPS button. Otherwise, leave SMTP
selected. If you want to allow an existing connection to upgrade to an encrypted
connection, select SMTP with STARTTLS.
Authentication Required Specify whether this SMTP server requires authentication. In most cases, this
field will be set to Yes.
User Name If you select Yes for Authentication Required, then this field displays. Enter
the user name required for SMTP authentication.
Password If you select Yes for Authentication Required, then this field displays. Enter
the password required for SMTP authentication.
Confirm Password If you select Yes for Authentication Required, then this field displays. Confirm
the password required for SMTP authentication.
TABLE 16. EMAIL CONFIGURATION FIELDS
Changing port settings
The default provisioning port is HTTP/8080. If you have signed certificates, you can select HTTPS/443, instead.
On-Premise Installation Guide for MobileIron Core and Enterprise Connector 11.1.0.0| 44
Procedure
1. Log into the System Manager.
2. Go to Settings > Port Settings.
3. Select https.
4. Click Apply > OK.
Setting up local admin users
Local administrators have access to the configuration of the server. The initial setup created the first local admin
user.
l To create new users go to Security > Local users > Add.
l To create user accounts for the Admin Portal, including accounts to register devices, see the “Managing
Users” chapter in the MobileIron Core Device Management Guide.
Restricting access to Core components
MobileIron recommends specifying either a singular IP or a network ID and subnet for Smartphone Manager
access. You can also restrict access for other components of MobileIron Core. To configure these restrictions,
select Security > Portal ACL in System Manager. See the MobileIron Core System Manager Guide for details.
Rolling out MobileIron Core
See the MobileIron Core Device Management Guide for guidelines for planning the next steps, including setting up
policies and registering devices.
Updating MobileIron software
Get MobileIron software updates, as necessary. See the System Manager Guide for the specific release for
instructions about how to upgrade to the release.
3
On-Premise Installation Guide for MobileIron Core and Enterprise Connector 11.1.0.0| 45
Installing Enterprise Connector
This chapter includes the following sections:
l About the Enterprise Connector
l Virtual Enterprise Connector requirements
l Configuring the Enterprise Connector on MobileIron Core
l Installing the Enterprise Connector ISO package
l Installing with the Configuration Wizard
l Configuring Enterprise Connectors
l Verifying the MobileIron Core connection
l Configuring LDAP servers
l Manually upgrading Enterprise Connector
l Local user authentication to Enterprise Connector
About the Enterprise Connector
The Enterprise Connector is a component that connects MobileIron Core to corporate directories, such as
Microsoft Active Directory or LDAP, by means of secure HTTPS connections. Multiple connectors can be used for
scaling and redundancy purposes. Requests go to all configured Connectors, but only one responds to the request.
Should one fail, all the requests are handled by another working Connector.
Note The Following:
The Enterprise Connector is not domain-specific and therefore every connector must be able to
reach every LDAP server.
The MobileIron Connector does not support certificate-based authentication. This means that
once you enable Connector service, the "Upload X509 Certificate" option in LDAP preferences is
not available.
Installation and configuration tasks
NOTE: If you are installing Enterprise Connector on a MobileIron appliance, only the M2200 appliance is
supported.
Complete the following tasks to install and configure the Enterprise Connector:

On-Premise Installation Guide for MobileIron Core and Enterprise Connector 11.1.0.0| 46
1. Complete preparations listed in Chapter 1, Pre-deployment tasks.
2. Configure the Enterprise Connector on MobileIron Core (Configuring the Enterprise Connector on
MobileIron Core).
3. Install the Enterprise Connector ISO package (Installing the Enterprise Connector ISO package).
4. Install the Enterprise Connector with the Configuration Wizard (Installing with the Configuration Wizard).
5. Configure the Enterprise Connector (Configuring Enterprise Connectors).
6. Verify the Core connection (Verifying the MobileIron Core connection).
Virtual Enterprise Connector requirements
If you are installing a virtual Enterprise Connector, ensure that the minimum requirements described in this section
are met.
Storage devices
The table below lists the requirements for storage devices.
Operation Min IOPS Bandwidth 90% Operations < xxx mS
Random Read 400 3 MBps 10 mS
Random Write 900* 15 MBps 4 mS
TABLE 17. STORAGE DEVICE REQUIREMENTS
* RAID controller may have to be specifically configured in order to achieve high Random Write IOPS - (e.g. Disk
Cache: Enabled, Default Write: Write Back with BBU)
MobileIron recommends configuring only one hard drive per virtual machine.
System performance is directly related to storage device performance. MobileIron recommends using only high-
performance tier 1 storage products.
Enterprise Connector components
The following table lists the requirements for the following Enterprise Connector components.

On-Premise Installation Guide for MobileIron Core and Enterprise Connector 11.1.0.0| 47
Components Requirements
Hard drive We recommend configuring only one hard drive on the virtual machine. System
performance is directly related to hard disk drive performance. MobileIron recommends
using only high-performance tier I storage products.
Backup VMware
MobileIron recommends taking periodic .vmdk backups of your MobileIron Virtual
Appliance as part of your system maintenance. Use VMware VCB or another VMware-
supported backup system. A backup of the full virtual disk is recommended; VMware
snapshots are not sufficient.
VMware
Confirm the following requirements before beginning setup of the MobileIron Virtual
Enterprise Connector:
l
VMware ESXi versions 6.5, 6.7, 7.0 with data stores created
l 64-bit VM
l 2 GB Memory
l 40 GB Disk
l Two CPU cores with min clock rate of 2 GHz
l Boot from BIOS firmware
l
Network adapter
o
E1000
o
VMXNET 3
l
VM OS Type: CentOS 7.4 (64-bit)
NOTE: This setting is intended to ensure successful installation; it does not
imply that MobileIron distributes Red Hat.
l
CPU Settings:
o
Shares: Normal
o
Reservation: 900 MHz
o
Limit: Unlimited (maximum assigned)
l
Memory Settings:
o
Shares: Normal
o
Reservation: 1.5 GB
o
Limit: Unlimited (maximum assigned)
Hyper-V
l
Download link or package (ISO) from MobileIron Support
TABLE 18. ENTERPRISE CONNECTOR COMPONENT REQUIREMENTS

On-Premise Installation Guide for MobileIron Core and Enterprise Connector 11.1.0.0| 48
Components Requirements
https://support.mobileiron.com/support/CDL.html
l Microsoft Hyper-V Server 2008, Microsoft Hyper-V Server 2008 R2, Microsoft
Hyper-V Server 2012, Microsoft Hyper-V Server 2012 R2, or Microsoft Hyper-V
Server 2016
l 64-bit Generation 1 VM
l 2 GB Memory
l 20 GB Disk
l Two CPU cores with min clock rate of 2 GHz
l Boot from BIOS firmware
l Minimum 4 GB RAM
l
Network adapter
Note The Following:
Microsoft Hyper-V Server 2008 requires legacy network adapter.
New features in Microsoft Hyper-V Server 2016 (discrete device
assignment, shielded virtual machines, disk encryption, secure boot,
etc.) are not supported.
KVM
l Connector can run on a Kernel Virtual Machine (KVM) as follows:
l
Download link or package (ISO) from MobileIron Support at
https://support.mobileiron.com/support/CDL.html
l
Minimum configuration of host machine:
o
Quad Core CPU with min clock rate of 2 GHz
o
16 GB RAM
o
8 GB guest memory:
NOTE: Performance data for different CPU, RAM, and memory
configurations is not available.
l
Supported KVM version: QEMU emulator version 2.0.0 (Debian 2.0.0+dfsg-
2ubuntu1.22)
MobileIron supports only this KVM version, but later versions are compatible.
l
Supported Virtual Machine Manager version: 0.9.5
MobileIron supports only this Virtual Machine Manager version, but later versions
are compatible.*
l
Supported Linux distribution: Ubuntu Server version 14.04
TABLE 18. ENTERPRISE CONNECTOR COMPONENT REQUIREMENTS (CONT.)

On-Premise Installation Guide for MobileIron Core and Enterprise Connector 11.1.0.0| 49
Components Requirements
MobileIron supports only this Linux distribution, but other Linux distributions are
compatible.
l In the Virtual Machine Manager, when creating a new virtual machine, select
Generic for the OS type and the Version.
l Boot from BIOS firmware
NOTE: For more information about setting up KVM, see
https://help.ubuntu.com/community/KVM.
* For definitions of supported and compatible versions, refer to the latest Core release
notes.
TABLE 18. ENTERPRISE CONNECTOR COMPONENT REQUIREMENTS (CONT.)
Gather required Enterprise Connector information
Enterprise Connector is an optional alternative for integrating with your network. Use the following table to gather
and record Enterprise Connector information before installation.
Item Description Values
Licensing agreement
information
The company name, contact person name, and contact
person email address for the end-user licensing agreement.
IP Address IP address defined for the Connector and the corresponding
netmask.
Hostname Fully-qualified domain name for the Connector.
“enable secret”
password
The MobileIron password to be defined for enabling access
to Privileged and Configuration modes.
Administrator User
Name
The user name to define for the MobileIron administrator.
Administrator
Password
The MobileIron Administrator password must contain the
following elements:
l At least 8 characters.
l At least 1 alphabetic character.
l At least 1 numeric character.
l Cannot have 4 or more repeating characters.
l Cannot be the same as the user ID.
TABLE 19. ENTERPRISE CONNECTOR INFORMATION

On-Premise Installation Guide for MobileIron Core and Enterprise Connector 11.1.0.0| 50
Item Description Values
l May contain Unicode characters, except for CLI
access.
Users cannot change a password more than once during a 24
hour period.
Physical Interface The physical interface to use. Enter a or b.
Default Gateway The IP address of the router used to forward traffic to
destinations outside of the local network or subnet.
Name Server 1, 2, 3 The IP address of a network name server (a DNS server, for
example). You must specify at least one name server.
Remote Shell via
SSH?
Specifies whether you want to configure remote shell access
via SSH.
NTP Server 1, 2, 3 Specifies the IP address of an optional reliable time source.
MobileIron recommends specifying an NTP server. If you do
not, you will have the opportunity to set the system clock and
date.
TABLE 19. ENTERPRISE CONNECTOR INFORMATION (CONT.)
Configuring the Enterprise Connector on MobileIron Core
There are several tasks that need to be completed on MobileIron Core prior to Connector installation. This section
contains the following tasks:
l Assigning the Connector role
l Adding Enterprise Connector entries on MobileIron Core
Assigning the Connector role
Each Connector authenticates to MobileIron Core with an Authorized Admin portal local user account. MobileIron
recommends creating a user and assigning only the Connector role to authenticate the Connector to your Core.
NOTE: If you are using multiple Connectors and/or auditing tools that require user names, assign one
user account to each Connector rather than having one user account accessing all
Connectors.
On-Premise Installation Guide for MobileIron Core and Enterprise Connector 11.1.0.0| 51
Procedure
1.
Log on to the Admin Portal.
l For Connected Cloud, use https://<URL>/<customer_id>.
l For On-Premise Core, use https://<fully-qualified_domain_name>/admin.
2. Select the Devices & Users > Users. Click Add Local User.
3. Enter the requested information to create the user account for Connector access.
4. Click Save.
5. Go to Admin > Admins.
6. Select the local user you created for Connector access.
7.
From Actions, select Assign to Space.
Core displays the Assign to Space dialog.
8.
From Select Space, select the device space for this user.
See MobileIron Core Delegated Administration Guide for information about device spaces and roles.
9. In the Admin Roles section of Assign to Space, find Other Roles.
10. In Other Roles, check Connector.
11. Click Save.
Adding Enterprise Connector entries on MobileIron Core
You can add a maximum of ten Connector entries on MobileIron Core.
Procedure
1.
Log on to the Admin Portal.
l For Connected Cloud, use https://<URL>/<customer_id>.
l For On-Premise Core, use https://<fully-qualified_domain_name>/admin.
2. Select Services > Connector.
3. Click Add New.
4.
Enter the Connector name in the Name field.
NOTE: You will need this name when you configure the Connector.
5. Set Enabled to Yes to allow this Connector to provide services to MobileIron Core.
6.
Click Save.
NOTE: The Connector status will remain “Stale” until the Connector is configured as described in
Configuring Enterprise Connectors on page55.
7. Select the Connector to display the detailed information on the right pane.
8.
Record the URL. You will need it to configure the Connector.
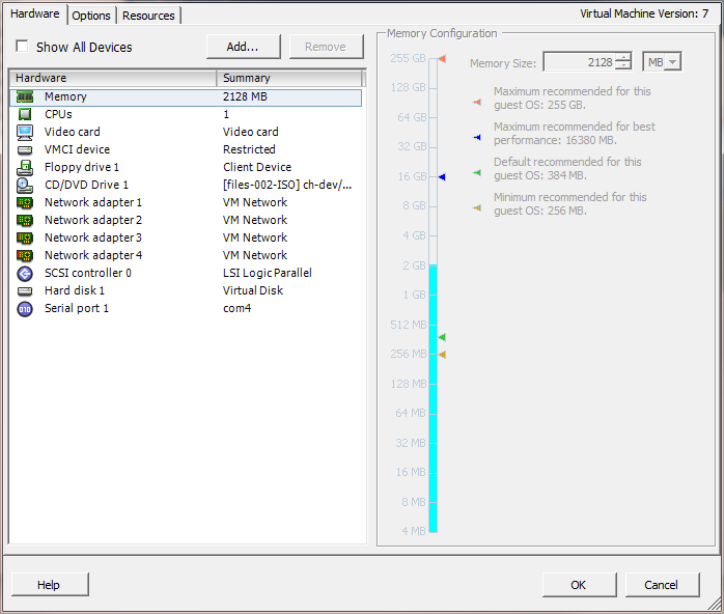
On-Premise Installation Guide for MobileIron Core and Enterprise Connector 11.1.0.0| 52
NOTE: "Not Available" displays on the Connector Detail Page, because the Connector has not
yet been configured.
Installing the Enterprise Connector ISO package
After the VM environment is set up, you can install the Connector ISO package.
Procedure
1. Log into the VM Client.
2. In the directory tree on the left, right-click the device for which you want to install the package.
3.
Select Edit Settings from the drop-down menu to open a screen as shown in the following figure.
4.
Select CD/DVD Drive 1 to update the screen as shown in the following screen.
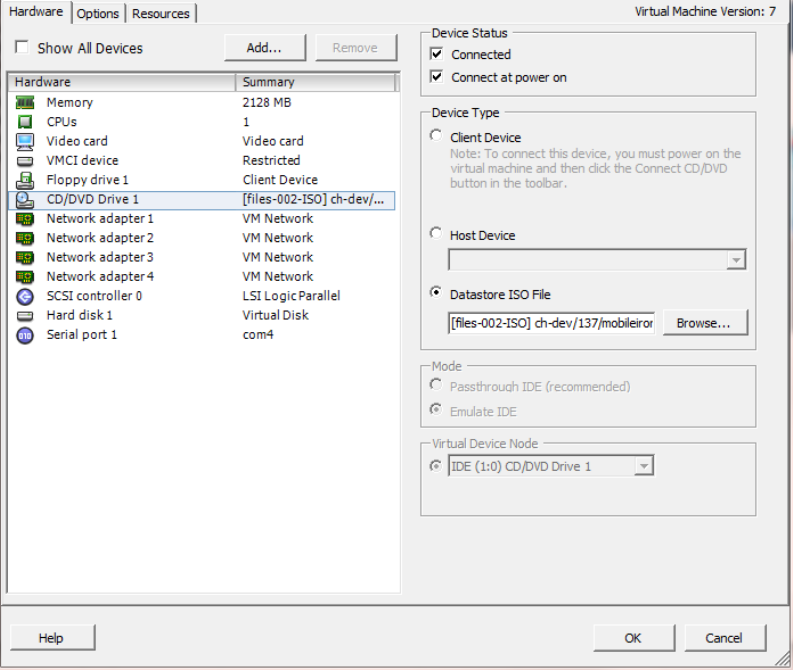
On-Premise Installation Guide for MobileIron Core and Enterprise Connector 11.1.0.0| 53
5. Click the Datastore ISO File option.
6. Click Browse and navigate to the directory where the ISO package is kept.
7. Select the ISO package.
8. Click Open to return to the VM Properties screen.
9. Click OK to return to the previous screen.
10. Right-click the device for which you will install the package.
11. Select Power, then Reset.
You are prompted to confirm that you want to proceed
12. Click Yes to reset the virtual machine.
The installer checks and formats the file system.
13. Observe the status messages at the bottom of the screen.
The VM automatically installs and reboots after a few minutes, after which it displays the configuration
screen.
14. Click the Console tab to specify the type of services you want to install.
15. Type vm-install.
The installer performs several minutes of file system formatting and image installation. When this step is
finished, the installer starts the configuration wizard.

On-Premise Installation Guide for MobileIron Core and Enterprise Connector 11.1.0.0| 54
16. Continue the installation with the configuration wizard.
See Installing with the Configuration Wizard for details.
Installing with the Configuration Wizard
The Welcome screen indicates that the configuration wizard is ready to use.
FIGURE 9. MOBILEIRON CORE WELCOME SCREEN
Procedure
1. Enter yes to continue and to open the end user license agreement.
2. Scroll through and read this agreement.
3. Enter yes when asked to accept the agreement or no to close the Wizard and terminate the installation
process.
4.
Enter the following information:
l company name used in both the SMS and email communication
l contact person’s name
l contact person’s email
5. When asked to Enter enable a secret, enter a password between 6 and 20 alphanumeric characters. The
enable secret is a password used to protect access to privileged EXEC and configuration modes. This
password, after entered, is encrypted in the configuration.
6. Re-enter the password at the confirmation prompt.
7. Enter the Administrator User Name at the prompt.
8. Enter the Administrator Password at the prompt.
9. Enter the network interface you will use to connect to the management network.
10. Type a or b for the physical interface you want to use.
11. Enter the IP Address associated with the physical interface you selected.
12. Enter the Netmask associated with the IP address you just entered.
13. Enter the IP of the Default Gateway for the appliance.
14.
Enter the hostname of the appliance.
Although the Wizard requests an External Hostname (FQDN) for this step, Connector does not require an
externally accessible URL, and therefore, you can enter an internal or external hostname.
15. Enter the IP address of the primary name server (Name Server 1) used by the appliance.
On-Premise Installation Guide for MobileIron Core and Enterprise Connector 11.1.0.0| 55
16. Enter the IP address(es) of the secondary and tertiary name servers, as preferred, or press Enter to skip
adding more name servers.
17. Type yes to enable remote shell access via SSH or NO to disable this option.
18. Type yes to enable NTP or NO to disable this option.
19. Enter the IP address of the primary time source to use.
20. Enter the IP address(es) of the secondary and tertiary time source(s) or press <Enter> to skip adding more
time sources.
21. Type yes to save your changes at the following prompt:
22. Type reload to reboot the system and enable the portal service.
23.
Type yes when asked if you want to proceed with reload.
The installation script continues, displaying status on the console. The installation process may take
several minutes. When it is complete, a confirmation message displays.
Configuring Enterprise Connectors
After the Enterprise Connector is installed and configured on MobileIron Core, you can configure the settings on the
Connector.
Procedure
1.
Gather the following information:
l Name: The Enterprise Connector name that was created in Enter the Connector name in the Name
field. on Enter the Connector name in the Name field..
l URL: The URL that was copied in Record the URL. You will need it to configure the Connector. on
Record the URL. You will need it to configure the Connector..
l User ID/password: The one to which the Connector role was assigned in Assigning the Connector
role on page 50.
2. Log in to the Connector (https://<fully-qualified_domain_name:8443>/mics).
3. Select Connector from the left panel to open the Connector Settings page.
4.
Enter the Connector name in the Name field.
NOTE: The Connector name must match the name created on MobileIron Core. It is case
sensitive.
5. Enter the Connector URL in the corresponding field.
6.
Select Yes for private deployment that accepts the self-signed certificates.
The default is No. Contact Customer Support for more information.
7.
Enter the user ID and password in the respective fields.
NOTE: This is the Connector user and role created on MobileIron Core.
8. Re-type to confirm the password.

On-Premise Installation Guide for MobileIron Core and Enterprise Connector 11.1.0.0| 56
9.
Click the check box for Outbound Proxy Required.
Use the following guidelines to specify the settings:
Item Description
Proxy Host Name / IP Enter the Proxy server host name or IP address.
Proxy Port Enter the port on which the Proxy server is listening.
The default is set as 8080.
Proxy Authentication Required Click the check box if authentication is required for the proxy server.
NOTE: Only HTTP basic authentication is supported.
Proxy User ID Enter the User ID for the proxy server.
Proxy User Password Enter the password for the proxy server.
Proxy User Confirm Password Re-enter the password.
10.
Click Test to validate the configuration.
A dialog appears displaying the status.
11. Click OK to return to the Connector Configuration page.
12.
Click Apply. A dialog appears prompting you to confirm that you want to proceed.
NOTE: Apply saves the configuration in the current session only. It is not persistent after the
machine reboots.
13.
Click Yes.
A dialog appears displaying the status.
14. Click OK.
15. Click Save in the upper-right corner.
NOTE: Make sure to click Save to make the configuration persistent after the machine reboots.
Verifying the MobileIron Core connection
After the Connector is configured, confirm that it is connected to MobileIron Core:
Procedure
1.
Log on to the Admin Portal.
l For Connected Cloud, use https://<URL>/<customer_id>.
l For On-Premise Core, use https://<fully-qualified_domain_name>.
2.
Go to Services > Connector.
The Connector page opens displaying the Connection status.

On-Premise Installation Guide for MobileIron Core and Enterprise Connector 11.1.0.0| 57
NOTE: Both More Actions and View Global Statistics menus are used in conjunction with
MobileIron personnel for diagnostics purposes.
3.
Click the Connector of interest to display the detailed information on the right pane.
NOTE: Troubleshooting and View Statistics are used in conjunction with MobileIron personnel for
diagnostics purposes.
Understanding global statistics
The following table describes the values tracked in the Global Statistics pane:
Statistic Description
work Statistics related to work orders posted by MobileIronCore, for example, an
LDAP query from MobileIron Core is a work order from MobileIron Core to
Connector.
posted Number of work orders posted to Connector.
async Number of asynchronous work orders posted from MobileIron Core.
solicitTimedout The solicit is the empty request posted from Connector. MobileIron Core
sends a work order in response to the solicit if the work order is queued.
Timeout means the solicit pended until the timeout limit and Core did not have
any work order to post in response, therefore, it abandoned the solicit.
responseTimedout Connector could not respond to the work order within the time Core was
expecting resent work orders reposted.
noConnectors MobileIron Core did not process work orders because there are no
corresponding solicits from Connector, or connector is off-line.
validationFailed Internal processing error.
dispatchLatency The latency required to dispatch the work orders, with min, max, and ave
calculated using the specified number of work orders.
responseLatency The time required to get the response from Connector after posting the work
order to Connector.
realtimeCounters
pendingSolicits Current number of waiting solicits in the queue from Connector waiting for
work orders.
pendingWorkOrders Current number of pending work orders in the queue waiting for Connector
solicits.
TABLE 20. GLOBAL STATISTICS
On-Premise Installation Guide for MobileIron Core and Enterprise Connector 11.1.0.0| 58
Configuring LDAP servers
You can configure multiple LDAP servers, but each server must contain a unique LDAP configuration.
Procedure
1.
Log on to the Admin Portal.
l For Connected Cloud, use https://<URL>/<customer_id>.
l For On-Premise Core, use https://<fully-qualified_domain_name>/admin.
2. Select Services > LDAP.
3. Click Add New to open the New LDAP Setting page.
4.
Enter information in the following fields to set up a connection to the LDAP directory:
l Directory URL: Enter the URL to the LDAP server. Make sure to start with
“ldap://” or “ldaps.” You do not need to specify the ports when you use these default ports: 389
(LDAP) or 636 (LDAPS).
l Directory Failover URL: Enter a secondary URL, if available.
l
NOTE: Make sure to include the domain, e.g., @local.domain, with the user ID.
l Directory Password: Enter the password for the user ID set above.
l Search Results Timeout: Leave it at default of 30 seconds unless you get connection errors.
l
Chase Referrals:
a. Select Enable if you are using a multi-forested domain. This indicates you want to use alternate
domain controllers when the targeted domain controller does not have a copy of the requested
object.
b.
Select Disable if you do not use alternate domain controllers.
NOTE: Enabling the Chase Referrals option delays LDAP authentication.
l
Admin State: Select Enable to put the server to service.
NOTE: Make sure to enable the Admin state or the LDAP server will be invisible.
l
Domain Options:
a. Select Active Directory for the Microsoft Windows server platform.
b. Select Domino for the IBM Lotus Domino server platform. The default DN and other LDAP
search filters are automatically changed to the Domino server.
c. Select Other for other platforms.
l Domain: Enter the domain name for the Active Directory. This information will automatically traverse
all levels of the tree and use them to populate Base DN, parent entry.
5. Click View LDAP Browser to view the LDAP server directory tree structure.
6. Click Test.
On-Premise Installation Guide for MobileIron Core and Enterprise Connector 11.1.0.0| 59
7. Enter a user or group identifier in the appropriate field.
8.
Click Submit to display a result page if the user was configured on the LDAP server.
9.
Return to the LDAP page and click Save.
A dialog appears concerning traffic disruption and prompts you to confirm that you want to proceed.
10.
Click Yes.
A dialog appears listing the status.
11.
Click OK.
The server you created appears on the LDAP page.
NOTE: Core is unable to resolve multiple LDAP entries with the same identifier (SAMAccountName).
MobileIron recommends you use globally unique identifiers for each entry across LDAP forests.
Manually upgrading Enterprise Connector
In most cases, Enterprise Connector is upgraded automatically after a MobileIron Core upgrade. Core upgrades
include any new service package necessary for the Enterprise Connector. If Connector needs to be updated, then
Core prompts Connector to access the new package and complete an in-place upgrade. In most cases, this
process completes successfully, and Connector restarts.
If there is a problem with the in-place upgrade, then Connector makes two additional attempts to complete the
upgrade. Connector reboots before attempting to upgrade again. If the upgrade is still not successful, then
Connector reverts to the previous version and begins running in compatibility mode. In this case, you must
complete the steps detailed in this section.
Complete the manual upgrade procedure under the following circumstances:
l The automatic upgrade is unsuccessful.
l The current Connector installation requires updates to the host platform.
Procedure
1.
In System Manager, select Maintenance > Software Updates.
The default URL should be sufficient. Do not change it unless instructed to do so.
2. Enter the credentials assigned by MobileIron Support.
On-Premise Installation Guide for MobileIron Core and Enterprise Connector 11.1.0.0| 60
3. Click Apply.
4. Click OK to dismiss the success popup.
5.
Click Check Updates.
The available updates are listed.
6. Select the update.
7. Click Download if you want to download the update now and complete the installation at a later time.
8.
Refresh the screen and click Check Updates.
After the download is complete, the status for the update changes to Downloaded.
9.
Click Stage for Install when you are ready to install.
l If you had already downloaded the selected update, the system stages the update for installation.
l If you did not previously download the selected update, it is downloaded and staged for installation.
10.
Refresh the screen and click Check Updates.
After the software update has been staged for installation, the status for the update changes to Reboot to
Install. You can now install the update by rebooting the system. If the status of an update is not Reboot to
Install, rebooting the system will not install the update.
11.
Select Maintenance > Reboot to reboot Enterprise Connector.
To successfully install the update, you must reboot after the status is Reboot to install.
Local user authentication to Enterprise Connector
l Enterprise Connector user authentication overview
l Certificates required for certificate authentication to Enterprise Connector
l Certificate attribute mapping used in certificate authentication to Enterprise Connector
l Using $EDIPI$ in certificate authentication to Enterprise Connector
l Adding local users to Enterprise Connector
l Add New User window in Enterprise Connector
l Configuring password authentication to Enterprise Connector
l Configuring certificate authentication to Enterprise Connector
l Replacing the certificate for authentication in Enterprise Connector
Enterprise Connector user authentication overview
Enterprise Connector administrators are set up as local users in the Enterprise Connector portal in Security >
Local Users. They can authenticate to the Enterprise Connector portal using one or both of the following methods:
On-Premise Installation Guide for MobileIron Core and Enterprise Connector 11.1.0.0| 61
l
a user name and password
These are the credentials for a local user as set up in the Enterprise Connector portal in Security > Local
Users. This authentication method is the default.
l
an identity certificate from a smart card
Using an identity certificate from a smart card is supported only on desktop computers. It is not supported
on mobile devices. Also, it is not supported with Firefox.
You use the Enterprise Connector portal to configure which methods are allowed.
NOTE: Certificate authentication is also supported in FIPS mode.
Certificates required for certificate authentication to Enterprise Connector
To allow certificate authentication to Enterprise Connector, you upload a PEM-formated file to Connector. The
PEM-formatted file contains either:
l the issuing certificate authority (CA) certificate
l the supporting certificate chain
Connector does not check the certificate’s validity. Make sure the certificate that you upload is valid. That is, make
sure it is not expired and not revoked.
When users sign in to the Enterprise Connector portal, they provide an identity certificate from a smart card.
Connector authenticates the user’s identity certificate against the certificate that you uploaded to Connector.
NOTE: When you create a local user in Enterprise Connector, set the User ID of the local user to the user
identity from the identity certificate.
Certificate attribute mapping used in certificate authentication to Enterprise
Connector
When the user presents an identify certificate for authentication to the Enterprise Connector portal, the Connector
authenticates the identity certificate against the issuing CA certificate or certificate chain you uploaded to
Connector. As part of that authentication, Connector makes sure the user identity in the identity certificate is a
valid Connector local user. You configure which field in the identity certificate and which Connector local user field
must match.
Therefore, when you upload the certificate used for authenticating user's identity certificate, you also configure the
following mapping information:

On-Premise Installation Guide for MobileIron Core and Enterprise Connector 11.1.0.0| 62
Values Description Notes
Designate user
identity
Select the user identity field
from the identity certificate the
authentication. The choices
are:
l the NT Principal Name
l the RFC822 email name
Your choice must match the Subject Alternative
Name type you chose for generating the identity
certificate.
NOTE: For the NT Principal Name, Enterprise
Connector uses the User Principal
Name in the Subject Alternative Name
(SAN) in the identity certificate.
Select a connector
substitution variable
The variable against which the
authentication compares the
user identity. Allowed
variables are:
l $USERID$ - User ID
l $EMAIL$ - Email
l $EDIPI$ - EDIPI values
entered when
configuring the
Connector local user.
The $EDIPI$ variable is for the Department of
Defense only.
See Using $EDIPI$ in certificate authentication to
Enterprise Connector.
Your choice depends on how you chose to populate
the Subject Alternative Name in the identity
certificate.
TABLE 21. MAPPING INFORMATION USED IN CERTIFICATE AUTHENTICATION
Example
Consider the case in which you specify the NT Principal Name as the field to use from the identity certificate, and
you specify $USERID$ or $EMAIL$ as the substitution variable to match. Connector accepts both of the following
formats as a match:
l DOMAIN\userid
l userid@domain
That is, the NT Principal Name and the substitution variable can have different formats, as long as the domain
and userid match.
Related topics
l Configuring certificate authentication to Enterprise Connector
l Using $EDIPI$ in certificate authentication to Enterprise Connector
Using $EDIPI$ in certificate authentication to Enterprise Connector
Using the substitution variable $EDIPI$ is applicable only to Department of Defense customers. You enter it when
adding an Enterprise Connector local user. This variable contains the Department of Defense identification
number, also known as the Electronic Data Interchange Personal Identifier.
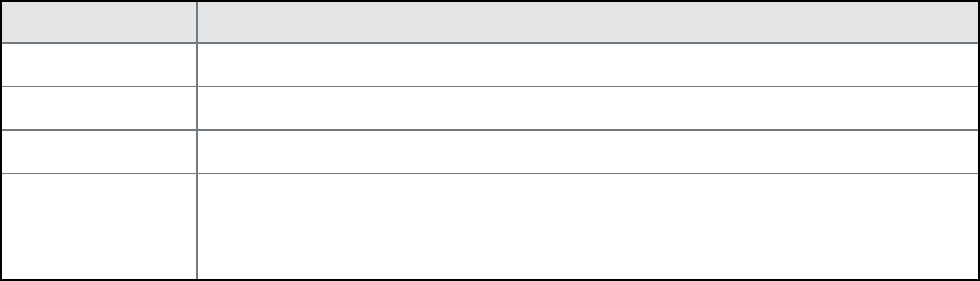
On-Premise Installation Guide for MobileIron Core and Enterprise Connector 11.1.0.0| 63
Procedure
If you are a Department of Defense customer setting up authentication to Enterprise Connector using a certificate
on a Common Access Card (CAC), then you must:
1.
Enter a value into the EDIPI field when you create a Connector local user.
Make sure the format of the field matches the format of the EDIPI value in the NT Principal Name in the
user's identity certificate.
2.
Use the $EDIPI$ variable as the attribute against which the authentication compares the user identity.
Although using $EDIPI$ is required for CAC cards, Connector does not enforce the selection when you
configure portal authentication. Connector also does not ensure that you have entered a value into the
EDIPI field of the Connector local user.
Adding local users to Enterprise Connector
Only local users created in the Enterprise Connector portal can access the portal. To add a local user to the
Enterprise Connector database:
Procedure
1. Log in to the Connector (https://<fully-qualified_domain_name:8443>/mics)
2. Go to Security > Identity Source > Local Users.
3. Click the Add button to open the Add New User window.
4.
Modify the fields, as necessary.
Refer to Add New User window in Enterprise Connector table for details.
5. Click Apply > OK.
Add New User window in Enterprise Connector
The following table summarizes fields and descriptions in the Add New Users window:
Fields Description
User ID Enter the unique identifier to assign to this user. The user ID is case sensitive.
First Name Enter the user’s first name.
Last Name Enter the user’s last name.
Password Enter a password for the user.
Valid passwords are determined by the password policy for Enterprise Connector local
users at Security > Identity Source > Password Policy.
TABLE 22. ADD NEW USER FIELDS

On-Premise Installation Guide for MobileIron Core and Enterprise Connector 11.1.0.0| 64
Fields Description
Confirm Password Confirm the password for the user.
Space This field is not configurable. It is set to the global space.
Email Enter the user’s email address.
EDIPI Department of Defense customers only:
Enter the user's the Department of Defense identification number, also known as the
Electronic Data Interchange Personal Identifier.
This field is required if your configuration on Security > Advanced > Portal
Authentication specifies certificate authentication for access to the System Manager
using a common access card (CAC).
TABLE 22. ADD NEW USER FIELDS (CONT.)
Configuring password authentication to Enterprise Connector
You can configure Enterprise Connector to allow administrators to authenticate to Connector with their user name
and password.
NOTE: This authentication method is the default setting.
Procedure
1. Log in to the Connector (https://<fully-qualified_domain_name:8443>/mics)
2. Go to Security > Advanced > Portal Authentication.
3. Select Password Authentication.
4. Under Password Authentication, select System Manager.
5. Click Apply > OK.
Related topics
Adding local users to Enterprise Connector
Configuring certificate authentication to Enterprise Connector
You can allow administrators to authenticate to the Enterprise Connector portal with the identity certificate on a
smart card.
Before you begin
Have the PEM-formatted issuing CA certificate or certificate chain available to upload to Connector.
On-Premise Installation Guide for MobileIron Core and Enterprise Connector 11.1.0.0| 65
Procedure
1. Log in to the Connector (https://<fully-qualified_domain_name:8443>/mics)
2. Go to Security > Advanced > Portal Authentication.
3. Select Certificate Authentication.
4. Under Certificate Authentication, select System Manager.
5. Select PIV or CAC, depending on whether the identity certificate to authenticate is on a personal identity
verification (PIV) card or common access card (CAC).
6. Click Upload Issuing CA Certificate. to open the Upload Issuing CA Certificate window.
7. Click Choose File, and select the PEM-formatted file that contains either the issuing CA certificate or the
supporting certificate chain.
8. Click Upload Certificate > OK.
9.
In Select Certificate Attribute Mapping:
a. In the Map from attribute dropdown, select the user identity type in the identity certificate to use for
authenticating the user.
b. In the Map to attribute dropdown, select the substitution variable with which to compare the user
identity. If you selected CAC when choosing CAC versus PIV, you must select $EDIPI$.
10. Click Apply > OK.
Related topics
l Certificates required for certificate authentication to Enterprise Connector
l Certificate attribute mapping used in certificate authentication to Enterprise Connector
l Using $EDIPI$ in certificate authentication to Enterprise Connector
Replacing the certificate for authentication in Enterprise Connector
After you have uploaded a PEM-formated file to the Enterprise Connector, you can replace it when necessary. For
example, if the existing issuing CA certificate is about to expire, upload a replacement.
Procedure
1. Log in to the Connector (https://<fully-qualified_domain_name:8443>/mics)
2. Go to Security > Advanced > Portal Authentication.
3. Click Replace CA Certificate.
4. Click Choose File, and select the PEM-formatted file that contains either the replacement issuing CA
certificate or the supporting certificate chain.
5. Click Upload Certificate > OK.
6. Click Save > OK.

4
On-Premise Installation Guide for MobileIron Core and Enterprise Connector 11.1.0.0| 67
Appliance specifications
This chapter includes the following sections:
l MobileIron M2600 Series appliance
l MobileIron M2500 Series appliance
l MobileIron M2250 Series appliance
l MobileIron M2200 Series appliance
MobileIron M2600 Series appliance
The M2600 Series large-scale deployment appliance provides the tightly integrated solution of the standard
appliance, with the resources necessary for larger deployments. The following table lists the M2600 appliance
specifications.
M2600 Specifications
Form factor 1U Rackmount Chassis, 27.95"D x 1.7”H x 17.2”W
Processors 2 x Intel®Xeon® E5-2690 v4, 2600 Mhz, 14 Cores/28 Threads, 28 Cores total
Memory 128 GB, 2400 MHz DDR4 ECC
USB 2x USB 2.0 Front, 3x USB 3.0 Back
VGA 1 x DB-15, 2D Video Controller
16MB Memory
Power 1+1 Redundant 750W Power Supply, Platinum level efficiency
Management
interface
1 x 1GbE RJ-45, IPMI 2.0, RMM4 lite, Virtual media over LAN, KVM over LAN
LAN ports Six (6) Intel I350 GbE connections
Storage devices 4x 960 GB SAS 12 Gb/s SSD, RAID 10
TABLE 23. M2600 SERIES APPLIANCE SPECIFICATIONS
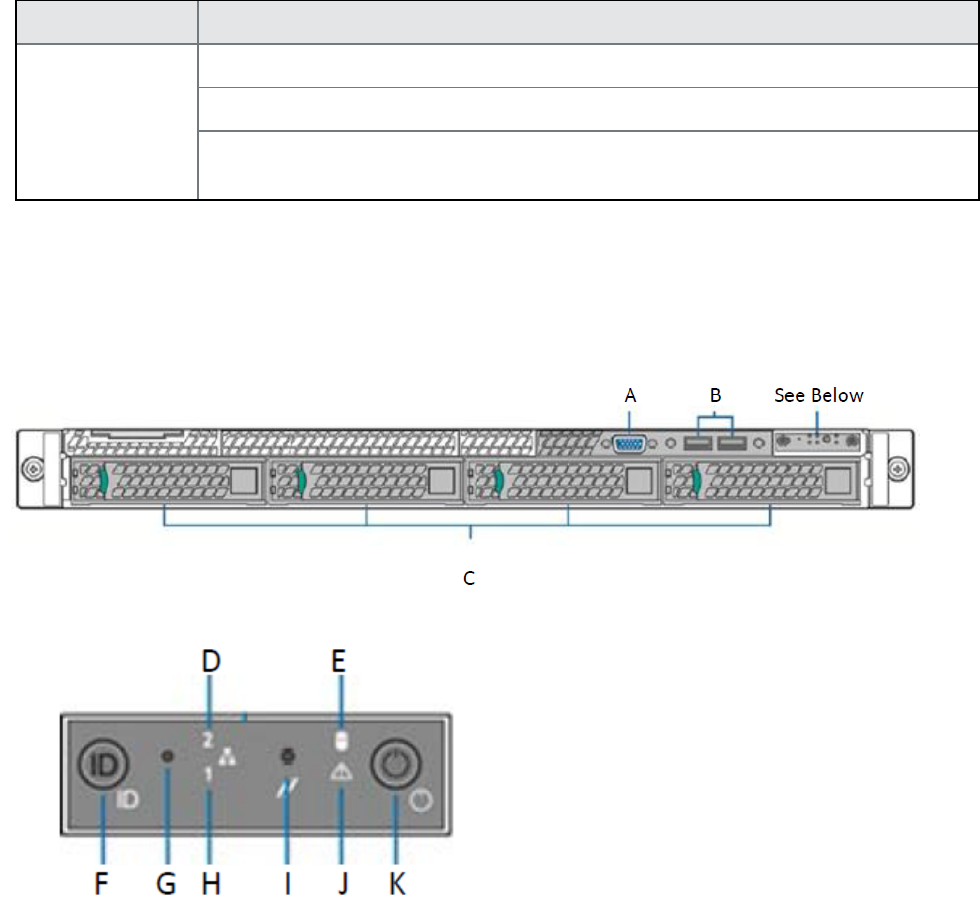
On-Premise Installation Guide for MobileIron Core and Enterprise Connector 11.1.0.0| 68
M2600 Specifications
Cooling 6x40mm dual rotor managed system fans
1+1 redundant 750 W power supply fan, Platinum level efficiency
1800 BTU/hr is the approximate maximum heat dissipation under normal operation based
on MobileIron’s configuration.
TABLE 23. M2600 SERIES APPLIANCE SPECIFICATIONS (CONT.)
M2600: front panel
The following figures, key, and LED table describe the M2600 font panel.
FIGURE 10. M2600 FRONT PANEL
M2600 front panel key:
A. Video port
B. USB ports
C. 960G Enterprise SSDs
D. NIC-2 Activity LED
E. Store drive activity LED
F. System ID button with LED

On-Premise Installation Guide for MobileIron Core and Enterprise Connector 11.1.0.0| 69
G. NMI button
H. NIC-1 activity LED
I. System cold reset button
J. System status LED
K. Power button with LED
LEDstatus Description
Green OK
Blinking green Degraded - usually means a redundant part has failed.
Blinking amber Degraded - System will fail soon
Solid amber System failure
TABLE 24. INFORMATIONAL LED FIELDS
M2600: back panel
The following figure and key describe the M2600 back panel.
FIGURE 11. M2600 BACK PANEL
M2600 back panel key:
A. Power supply 1
B. Power supply 2
C. GigabitEthernet5
D. GigabitEthernet6
E. Video port
F. RJ45 serial port
G. USB ports
H. RMM4 NIC port
I. GigabitEthernet1
J. GigabitEthernet2

On-Premise Installation Guide for MobileIron Core and Enterprise Connector 11.1.0.0| 70
K. GigabitEthernet3
L. GigabitEthernet4
MobileIron M2500 Series appliance
No new software releases are available for the MobileIron M2500 Series appliance. This version of Core software
has not been tested for compatibility with the M2500 Series appliance and is not supported.
MobileIron M2250 Series appliance
The MobileIron appliance is a tightly integrated hardware, OS, application, and database solution that is built,
optimized, and certified by MobileIron. The M2250 appliance ships with either MobileIron Core 10.1.0.0 or
MobileIron Sentry 9.5 preinstalled. The following table lists the M2250 appliance specifications.
Operating
environment
Processor 3.8 GHz Intel E3-1275 v6 CPU
Memory 32 GB
Drives 2 x 600 GB Hot-swap SAS3
12 GB/s SAS
HW RAID
Chassis
Form Factor 19” 1U Rackmount
Dimensions (D x H x W) 19.8” x 1.7” x 17.2” (503 mm x 43 mm x 437
mm)
Weight 32 lbs (16.5 kg)
Front panel
Buttons Power On/Off
System Reset
LEDs Power LED
Hard Drive Activity LED
2x Network Activity LED
System Overheat LED
USB 2x USB Ports
Drives 600 GB Hot swap SAS
12.0 GB Hard Drives (RAID1)
1x Slim DVD Drive
Back panel
IPMI Intelligent Platform Management Interface
TABLE 25. MOBILEIRON M2250 SERIES APPLIANCE SPECIFICATIONS

On-Premise Installation Guide for MobileIron Core and Enterprise Connector 11.1.0.0| 71
(IPMI) 2.0 with virtual media over LAN and
KVM-over-LAN support; 1x 10/100BASE-T
(RJ45)
Ethernet 2x 10/100/1000BASE-T (RJ45)
VGA 1x VGA (DB15)
USB 4x USB Ports
Serial 1x Serial port (DB9)
Power supply
Power 400W (1+1) Redundant Gold-level power
supply with PMBus and I2C
Voltage 100 – 240V, 50-60Hz, 6-3A
+5V standby: 3A
+12V: 33A
+5V: 25A
-12V: 0.6A
Connector IEC 60320-C13
Operating
environment
Operating Temperature: 50°F to 95°F (10°C to 35°C)
Relative Humidity: 8% to 90% (non-
condensing)
Approximate maximum heat dissipation under
normal operation based on MobileIron’s
configuration: 1262 BTU/hr
Non-Operating Temperature: -40° to 158°F (-40° to 70°C)
Relative Humidity: 5% to 95% (non-
condensing)
TABLE 25. MOBILEIRON M2250 SERIES APPLIANCE SPECIFICATIONS (CONT.)
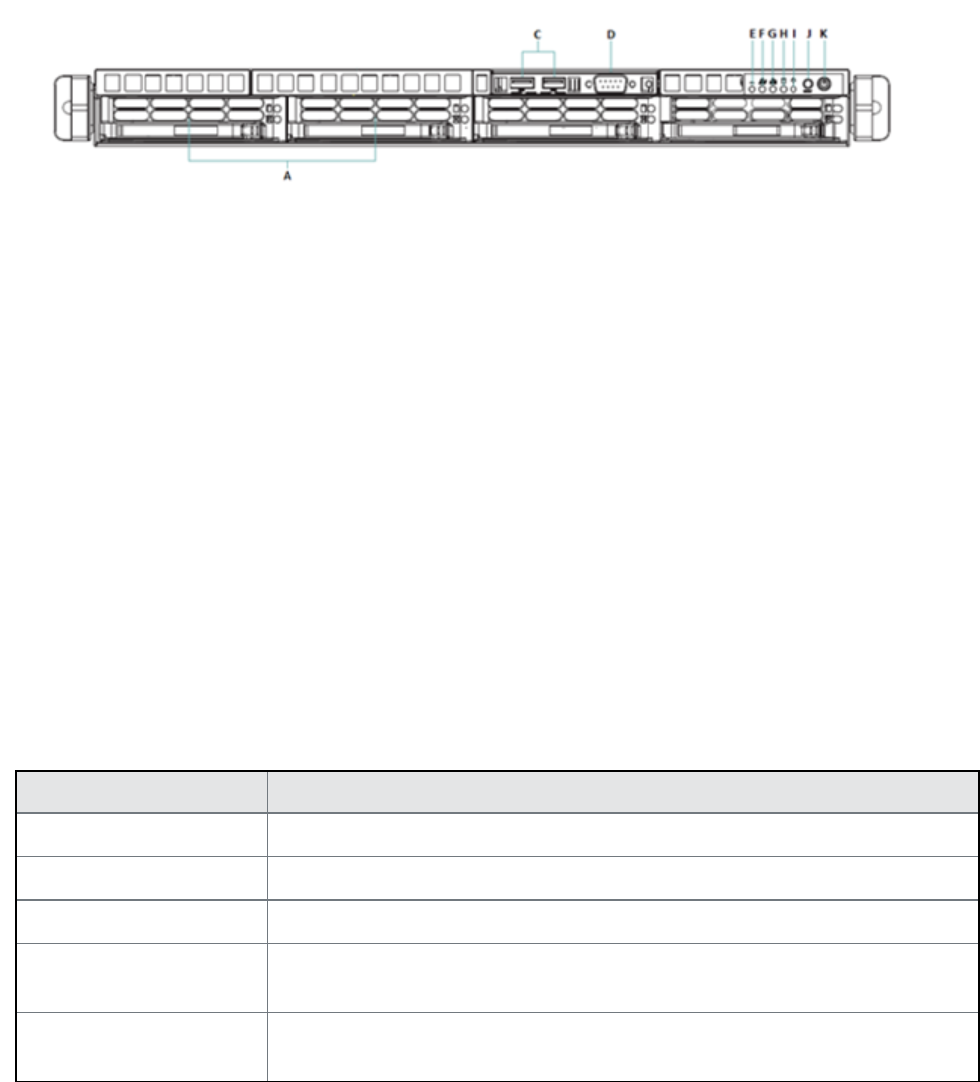
On-Premise Installation Guide for MobileIron Core and Enterprise Connector 11.1.0.0| 72
M2250: front panel
The following figure, key, and LED table describe the M2250 front panel.
FIGURE 12. M2250 FRONT PANEL
M2250 front panel key:
A. 600G HDDs
B. n/a
C. USB ports
D. Serial port
E. Informational LED
F. NIC-2 Activity LED
G. NIC-1 Activity LED
H. HDD Activity LED
I. Power LED
J. Reset button
K. Power button
LEDstatus Description
Solid red An overheat condition has occurred. This may be caused by cable congestion.
Blinking red (1Hz) A fan failure has occurred. Check for an inoperative fan.
Blinking red (0.25Hz) A power failure has occurred. Check for a non-operational power supply
Solid blue Location UID has been activated. Use this function to locate the server in a rack-
mount environment.
Blinking blue (300 msec) Remote UID is on. Use this function to identify the server from a remote
location.
TABLE 26. INFORMATIONAL LED FIELDS
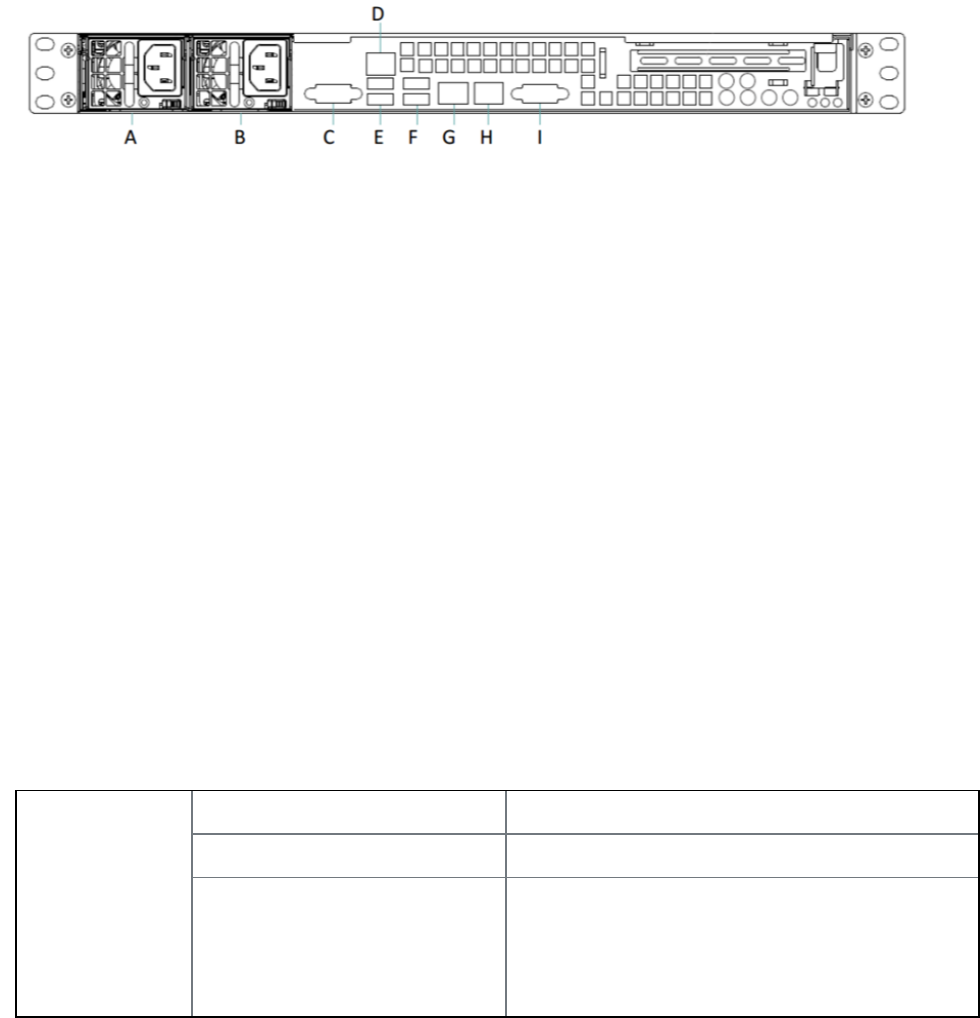
On-Premise Installation Guide for MobileIron Core and Enterprise Connector 11.1.0.0| 73
M2250: back panel
The following figure and key describe the M2250 back panel.
FIGURE 13. M2250 BACK PANEL
M2250 back panel key:
A. Power supply
B. Power supply
C. COM port
D. IPMI LAN
E. USB ports
F. USB ports
G. LAN1 port
H. LAN2 port
I. VGA port
MobileIron M2200 Series appliance
The MobileIron appliance is a tightly integrated hardware, OS, application, and data-base solution that is built,
optimized, and certified by MobileIron. The following table lists the M2200 appliance specifications.
Operating
environment
Processor 3.5 GHz Quadcore Xeon CPU
Memory 32 GB
Drives 2x 500 GB Hot-swap SAS3
12.0 GB Hard Disk
12G HW RAID w/ 1G
1x Slim DVD drive
TABLE 27. MOBILEIRON M2200 SERIES APPLIANCE SPECIFICATIONS

On-Premise Installation Guide for MobileIron Core and Enterprise Connector 11.1.0.0| 74
Chassis
Form factor 19” 1U Rackmount
Dimensions (D x H x W) 19.8” x 1.7” x 17.2” (503mm x 43mm x 437mm)
Weight 32 lbs (16.5 kg)
Front panel
Buttons Power On/Off
System Reset
LEDs Power LED
Hard Drive Activity LED
2x Network Activity LED
System Overheat LED
USB 2x USB Ports
Drives 600 GB Hot swap SAS
12.0 GB Hard Drives (RAID1)
1x Slim DVD Drive
Back panel
IPMI Intelligent Platform Management Interface
(IPMI) 2.0 with virtual media over LAN and
KVM-over-LAN support; 1x 10/100BASE-T
(RJ45)
Ethernet 2x 10/100/1000BASE-T (RJ45)
VGA 1x VGA (DB15)
USB 4x USB Ports
Serial 1x Serial port (DB9)
Power supply
Power 400W (1+1) Redundant Gold-level power
supply with PMBus and I2C
Voltage 100 – 240V, 50-60Hz, 6-3A
+5V standby: 3A
+12V: 33A
+5V: 25A
-12V: 0.6A
TABLE 27. MOBILEIRON M2200 SERIES APPLIANCE SPECIFICATIONS (CONT.)
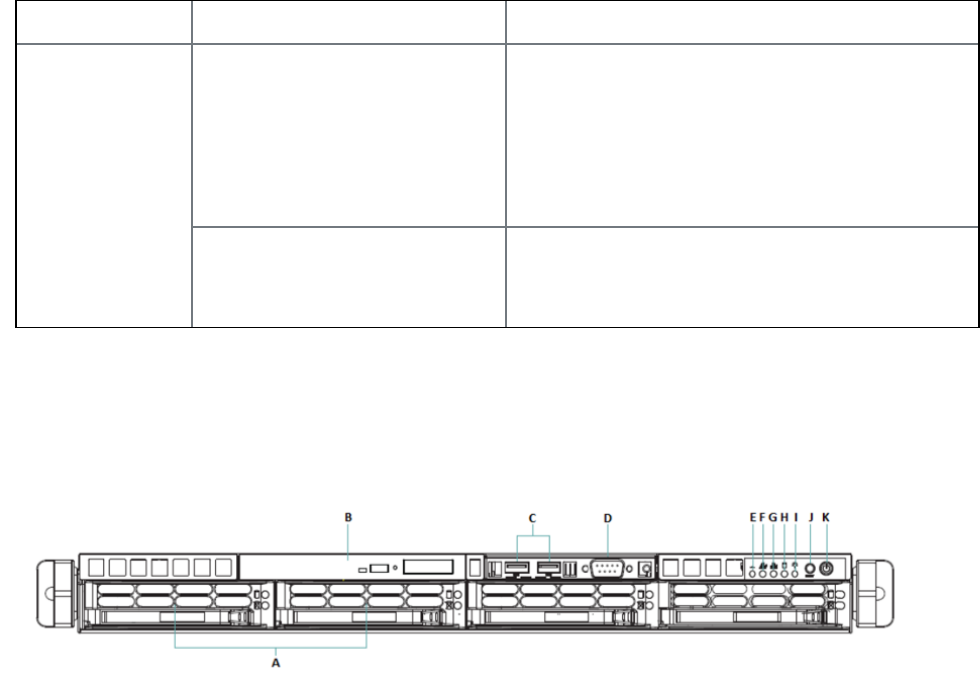
On-Premise Installation Guide for MobileIron Core and Enterprise Connector 11.1.0.0| 75
Connector IEC 60320-C13
Operating
environment
Operating Temperature: 50° to 95°F (10° to 35°C)
Relative Humidity: 8% to 90% (non-
condensing)
Approximate maximum heat dissipation under
normal operation based on MobileIron’s
configuration: 1262 BTU/hr
Non-operating Temperature: -40° to 158°F (-40° to 70°C)
Relative Humidity: 5% to 95% (non-
condensing)
TABLE 27. MOBILEIRON M2200 SERIES APPLIANCE SPECIFICATIONS (CONT.)
M2200: front panel
The following figure, key, and LED table describe the M2200 front panel.
FIGURE 14. M2200 FRONT PANEL
M2200 front panel key:
A. 600G HDDs
B. Slim DVD-ROM
C. USB ports
D. Serial port
E. Informational LED
F. NIC-2 Activity LED
G. NIC-1 Activity LED
H. HDD Activity LED
I. Power LED
J. Reset button
K. Power button
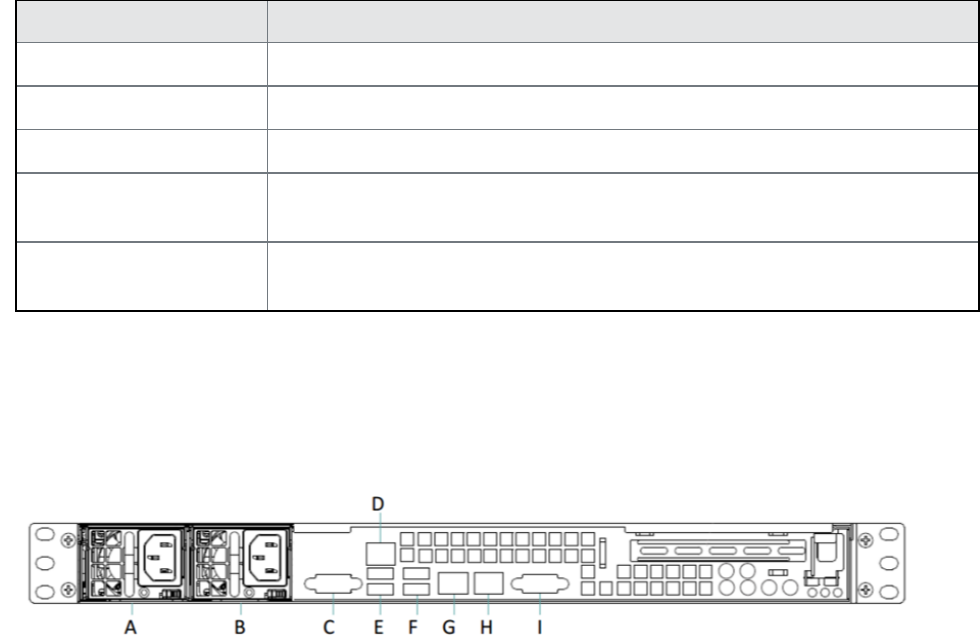
On-Premise Installation Guide for MobileIron Core and Enterprise Connector 11.1.0.0| 76
LEDstatus Description
Solid red An overheat condition has occurred. This may be caused by cable congestion.
Blinking red (1Hz) A fan has failed. Check for an inoperative fan.
Blinking red (0.25Hz) A power failure occurred. Check for a non-operational power supply.
Solid blue Location UID has been activated. Use this function to locate the server in a rack-
mount environment.
Blinking blue (300 msec) Remote UID is on. Use this function to identify the server from a remote
location.
TABLE 28. INFORMATIONAL LED FIELDS
M2200: back panel
The following figure and key describe the M2200 back panel.
FIGURE 15. M2200 BACK PANEL
M2200 back panel key:
A. Power supply
B. Power supply
C. COM port
D. IPMI LAN
E. USB ports
F. USB ports
G. LAN1 port
H. LAN2 port
I. VSG port
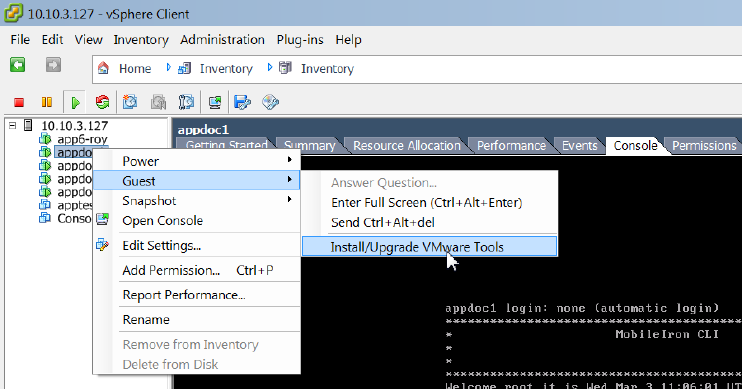
5
On-Premise Installation Guide for MobileIron Core and Enterprise Connector 11.1.0.0| 77
VMware Tools setup
The MobileIron CLI includes a command that facilitates installation of VMware Tools. Complete the following
steps:
1. In the vSphere Client, right-click on the VM.
2.
Select Guest | Install/Upgrade VMware Tools.
3. Enter the password when prompted.
4. Enter the following command: #install rpm cdrom
5. Select an rpm when prompted.
6. Enter the number for VMware Tools package.
7. Enter enable in the MobileIron CLI screen, at the prompt.

6
On-Premise Installation Guide for MobileIron Core and Enterprise Connector 11.1.0.0| 78
Outbound HTTP proxy set up
You can configure an outbound HTTP proxy for MobileIron Core. This proxy is intended primarily for organizations
that require an HTTP proxy for communications with the MobileIron Gateway.
Procedure
1. In Admin Portal, select Settings >System Settings > Security > Outbound HTTP.
2.
Use the following guidelines to complete the fields in this section:
Field Description
HTTP Client Connect Timeout Specify the amount of time to wait for the connection setup to
complete.
HTTP Client Socket Timeout Specify the amount of time to wait for a response from the proxy
server.
HTTP Proxy URL Enter the URL for the outbound HTTP proxy.
HTTP Proxy Auth Name Enter the authentication name for the HTTP proxy.
HTTP Proxy Auth Password Enter the authentication password for the HTTP proxy.
3.
Click Save.
At this point, the settings are saved, but not applied. To apply these changes, you need to reboot the entire
system or enter the following commands using the CLI:
enable
service tomcat stop
service tomcat start
NOTE: The HTTP outbound proxy does not apply to the following areas:
l APNS for MDM or the MobileIron Client
l MobileIron Sentry
l SCEP-to-CA connections
